Difference between revisions of "Template:FeaturedArticle/ko"
(→이전에 주목받은 문서) |
(→버프 배너) |
||
| Line 57: | Line 57: | ||
=== [[버프 배너]] === | === [[버프 배너]] === | ||
[[File:SoldierBuff.png|180px|right|link=Buff Banner{{if lang}}|alt=Buff Banner]] | [[File:SoldierBuff.png|180px|right|link=Buff Banner{{if lang}}|alt=Buff Banner]] | ||
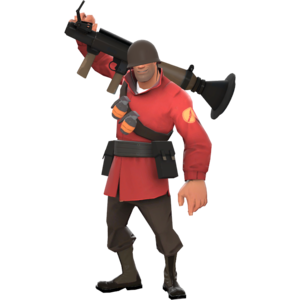
| − | [[Buff Banner/ko|버프 배너]]란 BB, 뷰글(나팔) 아니면 그냥 배너라고 불리우는 [[Soldier/ko|솔져]]의 보조 언락 무기입니다. | + | [[Buff Banner/ko|버프 배너]]란 BB, 뷰글(나팔) 아니면 그냥 배너라고 불리우는 [[Soldier/ko|솔져]]의 보조 언락 무기입니다. 버프 배너는 너덜너덜한 전투 깃발이 작은 가방에 고정된 모습으로, 찌그러진 황동 나팔과 함께 쓰입니다. 깃발의 모양은 노란색 직사각형 바탕에 가운데에 갈색 스타버스트 디자인이 있습니다. 이 깃발은 나팔을 불지 않았을 때는 가방 속에 숨겨져 있고, 나팔을 불면 위 처럼 가방에 깃발이 달려 현실적으로 흔들립니다. |
| + | |||
| + | 버프 배너를 착용하면 "분노 게이지"가 플레이어의 [[HUD/ko|HUD]]에 나타나며, 상대에게 대미지를 줄 때 마다 조금씩 게이지가 찹니다. 이 분노 게이지는 플레이어가 한 목숨으로 상대 팀에게 600 이상의 대미지를 입혔을 때 꽉 차게 됩니다. 이 때 솔저는 나팔을 불어 팀원들이 모이게 합니다. [[Telefrag/ko|텔레포터 킬]]을 한 솔저는 그 전의 분노 게이지 양과 상관없이 게이지가 꽉 찹니다. 클래스를 바꾸거나, 죽거나, 버프 배너를 다른 무기로 바꾸거나 할 때는 분노 게이지가 완전히 초기화됩니다. | ||
| + | 버프가 진행되는 10초간, 버프 배너를 사용한 솔저의 반경 450 [[해머_단위|해머 단위]] 이내에 있는 솔저를 포함한 팀원들의 공격은 모두 [[Mini-Crit/ko|소형 치명타]]로 계산됩니다. 버프를 받은 팀원들은 발 밑에 팀의 색을 내는 고리가 생기고, 무기에서 [[Critical_hits/ko|크리티컬 부스트]]와 비슷하게 빛이 납니다. 나팔을 불 때, 왼쪽 마우스 버튼을 계속 누름으로써 버프를 지연시킬 수 있습니다. | ||
| − | |||
=== [[Dispenser]] === | === [[Dispenser]] === | ||
[[Image:Engiwithdispenser.png|96px|right|link=Dispenser{{if lang}}|alt=Dispenser]] | [[Image:Engiwithdispenser.png|96px|right|link=Dispenser{{if lang}}|alt=Dispenser]] | ||
Revision as of 09:57, 8 May 2012
현재 주목받는 문서
Purge the page cache to update the below.
- Text
The Soldier is a crazed, jingoistic patriot from Midwest, USA. Tough and well-armed, he is versatile, capable of both offense and defense, and a great starter class to get familiar with the game.
Well-balanced and possessing both survivability and mobility, the Soldier is considered one of the most flexible classes in Team Fortress 2. Despite his low ground movement speed, he is capable of using rocket jumps to reach his destination quickly. His large health pool is second only to that of the Heavy, and his wide array of armaments and weaponry allows him to bring whatever weapon or equipment is best suited to the situation at hand.
- Image
목차
Propose new featured articles first, before making any changes here.
이전에 주목받은 문서
아이템 품질
모든 아이템들은 서로 다른 품질을 가지고 있습니다. 아이템의 품질은 이름의 색으로 표시되며, 이것은 거래시 더 높은 가치를 지닌 것으로 간주됩니다.
아이템은 밸브에 의해 특정 상황을 제외하고는 변경할 수 없는 시간에 하나의 할당된 품질을 지닙니다.
아이템의 여러가지의 품질명은 게임 파일에서 추출하였습니다.
중세 모드
중세 모드는 2010년 12월 17일 업데이트에서 호주의 크리스마스 이벤트 도중 팀 포트리스 2에 추가된 게임 모드입니다.
현재는, 데그룻 요새라는 중세 모드가 적용된 유일한 한개의 공식맵이 있습니다. 이 게임 모드는 플레이어들의 선택에 따라 마음대로 무기를 고르지 못하도록 만드는 특징이 있습니다 - 중세 모드는 플레이어들에게 주로 근접무기인 허용된 무기들만 사용하도록 제한합니다. 게임 모드의 목표는 점령 지점 게임과 비슷해서, 공격 팀은 장악해야만 하며 수비 팀은 수비해야만 하는 몇개의 점령 지점이 있습니다.그러나, 현재의 유일한 공식맵에선, 공격자들은 마지막 점령 지점을 장악하기 위해 일단 두개의 점령 지점을 먼저 장악해야만 하며, 만약 일정한 시간동안 장악하지 못하면 그 후 성문이 닫히고 모든 점령 지점이 장악되지 않은 상태로 되돌아갈것입니다.
백스텝

백스텝은 스파이의 칼과 천국의 구원으로 적을 한번에 죽일 수 있는 정밀한 공격입니다. 스파이는 적이 근접 공격을 받을 만큼 가까이 있고 적의 후방 180° 안에 있을 때 백스탭을 할 수 있습니다. 백스탭의 피해는 희생자의 최근 체력의 600%로 들어가며 언제나 치명타로 적용됩니다. 단, 부대 지원으로 보호받는 적은 죽긴 하지만 치명타로 적용되지 않습니다. 스파이 근접 무기는 여러 전법 을 시행하기 때문에 다른 근접 무기와는 다르게 백스탭을 시전 시 백스텝 행동으로 즉시 바뀝니다. 스파이가 백스탭 행동 범위에 들어왔을 때, 스파이는 칼을 아래로 향하게 하고 금방이라도 죽일 동작을 합니다. 스파이는 이런 백스텝 준비 행동을 목표가 거리에서 벗어날 때 혹은 백스탭 공격을 시도할 때까지 계속 유지합니다. 또한 칼은 변장한 적 스파이를 겨눌 때도 백스탭을 시도하는 행동을 합니다.
버프 배너

버프 배너란 BB, 뷰글(나팔) 아니면 그냥 배너라고 불리우는 솔져의 보조 언락 무기입니다. 버프 배너는 너덜너덜한 전투 깃발이 작은 가방에 고정된 모습으로, 찌그러진 황동 나팔과 함께 쓰입니다. 깃발의 모양은 노란색 직사각형 바탕에 가운데에 갈색 스타버스트 디자인이 있습니다. 이 깃발은 나팔을 불지 않았을 때는 가방 속에 숨겨져 있고, 나팔을 불면 위 처럼 가방에 깃발이 달려 현실적으로 흔들립니다.
버프 배너를 착용하면 "분노 게이지"가 플레이어의 HUD에 나타나며, 상대에게 대미지를 줄 때 마다 조금씩 게이지가 찹니다. 이 분노 게이지는 플레이어가 한 목숨으로 상대 팀에게 600 이상의 대미지를 입혔을 때 꽉 차게 됩니다. 이 때 솔저는 나팔을 불어 팀원들이 모이게 합니다. 텔레포터 킬을 한 솔저는 그 전의 분노 게이지 양과 상관없이 게이지가 꽉 찹니다. 클래스를 바꾸거나, 죽거나, 버프 배너를 다른 무기로 바꾸거나 할 때는 분노 게이지가 완전히 초기화됩니다. 버프가 진행되는 10초간, 버프 배너를 사용한 솔저의 반경 450 해머 단위 이내에 있는 솔저를 포함한 팀원들의 공격은 모두 소형 치명타로 계산됩니다. 버프를 받은 팀원들은 발 밑에 팀의 색을 내는 고리가 생기고, 무기에서 크리티컬 부스트와 비슷하게 빛이 납니다. 나팔을 불 때, 왼쪽 마우스 버튼을 계속 누름으로써 버프를 지연시킬 수 있습니다.
Dispenser
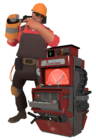
A Dispenser is a building that can be constructed by an Engineer, providing health, ammo and metal to nearby teammates. Engineers rely heavily on metal from their Dispensers to construct and maintain their Sentry Guns and other buildings. Any player may replenish their supplies by simply standing next to the Dispenser.
Dispensers can prove to be invaluable in supporting a team when used effectively. As well as providing a steady health increase for teammates, Dispensers act as a portable ammo source, and can provide additional Metal for other Engineers to use. Dispensers will also attract many teammates to one area which can help to better forward an attack, particularly if the team is scattered and ungrouped.
Spy

Hailing from an indeterminate region of France, the Spy is an aficionado of sharp suits and even sharper knives who relies on stealth and trickery to aid the team. Using his unique array of Cloaking watches, he can render himself invisible and even fake his own death, leaving unaware opponents off-guard. His disguise kit lets him take on the form of any class, allowing him to blend in and sneak behind enemy lines before stabbing his unsuspecting 'teammates', quite literally, in the back. In fact, a swift backstab from behind with the Spy's trusty Knife will take out any foe in a single hit.
In addition to being able to assassinate key enemies quickly and efficiently, the Spy is great against the Engineer. Using his Electro Sappers, he can disable his buildings, slowly draining their health until they are destroyed.
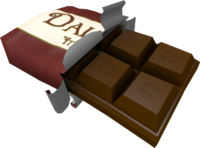
Dalokohs Bar
The Dalokohs Bar (pronounced ʻDah-lock-ussʻ) is an unlockable secondary 'Lunchbox' item for the Heavy, and was released in the March 18, 2010 Patch as part of the first series of community-created content. When consumed, the vitamin-enriched candy-bar heals the Heavy for 60 HP - 20% of his maximum health. In addition, his maximum health is increased temporarily for the next 30 seconds, like a semi-permanent overheal. Note that the additional health does not count towards base health for the purpose of further overheal as maximum health after overheal remains at 450. Like his Sandvich variant the Heavy will be immobile when eating, does not extinguish fire, nor can be eaten underwater. The Dalokohs bar, however, cannot be dropped to heal his team mates. An eaten Dalokohs bar has a cooldown of 30 seconds unless the Heavy dies or gets another one at a Resupply cabinet.
(more...)
Crafting

Crafting is an in-game system allowing players to create specific items, such as a weapon, hat or materials for further crafting, using unwanted or duplicate items gained normally via the Item drop system.
To create these items, the player must follow explicit blueprints, some of which are initially available and others of which must be discovered by the player by experimentation. After following a valid, undiscovered blueprint recipe, the player will both gain the item specified by the blueprint, and the blueprint will be added to the player's list of known blueprints. If the player attempts to craft an item without a corresponding blueprint, they will be notified that no such recipe exists, and no items will be lost.
(more...)
Engineer

A soft-spoken, amiable Texan with a knack for all things mechanical, the Engineer chooses to build and maintain buildings that benefit the team rather than engage in much direct combat. The Engineer's various gadgets include the Sentry gun, an automated turret that fires at any enemy in range, the Dispenser, a device that replenishes the health and ammo of nearby teammates and Teleporters that quickly transport his teammates to the fray.
However, the Engineer's ingenious devices are under constant threat from explosives and devious enemy Spies; a good Engineer must keep his gear under a watchful eye and in good repair at all times. When the Engineer needs to get his hands dirty, his trio of generic, yet capable weapons combined with the assistance of his helpful hardware make him more than capable of holding his own in a fight.
(more...)
Eyelander

The Eyelander is the unlockable melee weapon for the Demoman. First hinted at on a hidden page during the WAR! Update. It is an exceptional claymore, being "harmonically-balanced, made from pattern-welded Damascus steel, and slow-forged in the bowels of captured English kings." It is, unfortunately, also haunted by a bloodthirsty, malevolent spirit.
Wielding the Eyelander results in an initial penalty of 25 to the wielder's health, resulting in a total of 150; however, for every victim the wielder claims with it, they will gain a boost to speed and 15 maximum health (four times per life). On the downside, you cannot gain random Critical Hits but it is possible to guarantee one with the Chargin' Targe special ability. Kills using the Eyelander results in the decapitation of the victim's head. As the Demoman’s head count increases, his eye will glow with an increasing intensity.
(more...)
Administrator

The Administrator, also referred to as the TF Announcer or simply the Announcer, is the CEO of both RED and BLU as well as TF Industries. She is the source of the mysterious, disembodied voice that issues commands and announces vital events during matches. An aged and thoroughly evil mastermind of a woman, the Administrator possesses both a piercing gaze and the sort of voice that commands total and unwavering obedience...or else. Her general demeanor tends towards either slight anger or various stages of bitter disappointment.
The Administrator wields considerable influence and power. Her ownership of both the RED and BLU holding corporations grants her, by extension, control over every major government on the planet. She tends to keeps her operations top secret, manipulating events from behind the scenes. Any development that may chance unwanted attention is swiftly terminated with extreme prejudice. (more...)