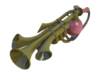
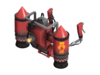
 火焰兵 是一个十分善于短距离作战的兵种,在一个小的区域内可以用火焰喷射器把他的敌人全都点燃。除此之外,他也可以使用压缩气爆推开敌人或者是反弹投射物。火焰兵所有的主武器都是与“点燃附近所有的敌人”有关。而信号枪可以远距离打击敌人。
一般信息

职责
|
- 火焰兵十分善于伏击而不是单单地和你对打。小心你的四周,看看有没有他的身影。
- 火焰兵也可以通过气爆来进行防守,可以反弹投射物。
|

生命值
|
|

速度
|
- 火焰兵有着一般的移动速度,也就是说,他们很容易被子弹打成筛子。
- 所以,火焰兵一般玩偷袭或者是玩保守玩法。
|

武器
|
- 火焰兵善于打近距离伤害,但是却很难打出远距离伤害。你可以通过与其保持距离以避免伤害。
- 火焰兵的气爆可以反弹你的弹射物(以迷你暴击的伤害)。
|
武器
主武器
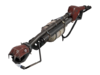
火焰喷射器 + 其皮肤
|
- It is very difficult to escape the Pyro's Flame Thrower once caught, so take note of routes a Pyro can take so that you can repel them before they reach you.
- If you can't escape the Pyro, try to weaken them for your teammates before they kill you.
- If the Pyro sets you on fire, extinguish yourself as soon as possible to reduce afterburn damage. Medkits, certain teammates, and bodies of water can all extinguish flames.
- An allied Pyro can extinguish you with their compression blast or a few choice secondary weapons. An allied Scout's Mad Milk, a Heavy's Sandvich, and a Sniper's Jarate also work.
|
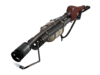
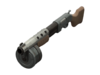
偷袭烈焰喷射器 + 其皮肤
|
- Watch your surroundings at all times to reduce the chances of a successful ambush by a Pyro.
- The Backburner deals critical hits from behind. If the Pyro finds you, keep facing them while you fight back.
- The Backburner uses much more ammunition for compression blasts; forcing a Pyro to reflect projectiles with it will quickly deplete the weapon's ammo. Knowing this, a Backburner Pyro will use their compression blast less often.
|
脱油剂
|
- The Degreaser allows a Pyro to quickly switch weapons. This makes weapon heckling much less effective.
- The Degreaser deals minimal afterburn damage and requires slightly more ammo to airblast. Expect the Pyro to use another weapon, such as the Flare Gun or Axtinguisher, to finish you off.
|
燃素喷射器
|
- The Phlogistinator promotes an opportunistic playstyle. Don't allow the Pyro to freely ambush teammates or ignite you from long range with flares, which will fill their "Mmmph" meter.
- The Pyro can activate a fully charged Phlogistinator to gain guaranteed critical hits. A full charge is indicated by the weapon's nozzle sparking.
- If you suspect the Pyro has a full charge but can't see them, be ready for an ambush.
- If the Pyro taunts in the open for brief invulnerability, have your team prepare for their attempted rampage by focusing firepower. Class-specific methods include laying a carpet of Stickybombs, charging the Sniper Rifle, and getting into position for the Knife's backstab.
- The Phlogistinator cannot airblast, so you can freely use rockets, grenades, and other projectiles against the Pyro without fear of reflection.
|
龙之怒焰
|
- The Dragon's Fury shoots fireballs instead of a wide spread of flames, actually giving you opportunities to dodge the Pyro's attacks.
- Be as unpredictable as you can; the weapon reloads quickly if the Pyro can land successive shots, and accurate shots inflict heavy damage to you.
- While the Dragon's Fury can use the compression blast, using the compression blast takes much longer for the Pyro to attack again compared to other primary weapons. Pressure from projectiles will force a Pyro with this weapon to take cover.
|
彩虹喷灯
|
- The Rainblower functions identically to the Flame Thrower but also comes with the Armageddon taunt attack.
- There are multiple distinct cues during the 3 seconds Armageddon takes to activate, including rainbows, a neighing horse, and a menacing song. Don't blindly rush around corners.
- The Rainblower is not visible without Pyrovision. Keep in mind that the Pyro has taunt attacks on other weapons like the Flare Gun, too.
|

Compression Blast
|
- The compression blast's most obvious use is to shove enemies into environmental hazards, such as cliffs, or into corners, where you are easier to target. Stay away from areas where a Pyro can easily pin you down or push you off the map.
- The compression blast can reflect projectiles; use bullets, fire from outside the Pyro's line of sight, or change the timing of your shots to avoid having them be reflected.
- The compression blast has a small cooldown time. Two teammates can easily overwhelm a Pyro with more projectiles than can be reflected.
- The compression blast uses a significant amount of ammunition; if you can trick the Pyro into wasting compression blasts, they may run out of ammo, giving you the upper hand.
- Pay attention to which primary the Pyro has equipped. Some flamethrowers consume more ammo than others when firing a compression blast.
|
副武器
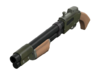
霰弹枪 + 其皮肤
|
- The Shotgun is the Pyro's best secondary weapon against foes outside the Flame Thrower's range as well as against enemy Pyros. Keep your distance to reduce the effectiveness of all the enemy Pyro's weapons, and move erratically to avoid damage.
|
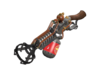
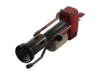
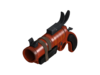
信号枪 + 其皮肤
|
- The Flare Gun's projectiles should be easy to avoid in open areas, even at close range, as long as your movement is unpredictable.
- The Flare Gun's projectiles deal guaranteed critical hits to burning enemies. If you are ignited from a distance, extinguish yourself before re-engaging the Pyro. If ignited up close, move erratically to avoid being finished by a critical flare. If the flare misses, attack while the Pyro reloads or switches weapons.
|
起爆者
|
- The Detonator's flares can be manually triggered by the Pyro to explode, creating a small blast that can ignite multiple targets. Stay away from your teammates to minimize splash damage.
- Compared to the Flare Gun, Detonator flares only deal mini-crits to burning players, making it less effective for killing enemies.
- A Pyro can use the Detonator to perform a small Flare Jump at the cost of health. Stay aware of all possible routes that the Pyro can take to reach you.
|
预备役射手
|
- The Reserve Shooter is capable of landing mini-crits on targets airborne through every type of knock back excluding airblast and bullets. Try to dodge explosives from enemy Soldiers and Demomen that may launch you into the air, and avoid blast jumping until the Pyro retreats or is killed.
- The Reserve Shooter's reduced magazine size gives the Pyro much less staying power. If he fires all four shots, he will be forced to reload or switch to his primary, giving you time to attack.
|
熔人枪
|
- The Manmelter has unlimited ammunition and faster projectiles, making it more effective at continuous long-range harassment than the Flare Gun. Move unpredictably to avoid being ignited.
- The Manmelter's projectiles do not deal critical damage to burning players, making it less effective at finishing foes off. A Pyro will likely engage you with their Flame Thrower instead.
- If an enemy is set on fire, try to finish them off before a Manmelter Pyro can extinguish them and gain a stored critical hit.
|

焦化枪
|
- The Scorch Shot can ignite multiple targets with one hit. Don't stay clustered with teammates.
- The Scorch Shot's flares can knock enemies back; the knockback increases if you already are on fire. Don't idle close to environmental hazards.
- The Scorch Shot focuses on keeping enemies on fire rather than finishing them off. Remember where you can find healing or extinguish yourself.
- Pyros often use this weapon to charge up the Phlogistinator for guaranteed critical hits. Keep an ear out for the Pyro activating their crit-boost.
|
恐慌打击
|
- The Panic Attack deploys quickly but suffers from massive bullet spread with consecutive shots. Expect it to be deployed for strong burst damage at close range, especially if you get airblasted.
- Anything past the first shot will typically deal less damage, especially at medium range. If you survive the first shot, maintain distance and press your advantage.
|
热能推进器
|
- The Thermal Thruster grants the Pyro greatly increased mobility. When fired, the Pyro will be launched into the air, similarly to a Soldier's rocket jump. Landing knocks nearby enemies back, and deals triple fall damage to enemies landed on.
- In combat, the Pyro can use the Thermal Thruster to enter close range quickly. It takes one second to launch, so pick the correct direction to move away.
- The Pyro can switch weapons in mid-flight. They may be ready to attack with their Flame Thrower upon landing!
- The Thermal Thruster stores two charges which take 15 seconds to recharge. If the Pyro has recently used both charges, their mobility is as average as usual.
|
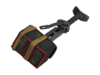
纵火者的油桶
|
- The Pyro can use the Gas Passer to deploy a Gas Cloud. Anyone who enters the Gas Cloud is doused for 10 seconds. Anyone who is doused, including Pyros, ignites for 10 seconds if damaged by any source.
- The Pyro must wait up to 60 seconds or deal enough damage to use the Gas Passer. Until then, the Pyro lacks a ranged weapon.
- If you are doused, consider retreating to a source of healing to reduce the debuff's duration.
- If you are blocked by the Gas Cloud, consider if it is worth braving to quickly reach the area you are trying to access.
|
近战武器
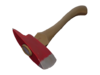
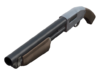
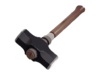
消防斧 + 其皮肤
|
- Due to the vast range of utility that unlockable melee weapons provide, it is rare for a Pyro to equip the stock Fire Axe, much less use it; his primary weapons better range and more consistent damage
- As with all other Pyro melee weapons, stay away from melee range if the Pyro is holding his melee weapon. Be aware that if you remain outside his melee range too long, he will likely switch to his primary or secondary weapon.
|
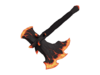
火焰战斧 + 其皮肤
|
- The Axtinguisher deals less damage against non-burning players, but deals mini-crit damage against burning players, and deals all the afterburn damage the player would have taken, all at once. A Pyro will use this weapon to finish you off after igniting you with his other weapons.
- The bonus damage is equal to the damage you would have taken from afterburn. The Pyro must choose between different options, such the Degreaser's fast weapon switch and low afterburn power. Take note of the Pyro's other weapons - you may gain insight into what tactics they use.
- The Axtinguisher has less range than the Flame Thrower and holsters 35% slower, giving you a time to counterattack should you survive the hit.
|
拆迁者 + 其皮肤
|
- A Pyro with the Homewrecker typically watches over an Engineer's buildings, protecting them from Spies and incoming projectiles. They will tend to play passively and defend an Engineer nest, only going on the offensive to punish an enemy for overextending.
- A Pyro with the Homewrecker prevents Spies from sapping any nearby buildings. Coordinate with teammates to distract or backstab the Pyro first.
|
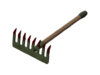
强力千斤顶
|
- The Powerjack grants the Pyro bonus movement speed but causes him to take 20% more damage while active. This speed boost makes him faster than every class besides the Scout. Pyros will typically deploy this weapon to reach the front lines faster, then switch to their other weapons for combat. If you catch a Pyro moving between areas with it, try to hit him before he can switch weapons.
- In combat, the Pyro will sometimes switch to the Powerjack to finish you off and regain some health. Take advantage of his damage vulnerability, and shoot him before he reaches you.
|
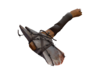
不求人
|
- Stay out of melee range - the Back Scratcher hits much harder than the stock Fire Axe.
- The Back Scratcher grants Pyros increased healing from medkits, encouraging them to roam the map more freely, away from their team. Try to take any nearby health packs before the Pyro can reach them.
|
熔岩战斧
|
- A Pyro may use the Sharpened Volcano Fragment to conserve Flame Thrower ammo, or as a last resort for lighting enemies ablaze. As with all melee weapons, keep your distance and continue attacking.
|
三度烧伤
|
- The Flame Thrower is often more effective than the Third Degree when it comes to attacking a Medic and his patient. Either way, beware of possible ambushes.
- In Casual Mode, Pyros with this weapon will often try to take advantage of the high melee critical hit rate. If a Pyro approaches your patient with this weapon, disconnect your Medi Gun, or you may be killed instantly.
|
霓虹杀手
|
- A Pyro may try to finish you off with the Neon Annihilator if you are wet. Keep your distance, and they will be left vulnerable.
- Beware fighting Scouts (who throw Mad Milk) and Snipers (who throw Jarate) in enemy territory; they may give opportunities to a Pyro with the Neon Annihilator.
- Like the Homewrecker, the Neon Annihilator can destroy Sappers, albeit at a slower rate. Treat it as if the Pyro was holding the Homewrecker.
|
灼热之手
|
- The Hot Hand attacks faster than all other Pyro melees, deals less damage, and provides the Pyro a brief speed boost upon a successful hit. Unlike other clothing-related weapons, the Pyro can hide this weapon from their loadout until they pull out their distinct right-handed grey glove.
- This weapon announces each Slap in the kill feed, which can be used to track down Spies using the Dead Ringer, although this is often less of a threat compared to the Pyro's fiery weapons.
- A Pyro using this weapon generally is not taking the game too seriously. Despite this, continue to stay out of melee range - this weapon allows Pyro to continuously hit you, even as a Scout.
|
参见
| 火焰兵 |
|---|
| | 武器 |
主武器 | | | 副武器 | | | 近战武器 |
消防斧 ( 平底煎锅, 萨氏金像奖小金人, 有良心的示威者标志牌, 自由权杖, 恐怖骸骨, 回忆制造者, 美味火腿, 黄金平底煎锅, 大力碎尸锤, 铁轨管制员, 普利尼砍刀) · 火焰战斧 ( 明信片打手) · 拆迁者 ( 破坏锤) · 强力千斤顶 · 不求人 · 熔岩战斧 · 三度烧伤 · 锋利的波板糖 · 霓虹杀手 · 灼热之手 | | | | | | |
| | | 能力 | | | | 饰品 | | | | 套装 | | | | 特殊嘲讽 | | | | 成就 | | | | 角色 | | | | 战术 | | | | 其它 | |
|

