 |
| “Sun Tzu's got nothing on us!” This article is a Community strategy stub. As such, it is not complete. You can help the Team Fortress Wiki Community Strategy Project by expanding it. Notes: Expand the "General Strategy" section to cover map locations in more detail. Potentially look at the class-specific strategies as well. |
| Lumberyard | |
|---|---|

| |
| 基本信息 | |
| 种类: | 竞技场 |
| 文件名: | arena_lumberyard
|
| 发布时间: | 2008年8月19日补丁 (机枪手更新) |
| 地图变种: | 万圣节系列 |
| 开发者: | Valve |
| 地图资料 | |
| 环境: | Alpine |
| 设定: | Daylight, sunny |
| 危害: | Pitfall |
| 地图物品 | |
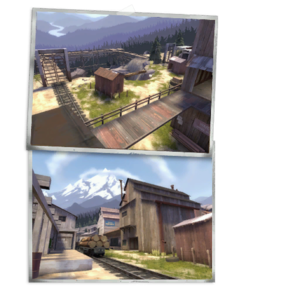
| 地图照片 | |
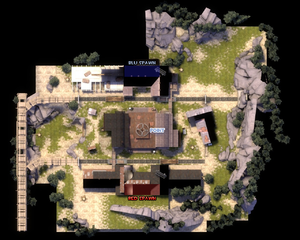
| 地图俯视图 | |
This article is about Community Lumberyard strategy.
Note: It is recommended to read the main Lumberyard article first to become familiar with the names of key map locations used in this article.
General strategy
- The decks that overlook the internal control point can be a helpful vantage point to those who are trying to capture it below. This can be a good spot for a Sentry Gun if it can be successfully defended from sabotage from the rear. Spies can also enter via this passage to easily reach those on the point and catch those not eyeing the higher decks. Snipers with Huntsman can use this deck for taking pot shots.
- It is common for Demomen and Soldiers to try and dominate the roof, and use it as a vantage point to rain down explosives on the enemy team.
- If there are only a few enemies left alive, chances are that some are severely injured. As such, the lone health kit on the log will attract them, allowing for a suitable ambush.
Class-specific strategy
 侦察兵
侦察兵
- It is common for Scouts to go on the rooftops, this helps with the element of surprise as players have trouble looking up.
- Jumping off the roof and attacking the enemies below would give the Scout a few shots without taking damage until the opposing team notices where the Scout is coming from.
 士兵
士兵
- The small and flat nature of the terrain means that rocket jumping is limited, but is viable when trying to maneuver through or over the central building.
- A good ambush spot for the Soldier is above the Control Point, giving you the high ground using splash damage from rockets to clear the point.
 火焰兵
火焰兵
- There are many ambush points from the main building. The Backburner can be used for a devastating sneak attack.
- A good spot for the Pyro is near the cliff with the health pick-up where you can airblast enemies off it.
- Remember to Spy-check under stairs as Cloak and Dagger Spies tend to hide under it.
 爆破手
爆破手
- Demomen can defeat Engineers trying to deploy Sentry Guns on the Control point by placing Stickybombs from the inside of the door and detonating them right before the doors open. This will destroy the buildings and hopefully kill the Engineer.
 机枪手
机枪手
- Stick around the middle building to have a better chance of killing the enemy in close quarters. There are many hiding spots for a Heavy, and they can even jump down the staircases while revved up as a surprise attack.
- Try to use the higher route to control territory, as the top part of the main shed is small and a single Heavy can easily hold off any attackers from the stairs or the roof.
- It is best to be spun up when approcing the upstairs, and when upstairs, stay spun up and watch particularly for ambushes from the two doorways.
 工程师
工程师
- Normal Engineer is very hard to pull off in this map because you don’t get much room to set up buildings. So either use the Jag or play battle Engineer.
- A full ammo crate outside of the spawn doors can be used to replenish metal reserves immediately, but it can still be tricky to build without team support.
- Try to set up a Dispenser and Sentry Gun inside the central building or just outside the closed doors to surprise any enemies who may be waiting to capture.
- Engineers can also set up Sentry Guns right below the stairs, an often overlooked location.
- Building a Sentry Gun or a Mini-Sentry inside one of the sheds that overlook the Small Health Pickup will cause great inconvenience for those who are seeking health and as the gun will damage/finish off those who are in need to replenish health themselves. The Sentry Gun's knockback can also push enemies off the log to face a certain death.
- On the RED side of the map, to the right, there is a large bush. This is a fantastic spot for hiding a Sentry Gun or a Combat Mini-Sentry Gun as it is almost invisible to enemies.
- There is also a similar but smaller bush on the BLU side of the map, this may be used to partially hide the Sentry but is not as effective.
 医生
医生
- Because of the effectively non-existant Health Pickups, you are especially important in this map. Be sure to keep out of all the main fighting, but be sure to also follow teammates so that you can heal them. Dying on this map would be catastrophic for both you and your team.
 狙击手
狙击手
- Sniper is quite harder to play on this map compared to others, but he can be used to watch the outside of the building as an anti-flank.
- Huntsman Snipers can contribute more in isolated spaces.
- As a Sniper you can hide behind the boxes in spawn, effectively shielding your position. This is especially useful when the point is activated, giving you a clear view over the point.
 间谍
间谍
- The stairs give skilled Spies the perfect opportunity to stair-stab.
- Spies can hide underneath the stairs to recharge the Cloak and Dagger or to ambush unsuspecting players.
- While in the enemy's territory, a good place to decloak is their side door to the exit of the spawn. There is almost no traffic through the door, which can make it look like you just came out of it.
- Another good place to decloak is in the corner right outside the side door to the control point. Enemies will usually just run right past you.

