|
|
| (6 intermediate revisions by 3 users not shown) |
| Line 1: |
Line 1: |
| − | {{update trans}}
| |
| | {{DISPLAYTITLE:叢林煉獄更新}} | | {{DISPLAYTITLE:叢林煉獄更新}} |
| | {{patch info|10|20|2017}} | | {{patch info|10|20|2017}} |
| Line 26: |
Line 25: |
| | | | |
| | ==== 地圖 ==== | | ==== 地圖 ==== |
| | + | {{main|List of maps/zh-hant|l1={{common string|List of maps}}}} |
| | {{hatnote|社群地圖將用斜體標示。}} | | {{hatnote|社群地圖將用斜體標示。}} |
| | {| class="wikitable" cellpadding=2 style="text-align:center;" | | {| class="wikitable" cellpadding=2 style="text-align:center;" |
| Line 34: |
Line 34: |
| | ! class="header" style="background-color:#748c41;color:white;" |文件名稱 | | ! class="header" style="background-color:#748c41;color:white;" |文件名稱 |
| | |- | | |- |
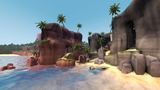
| − | | style="background-color:#b5b85c;" |'''''[[Banana Bay/zh-hant|香蕉灣(Banana Bay)]]''''' | + | | style="background-color:#b5b85c;" | '''''[[Banana Bay/zh-hant|香蕉灣<br>(Banana Bay)]]''''' |
| − | | style="background-color:#f8d28c;" width="100px" | [[File:Bananabay_main.jpg|160px|link=Banana Bay/zh-hant]] | + | | style="background-color:#f8d28c;" | [[File:Bananabay_main.jpg|160px|link=Banana Bay/zh-hant]] |
| − | | style="background-color:#f8d28c;" align="center" |'''[[Payload/zh-hant|推車護送比賽]]'''<br>[[File:RED Bombcart.png|30px| link=Payload Race/zh-hant]][[File:BLU Bombcart.png|30px|link=Payload Race/zh-hant]] | + | | style="background-color:#f8d28c;" | '''[[Payload/zh-hant|推車護送比賽]]'''<br>[[File:RED Bombcart.png|30px| link=Payload Race/zh-hant]][[File:BLU Bombcart.png|30px|link=Payload Race/zh-hant]] |
| − | | style="background-color:#f8e2a1;" width="60px" |{{code|plr_bananabay}} | + | | style="background-color:#f8e2a1;" | {{code|plr_bananabay}} |
| | |- | | |- |
| − | | style="background-color:#b5b85c;" |'''''[[Brazil/zh-hant|巴西(Brazil)]]''''' | + | | style="background-color:#b5b85c;" | '''''[[Brazil/zh-hant|巴西<br>(Brazil)]]''''' |
| − | | style="background-color:#f8d28c;" width="100px" |[[File:Brazil_main.jpg|160px|link=Brazil/zh-hant]] | + | | style="background-color:#f8d28c;" | [[File:Brazil_main.jpg|160px|link=Brazil/zh-hant]] |
| − | | style="background-color:#f8d28c;" align="center" |'''[[King of the Hill/zh-hant|山丘之王]]'''<br>[[File:Controlpoint.png|50px|link=King of the Hill/zh-hant]] | + | | style="background-color:#f8d28c;" | '''[[King of the Hill/zh-hant|山丘之王]]'''<br>[[File:Controlpoint.png|50px|link=King of the Hill/zh-hant]] |
| − | | style="background-color:#f8e2a1;" width="60px" |{{code|koth_brazil}} | + | | style="background-color:#f8e2a1;" | {{code|koth_brazil}} |
| | |- | | |- |
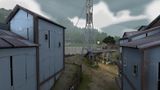
| − | | style="background-color:#b5b85c;" |'''''[[Enclosure/zh-hant|圈地(Enclosure)]]''''' | + | | style="background-color:#b5b85c;" | '''''[[Enclosure/zh-hant|圈地<br>(Enclosure)]]''''' |
| − | | style="background-color:#f8d28c;" width="100px" | [[File:Enclosure_main.jpg|160px|link=Enclosure/zh-hant]] | + | | style="background-color:#f8d28c;" | [[File:Enclosure_main.jpg|160px|link=Enclosure/zh-hant]] |
| − | | style="background-color:#f8d28c;" align="center" |'''[[Payload/zh-hant|推車護送]]'''<br>[[File:BLU_Bombcart.png|50px|link =Payload/zh-hant]] | + | | style="background-color:#f8d28c;" | '''[[Payload/zh-hant|推車護送]]'''<br>[[File:BLU_Bombcart.png|50px|link =Payload/zh-hant]] |
| − | | style="background-color:#f8e2a1;" width="60px" |{{code|pl_enclosure}} | + | | style="background-color:#f8e2a1;" | {{code|pl_enclosure}} |
| | |- | | |- |
| − | | style="background-color:#b5b85c;" |'''''[[Lazarus/zh-hant|拉撒路(Lazarus)]]''''' | + | | style="background-color:#b5b85c;" | '''''[[Lazarus/zh-hant|拉撒路<br>(Lazarus)]]''''' |
| − | | style="background-color:#f8d28c;" width="100px" |[[File:Lazarus_main.jpg|160px|link=Lazarus/zh-hant]] | + | | style="background-color:#f8d28c;" | [[File:Lazarus_main.jpg|160px|link=Lazarus/zh-hant]] |
| − | | style="background-color:#f8d28c;" align="center" |'''[[King of the Hill/zh-hant|山丘之王]]'''<br>[[File:Controlpoint.png|50px|link=King of the Hill/zh-hant]] | + | | style="background-color:#f8d28c;" | '''[[King of the Hill/zh-hant|山丘之王]]'''<br>[[File:Controlpoint.png|50px|link=King of the Hill/zh-hant]] |
| − | | style="background-color:#f8e2a1;" width="60px" |{{code|koth_lazarus}} | + | | style="background-color:#f8e2a1;" | {{code|koth_lazarus}} |
| | |- | | |- |
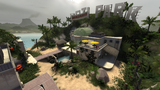
| − | | style="background-color:#b5b85c;" |'''[[Mercenary Park/zh-hant|傭兵公園(Mercenary Park)]]''' | + | | style="background-color:#b5b85c;" | '''[[Mercenary Park/zh-hant|傭兵公園<br>(Mercenary Park)]]''' |
| − | | style="background-color:#f8d28c;" width="100px" | [[File:Yetipark 5.png|160px|link=Mercenary Park/zh-hant]] | + | | style="background-color:#f8d28c;" | [[File:Yetipark 5.png|160px|link=Mercenary Park/zh-hant]] |
| − | | style="background-color:#f8d28c;" align="center" |'''[[Control Point (game mode)/zh-hant|進攻/防守]]'''<br>[[File:Controlpoint.png|50px|link=Control Point (game mode)/zh-hant]] | + | | style="background-color:#f8d28c;" | '''[[Control Point (game mode)/zh-hant|進攻/防守]]'''<br>[[File:Controlpoint.png|50px|link=Control Point (game mode)/zh-hant]] |
| − | | style="background-color:#f8e2a1;" width="60px" |{{code|cp_mercenarypark}} | + | | style="background-color:#f8e2a1;" | {{code|cp_mercenarypark}} |
| | |- | | |- |
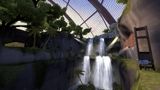
| − | | style="background-color:#b5b85c;" |'''''[[Mossrock/zh-hant|苔蘚石(Mossrock)]]''''' | + | | style="background-color:#b5b85c;" | '''''[[Mossrock/zh-hant|苔蘚石<br>(Mossrock)]]''''' |
| − | | style="background-color:#f8d28c;" width="100px" |[[File:Mossrock_main.jpg|160px|link=Mossrock/zh-hant]] | + | | style="background-color:#f8d28c;" | [[File:Mossrock_main.jpg|160px|link=Mossrock/zh-hant]] |
| − | | style="background-color:#f8d28c;" align="center" |'''[[Control Point (game mode)/zh-hant|進攻/防守]]'''<br>[[File:Controlpoint.png|50px|link=Control Point (game mode)/zh-hant]] | + | | style="background-color:#f8d28c;" | '''[[Control Point (game mode)/zh-hant|進攻/防守]]'''<br>[[File:Controlpoint.png|50px|link=Control Point (game mode)/zh-hant]] |
| − | | style="background-color:#f8e2a1;" width="60px" |{{code|cp_mossrock}} | + | | style="background-color:#f8e2a1;" | {{code|cp_mossrock}} |
| | |} | | |} |
| | | | |
| | ==== 嘲諷 ==== | | ==== 嘲諷 ==== |
| | + | {{main|Taunts/zh-hant|l1=嘲諷}} |
| | {| class="wikitable collapsible" cellpadding=2 style="text-align:center;" | | {| class="wikitable collapsible" cellpadding=2 style="text-align:center;" |
| | |- | | |- |
| − | | style="background: #b5b85c; width:90px;" rowspan="1" | {{icon class|Pyro}}<br/>'''[[Pyro{{if lang}}|<span style=" color: #000;">火焰兵</span>]]''' | + | | width="90px" style="background:#b5b85c;" rowspan="1" | '''{{class link|Pyro|br=yes|color=black}}''' |
| − | | align="center" style="background: #f8d28c " | {{Icon item|Headcase|75px}} | + | | style="background:#f8d28c;" | {{Icon item|Headcase|75px}} |
| − | | style="background: #f8e2a1 "| '''{{item link|Headcase}}''' | + | | style="background:#f8e2a1;" | '''{{item link|Headcase}}''' |
| | |- | | |- |
| − | | style="background: #b5b85c; width:90px;" rowspan="2" | {{icon class|Heavy}}<br/>'''[[Heavy{{if lang}}|<span style=" color: #000;">重裝兵</span>]]''' | + | | style="background:#b5b85c;" rowspan="2" | '''{{class link|Heavy|br=yes|color=black}}''' |
| − | | align="center" style="background: #f8d28c " | {{Icon item|Russian Arms Race|75px}} | + | | style="background:#f8d28c;" | {{Icon item|Russian Arms Race|75px}} |
| − | | style="background: #f8e2a1 "| '''{{item link|Russian Arms Race}}''' | + | | style="background:#f8e2a1;" | '''{{item link|Russian Arms Race}}''' |
| | |- | | |- |
| − | | align="center" style="background: #f8d28c " | {{Icon item|Soviet Strongarm|75px}} | + | | style="background:#f8d28c;" | {{Icon item|Soviet Strongarm|75px}} |
| − | | style="background: #f8e2a1 "| '''{{item link|Soviet Strongarm}}''' | + | | style="background:#f8e2a1;" | '''{{item link|Soviet Strongarm}}''' |
| | |- | | |- |
| − | | style="background: #b5b85c; width:90px;" rowspan="2" | {{icon class|Engineer}}<br/>'''[[Engineer{{if lang}}|<span style=" color: #000;">工程師</span>]]''' | + | | style="background:#b5b85c;" rowspan="2" | '''{{class link|Engineer|br=yes|color=black}}''' |
| − | | align="center" style="background: #f8d28c " | {{Icon item|Dueling Banjo|75px}} | + | | style="background:#f8d28c;" | {{Icon item|Dueling Banjo|75px}} |
| − | | style="background: #f8e2a1 "| '''{{item link|Dueling Banjo}}''' | + | | style="background:#f8e2a1;" | '''{{item link|Dueling Banjo}}''' |
| | |- | | |- |
| − | | align="center" style="background: #f8d28c " | {{Icon item|Jumping Jack|75px}} | + | | style="background:#f8d28c;" | {{Icon item|Jumping Jack|75px}} |
| − | | style="background: #f8e2a1 "| '''{{item link|Jumping Jack}}''' | + | | style="background:#f8e2a1;" | '''{{item link|Jumping Jack}}''' |
| | |- | | |- |
| − | | style="background: #b5b85c; width:90px;" rowspan="2" | {{icon class|All Classes}}<br/>'''[[Classes{{if lang}}|<span style= "color: #000;">所有兵種</span>]]''' | + | | style="background:#b5b85c;" rowspan="2" | '''{{class link|All Classes|br=yes|color=black}}''' |
| − | | align="center" style="background: #f8d28c " | {{Icon item|Yeti Punch|75px}} | + | | style="background:#f8d28c;" | {{Icon item|Yeti Punch|75px}} |
| − | | style="background: #f8e2a1 "| '''{{item link|Yeti Punch}}''' | + | | style="background:#f8e2a1;" | '''{{item link|Yeti Punch}}''' |
| | |- | | |- |
| − | | align="center" style="background: #f8d28c " | {{Icon item|Yeti Smash|75px}} | + | | style="background:#f8d28c;" | {{Icon item|Yeti Smash|75px}} |
| − | | style="background: #f8e2a1 "| '''{{item link|Yeti Smash}}''' | + | | style="background:#f8e2a1;" | '''{{item link|Yeti Smash}}''' |
| − | |}
| |
| − | | |
| − | === 第二天 ===
| |
| − | 第二天推出了[[Jungle Inferno Campaign/zh-hant|叢林煉獄戰役]]和[[War Paint/zh-hant|戰漆]]箱,用來代替戰爭中的武器掉落和武器箱,以及 2 個裝飾品,新的戰爭系統。 這次戰爭包含了 36 個需要合作完成的新合約。合約完成將會有特定獎勵的物品和“血色獎券”,可以用來購買戰漆和箱子。
| |
| − | | |
| − | ==== 戰役 ====
| |
| − | 叢林煉獄戰役需要購買[[Jungle Inferno Campaign Pass/zh-hans|叢林戰役通行證]]才能解鎖該合約。同時也引進了[[ConTracker/zh-hant|合約追蹤器]] PDA ,用來自定義合約進度以及進入傭兵公園禮品商店。友軍的火力也會同時出現,允許小隊中的 2 名好友互相傷害來完成合約。
| |
| − | | |
| − | ==== 裝飾品 ====
| |
| − | {{main|Cosmetic items/zh-hans|l1=裝飾品}}
| |
| − | {| class="wikitable collapsible" cellpadding=2 style="text-align:center;"
| |
| − | |-
| |
| − | | style="background: #b5b85c; width:90px;" rowspan="3" | {{icon class|Scout}}<br/>'''[[Scout{{if lang}}|<span style="color: #000;">{{class name|Scout}}</span>]]'''
| |
| − | | align="center" style="background: #4B69FF "| {{Icon item|Forest Footwear|75px}}
| |
| − | | style="background: #f8e2a1 "| '''{{item link|Forest Footwear}}'''
| |
| − | |-
| |
| − | | align="center" style="background: #D32CE6 " | {{Icon item|Jungle Jersey|75px}}
| |
| − | | style="background: #f8e2a1 "| '''{{item link|Jungle Jersey}}'''
| |
| − | |-
| |
| − | | align="center" style="background: #8847FF " | {{Icon item|Transparent Trousers|75px}}
| |
| − | | style="background: #f8e2a1 "| '''{{item link|Transparent Trousers}}'''
| |
| − | |-
| |
| − | | style="background: #b5b85c; width:90px;" rowspan="4" | {{icon class|Soldier}}<br/>'''[[Soldier{{if lang}}|<span style="color: #000;">{{class name|Soldier}}</span>]]'''
| |
| − | | align="center" style="background: #4B69FF "| {{Icon item|Attack Packs|75px}}
| |
| − | | style="background: #f8e2a1 "| '''{{item link|Attack Packs}}'''
| |
| − | |-
| |
| − | | align="center" style="background: #8847FF " | {{Icon item|Crit Cloak|75px}}
| |
| − | | style="background: #f8e2a1 "| '''{{item link|Crit Cloak}}'''
| |
| − | |-
| |
| − | | align="center" style="background: #4B69FF " | {{Icon item|Sharp Chest Pain|75px}}
| |
| − | | style="background: #f8e2a1 "| '''{{item link|Sharp Chest Pain}}'''
| |
| − | |-
| |
| − | | align="center" style="background: #4B69FF " | {{Icon item|Shellmet|75px}}
| |
| − | | style="background: #f8e2a1 "| '''{{item link|Shellmet}}'''
| |
| − | |-
| |
| − | | style="background: #b5b85c; width:90px;" rowspan="6" | {{icon class|Pyro}}<br/>'''[[Pyro{{if lang}}|<span style="color: #000;">{{class name|Pyro}}</span>]]'''
| |
| − | | align="center" style="background: #4B69FF "| {{Icon item|Deity's Dress|75px}}
| |
| − | | style="background: #f8e2a1 "| '''{{item link|Deity's Dress}}'''
| |
| − | |-
| |
| − | | align="center" style="background: #8847FF " | {{Icon item|D-eye-monds|75px}}
| |
| − | | style="background: #f8e2a1 "| '''{{item link|D-eye-monds}}'''
| |
| − | |-
| |
| − | | align="center" style="background: #8847FF " | {{Icon item|Feathered Fiend|75px}}
| |
| − | | style="background: #f8e2a1 "| '''{{item link|Feathered Fiend}}'''
| |
| − | |-
| |
| − | | align="center" style="background: #4B69FF " | {{Icon item|Fireman's Essentials|75px}}
| |
| − | | style="background: #f8e2a1 "| '''{{item link|Fireman's Essentials}}'''
| |
| − | |-
| |
| − | | align="center" style="background: #8847FF " | {{Icon item|Hot Huaraches|75px}}
| |
| − | | style="background: #f8e2a1 "| '''{{item link|Hot Huaraches}}'''
| |
| − | |-
| |
| − | | align="center" style="background: #D32CE6 " | {{Icon item|Sacrificial Stone|75px}}
| |
| − | | style="background: #f8e2a1 "| '''{{item link|Sacrificial Stone}}'''
| |
| − | |-
| |
| − | | style="background: #b5b85c; width:90px;" rowspan="8" | {{icon class|Heavy}}<br/>'''[[Heavy{{if lang}}|<span style="color: #000;">{{class name|Heavy}}</span>]]'''
| |
| − | | align="center" style="background: #FFD700 "| {{Icon item|Abominable Snow Pants|75px}}
| |
| − | | style="background: #f8e2a1 "| '''{{item link|Abominable Snow Pants}}'''
| |
| − | |-
| |
| − | | align="center" style="background: #D32CE6 " | {{Icon item|Aztec Aggressor|75px}}
| |
| − | | style="background: #f8e2a1 "| '''{{item link|Aztec Aggressor}}'''
| |
| − | |-
| |
| − | | align="center" style="background: #4B69FF " | {{Icon item|Commando Elite|75px}}
| |
| − | | style="background: #f8e2a1 "| '''{{item link|Commando Elite}}'''
| |
| − | |-
| |
| − | | align="center" style="background: #4B69FF " | {{Icon item|Fat Man's Field Cap|75px}}
| |
| − | | style="background: #f8e2a1 "| '''{{item link|Fat Man's Field Cap}}'''
| |
| − | |-
| |
| − | | align="center" style="background: #4B69FF " | {{Icon item|Heavy Harness|75px}}
| |
| − | | style="background: #f8e2a1 "| '''{{item link|Heavy Harness}}'''
| |
| − | |-
| |
| − | | align="center" style="background: #FFD700 " | {{Icon item|Himalayan Hair Shirt|75px}}
| |
| − | | style="background: #f8e2a1 "| '''{{item link|Himalayan Hair Shirt}}'''
| |
| − | |-
| |
| − | | align="center" style="background: #FFD700 " | {{Icon item|Kathman-Hairdo|75px}}
| |
| − | | style="background: #f8e2a1 "| '''{{item link|Kathman-Hairdo}}'''
| |
| − | |-
| |
| − | | align="center" style="background: #4B69FF " | {{Icon item|Siberian Tigerstripe|75px}}
| |
| − | | style="background: #f8e2a1 "| '''{{item link|Siberian Tigerstripe}}'''
| |
| − | |-
| |
| − | | style="background: #b5b85c; width:90px;" rowspan="2" | {{icon class|Engineer}}<br/>'''[[Engineer{{if lang}}|<span style="color: #000;">{{class name|Engineer}}</span>]]'''
| |
| − | | align="center" style="background: #4B69FF "| {{Icon item|Conaghers' Utility Idol|75px}}
| |
| − | | style="background: #f8e2a1 "| '''{{item link|Conaghers' Utility Idol}}'''
| |
| − | |-
| |
| − | | align="center" style="background: #D32CE6 " | {{Icon item|Tropical Toad|75px}}
| |
| − | | style="background: #f8e2a1 "| '''{{item link|Tropical Toad}}'''
| |
| − | |-
| |
| − | | style="background: #b5b85c; width:90px;" rowspan="2" | {{icon class|Medic}}<br/>'''[[Medic{{if lang}}|<span style="color: #000;">{{class name|Medic}}</span>]]'''
| |
| − | | align="center" style="background: #4B69FF "| {{Icon item|Battle Boonie|75px}}
| |
| − | | style="background: #f8e2a1 "| '''{{item link|Battle Boonie}}'''
| |
| − | |-
| |
| − | | align="center" style="background: #4B69FF " | {{Icon item|Vitals Vest|75px}}
| |
| − | | style="background: #f8e2a1 "| '''{{item link|Vitals Vest}}'''
| |
| − | |-
| |
| − | | style="background: #b5b85c; width:90px;" rowspan="6" | {{icon class|Sniper}}<br/>'''[[Sniper{{if lang}}|<span style="color: #000;">{{class name|Sniper}}</span>]]'''
| |
| − | | align="center" style="background: #4B69FF "| {{Icon item|Bait and Bite|75px}}
| |
| − | | style="background: #f8e2a1 "| '''{{item link|Bait and Bite}}'''
| |
| − | |-
| |
| − | | align="center" style="background: #4B69FF " | {{Icon item|Cammy Jammies|75px}}
| |
| − | | style="background: #f8e2a1 "| '''{{item link|Cammy Jammies}}'''
| |
| − | |-
| |
| − | | align="center" style="background: #4B69FF " | {{Icon item|Classy Capper|75px}}
| |
| − | | style="background: #f8e2a1 "| '''{{item link|Classy Capper}}'''
| |
| − | |-
| |
| − | | align="center" style="background: #8847FF " | {{Icon item|Conspicuous Camouflage|75px}}
| |
| − | | style="background: #f8e2a1 "| '''{{item link|Conspicuous Camouflage}}'''
| |
| − | |-
| |
| − | | align="center" style="background: #4B69FF " | {{Icon item|Most Dangerous Mane|75px}}
| |
| − | | style="background: #f8e2a1 "| '''{{item link|Most Dangerous Mane}}'''
| |
| − | |-
| |
| − | | align="center" style="background: #8847FF " | {{Icon item|Rifleman's Regalia|75px}}
| |
| − | | style="background: #f8e2a1 "| '''{{item link|Rifleman's Regalia}}'''
| |
| − | |-
| |
| − | | style="background: #b5b85c; width:90px;" | '''{{Class link|Scout|color=black}}'''<br/>'''{{Class link|Engineer|color=black}}'''<br/>'''{{Class link|Spy|color=black}}'''
| |
| − | | align="center" style="background: #4B69FF; " | {{Icon item|Aloha Apparel|75px}}
| |
| − | | style="background: #f8e2a1; " | '''{{item link|Aloha Apparel}}'''
| |
| − | |-
| |
| − | | style="background: #b5b85c; width:90px;" | '''{{Class link|Soldier|color=black}}'''<br/>'''{{Class link|Pyro|color=black}}'''<br/>'''{{Class link|Demoman|color=black}}'''
| |
| − | | align="center" style="background: #D32CE6; " | {{Icon item|Bananades|75px}}
| |
| − | | style="background: #f8e2a1; " | '''{{item link|Bananades}}'''
| |
| − | |-
| |
| − | | style="background: #b5b85c; width:90px;" | '''{{Class link|Soldier|color=black}}'''<br/>'''{{Class link|Demoman|color=black}}'''<br/>'''{{Class link|Heavy|color=black}}'''
| |
| − | | align="center" style="background: #EB4B4B; " | {{Icon item|War Eagle|75px}}
| |
| − | | style="background: #f8e2a1; " | '''{{item link|War Eagle}}'''
| |
| − | |-
| |
| − | | style="background: #b5b85c; width:90px;" | '''{{Class link|Soldier|color=black}}'''<br/>'''{{Class link|Heavy|color=black}}'''
| |
| − | | align="center" style="background: #4B69FF; " | {{Icon item|Nuke|75px}}
| |
| − | | style="background: #f8e2a1; " | '''{{item link|Nuke}}'''
| |
| − | |-
| |
| − | | style="background: #b5b85c; width:90px;" rowspan="14" | {{icon class|All Classes}}<br/>'''[[Classes{{if lang}}|<span style="color: #000;">{{class name|All Classes}}</span>]]'''
| |
| − | | align="center" style="background: #EB4B4B " | {{Icon item|Aztec Warrior|75px}}
| |
| − | | style="background: #f8e2a1 "| '''{{item link|Aztec Warrior}}'''
| |
| − | |-
| |
| − | | align="center" style="background: #8847FF " | {{Icon item|Croaking Hazard|75px}}
| |
| − | | style="background: #f8e2a1 "| '''{{item link|Croaking Hazard}}'''
| |
| − | |-
| |
| − | | align="center" style="background: #8847FF " | {{Icon item|Hunter in Darkness|75px}}
| |
| − | | style="background: #f8e2a1 "| '''{{item link|Hunter in Darkness}}'''
| |
| − | |-
| |
| − | | align="center" style="background: #D32CE6 " | {{Icon item|Jungle Wreath|75px}}
| |
| − | | style="background: #f8e2a1 "| '''{{item link|Jungle Wreath}}'''
| |
| − | |-
| |
| − | | align="center" style="background: #FFD700 " | {{Icon item|Mannanas Hat|75px}}
| |
| − | | style="background: #f8e2a1 "| '''{{item link|Mannanas Hat}}'''
| |
| − | |-
| |
| − | | align="center" style="background: #FFD700 " | {{Icon item|Mercenary Park|75px}}
| |
| − | | style="background: #f8e2a1 "| '''{{item link|Mercenary Park}}'''
| |
| − | |-
| |
| − | | align="center" style="background: #FFD700 " | {{Icon item|Monstrous Memento|75px}}
| |
| − | | style="background: #f8e2a1 "| '''{{item link|Monstrous Memento}}'''
| |
| − | |-
| |
| − | | align="center" style="background: #FFD700 " | {{Icon item|Never Forget Hat|75px}}
| |
| − | | style="background: #f8e2a1 "| '''{{item link|Never Forget Hat}}'''
| |
| − | |-
| |
| − | | align="center" style="background: #4B69FF " | {{Icon item|Pithy Professional|75px}}
| |
| − | | style="background: #f8e2a1 "| '''{{item link|Pithy Professional}}'''
| |
| − | |-
| |
| − | | align="center" style="background: #8847FF " | {{Icon item|Pocket Saxton|75px}}
| |
| − | | style="background: #f8e2a1 "| '''{{item link|Pocket Saxton}}'''
| |
| − | |-
| |
| − | | align="center" style="background: #EB4B4B " | {{Icon item|Quizzical Quetzal|75px}}
| |
| − | | style="background: #f8e2a1 "| '''{{item link|Quizzical Quetzal}}'''
| |
| − | |-
| |
| − | | align="center" style="background: #FFD700 " | {{Icon item|Saxton|75px}}
| |
| − | | style="background: #f8e2a1 "| '''{{item link|Saxton}}'''
| |
| − | |-
| |
| − | | align="center" style="background: #EB4B4B " | {{Icon item|Slithering Scarf|75px}}
| |
| − | | style="background: #f8e2a1 "| '''{{item link|Slithering Scarf}}'''
| |
| − | |-
| |
| − | | align="center" style="background: #FFD700 " | {{Icon item|Yeti Park Hardhat|75px}}
| |
| − | | style="background: #f8e2a1 "| '''{{item link|Yeti Park Hardhat}}'''
| |
| − | |}
| |
| − | | |
| − | ==== 套裝 ====
| |
| − | {| class="wikitable collapsible" cellpadding="2" style="text-align:center;"
| |
| − | | style="background: #b5b85c; width:90px;" rowspan="3" | {{icon class|Heavy}}<br/>'''[[Heavy{{if lang}}|<span style="color: #000;">重裝兵</span>]]'''
| |
| − | | style="background: #f8e2a1;" rowspan="3" | '''[[Monster Mash-Up Pack/zh-hant|怪獸合併套装]]'''<br/>
| |
| − | | align="center" style="background: #f8d28c;" | {{icon item|Kathman-Hairdo|80px}}
| |
| − | | style="background: #f8e2a1;" | '''{{item link|Kathman-Hairdo}}'''
| |
| − | |-
| |
| − | | align="center" style="background: #f8d28c;" | {{item icon|Himalayan Hair Shirt|80px}}
| |
| − | | style="background: #f8e2a1;" | '''{{item link|Himalayan Hair Shirt}}'''
| |
| − | |-
| |
| − | | align="center" style="background: #f8d28c;" | {{item icon|Abominable Snow Pants|80px}}
| |
| − | | style="background: #f8e2a1;" | '''{{item link|Abominable Snow Pants}}'''
| |
| − | |-
| |
| − | |}
| |
| − | | |
| − | ==== 工具物品 ====
| |
| − | {{main|Tools/zh-hant|l1=工具物品}}
| |
| − | {| class="wikitable collapsible" cellpadding="3" style="text-align:center;"
| |
| − | | align="center" style="background: #f8d28c " | {{Icon item|Abominable Cosmetic Case|75px}}
| |
| − | | style="background: #f8e2a1 "| '''{{item link|Abominable Cosmetic Case}}'''
| |
| − | |-
| |
| − | | align="center" style="background: #f8d28c " | {{Icon item|Unleash the Beast Cosmetic Case|75px}}
| |
| − | | style="background: #f8e2a1 "| '''{{item link|Unleash the Beast Cosmetic Case}}'''
| |
| − | |-
| |
| − | | align="center" style="background: #f8d28c " | {{Icon item|Jungle Inferno Campaign Pass|75px}}
| |
| − | | style="background: #f8e2a1 "| '''{{item link|Jungle Inferno Campaign Pass}}'''
| |
| − | |-
| |
| − | | align="center" style="background: #f8d28c " | {{Icon item|Jungle Inferno ConTracker|75px}}
| |
| − | | style="background: #f8e2a1 "| '''{{item link|Jungle Inferno ConTracker}}'''
| |
| − | |-
| |
| − | | align="center" style="background: #f8d28c " | {{Icon item|Infernal Reward War Paint Case|75px}}
| |
| − | | style="background: #f8e2a1 "| '''{{item link|Infernal Reward War Paint Case}}'''
| |
| − | |-
| |
| − | | align="center" style="background: #f8d28c " | {{Icon item|Jungle Jackpot War Paint Case|75px}}
| |
| − | | style="background: #f8e2a1 "| '''{{item link|Jungle Jackpot War Paint Case}}'''
| |
| − | |}
| |
| − | === 第三天 ===
| |
| − | 第三天則是發布了 4 把火焰兵的新武器,其中一把武器([[Thermal Thruster/zh-hant|熱能推進器器]])的殺敵嘲諷,重裝兵的新食物,以及對火焰噴射器的調整。
| |
| − | | |
| − | ==== 武器列表 ====
| |
| − | {| class="wikitable collapsible" cellpadding=2 style="text-align:center;"
| |
| − | |-
| |
| − | | style="background: #b5b85c; width:90px;" rowspan="4" | {{icon class|Pyro}}<br/>'''[[Pyro{{if lang}}|<span style="color: #000;">火焰兵</span>]]'''
| |
| − | | align="center" style="background: #f8d28c " | {{Icon item|Dragon's Fury|75px}}
| |
| − | | style="background: #f8e2a1 "| '''{{item link|Dragon's Fury}}'''
| |
| − | |-
| |
| − | | align="center" style="background: #f8d28c "| {{Icon item|Gas Passer|75px}}
| |
| − | | style="background: #f8e2a1 "| '''{{item link|Gas Passer}}'''
| |
| − | |-
| |
| − | | align="center" style="background: #f8d28c " | {{Icon item|Hot Hand|75px}}
| |
| − | | style="background: #f8e2a1 "| '''{{item link|Hot Hand}}'''
| |
| − | |-
| |
| − | | align="center" style="background: #f8d28c " | {{Icon item|Thermal Thruster|75px}}
| |
| − | | style="background: #f8e2a1 "| '''{{item link|Thermal Thruster}}'''
| |
| − | |-
| |
| − | | style="background: #b5b85c; width:90px;" rowspan="1" | {{icon class|Heavy}}<br/>'''[[Heavy{{if lang}}|<span style="color: #000;">重裝兵</span>]]'''
| |
| − | | align="center" style="background: #f8d28c " | {{Icon item|Second Banana|75px}}
| |
| − | | style="background: #f8e2a1 "| '''{{item link|Second Banana}}'''
| |
| − | | |
| − | |}
| |
| − | | |
| − | ==== 平衡性調整 ====
| |
| − | {| class="wikitable"
| |
| − | ! style="background: #748c41;" class="header" | <span style="color: white;"> 職業
| |
| − | ! style="background: #748c41;" class="header" | <span style="color: white;"> 調整
| |
| − | |-
| |
| − | ! style="background: #b5b85c;" rowspan="6"| {{icon class|Pyro}}<br/>[[Pyro{{if lang}}|{{class name|pyro}}]]
| |
| − | | style="background: #f8d28c " | {{c|+|改動:}} 壓縮氣爆的範圍將會形成一個圓錐形。
| |
| − | |-
| |
| − | | style="background: #f8d28c " | {{c|+|改動:}} 壓縮氣爆的擊退效果增加。
| |
| − | |-
| |
| − | | style="background: #f8d28c " | {{c|-|改動:}} 壓縮氣爆現在只能暫時降低敵人在空中機動性,而不是使他完全失控。
| |
| − | |-
| |
| − | | style="background: #f8d28c " | {{c|=|改動:}} 火焰兵和其目標的行動也將成為影響壓縮氣爆效果的因素。
| |
| − | |-
| |
| − | | style="background: #f8d28c " | {{c|=|改動:}} 向上的壓縮氣爆效果將會取決其角度,而不是原原來固定向上的方向。
| |
| − | |-
| |
| − | | style="background: #f8d28c " | {{c|=|改動:}} 後續餘火燃燒時間將由火焰噴射器持續對敵人的傷害時間做調整。
| |
| − | |-
| |
| − | |}
| |
| − | | |
| − | ==== 武器調整 ====
| |
| − | {| class="wikitable"
| |
| − | ! style="background: #748c41;" class="header" | <span style="color: white;"> 職業
| |
| − | ! style="background: #748c41;" class="header" | <span style="color: white;"> 武器
| |
| − | ! style="background: #748c41;" class="header" | <span style="color: white;"> 調整
| |
| − | |-
| |
| − | ! style="background: #b5b85c;" rowspan=7| {{icon class|Pyro}}<br/>[[Pyro{{if lang}}|{{class name|pyro}}]]
| |
| − | ! style="background: #f8d28c;" rowspan=2 | {{Icon item|Flame Thrower|icon-size=75px}} <br /> {{item link|Flame Thrower}}及其變化
| |
| − | | style="background: #f8e2a1;" | {{c|=|改動:}} 更好的視覺效果,實際效果不會和視角看到的錯位。
| |
| − | |-
| |
| − | | style="background: #f8e2a1;" | {{c|=|改動:}} 新的粒子效果。
| |
| | |} | | |} |
| | | | |