Community Rottenburg strategy
| “Sun Tzu's got nothing on us!” This article is a Community strategy stub. As such, it is not complete. You can help the Team Fortress Wiki Community Strategy Project by expanding it. Notes: Expand the "General strategy" section to cover map locations in more detail. Potentially look at the class-specific strategies as well. |
| Rottenburg | |
|---|---|

| |
| Basic Information | |
| Map type: | Mann vs. Machine |
| File name: | mvm_rottenburg
|
| Released: | November 21, 2013 Patch (Two Cities Update) |
| Developer(s): | Valve |
| Map Info | |
| Environment: | German Town |
| Setting: | Daylight, sunny |
| Hazards: | Pitfall |
| Pyrovision Support: | No |
| Map Items | |
| Map Photos | |
| Map Overview | |
This article is about Community Rottenburg strategy.
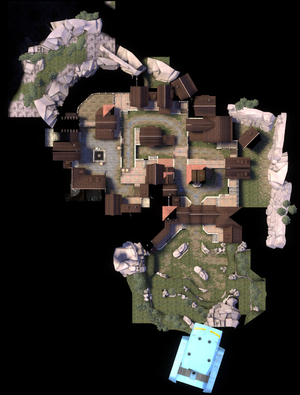
Note: It is recommended to read the main Rottenburg article first to become familiar with the names of key map locations used in this article.
General strategy
- Whenever a Tank appears, only have 1 or 2 players follow the Tank into the town if possible. Pyro, Soldier, Engineer, and Scout are all good at killing Tanks. The rest of the team should hold the front and keep the bomb carrier from buffing.
- Don't allow the bomb to get into the town. The further in the bomb gets, the further in Engineer bots will spawn.
- When a Tank is demolished, make sure all of the money is picked up. Check all nearby areas at different elevations.
- Avoid popping Über Medics before the Demoman or other appropriate class can get rid of them.
- Note the bomb carrier path before the wave starts. It will help you plan your secondary defense if the bomb makes it into the town.
- Max out Crit Resistance early on.
Class-specific strategy
 Scout
Scout
- Use Mad Milk with the slowdown upgrade to slow Giant Scouts, especially if they are running with the bomb.
- Due to the map's large, open spaces, the Soda Popper can greatly help in credit collection and general agility.
- Pay attention to teammates who like to kill robots in weird places and not collect the money.
- Use your Fan O'War or an upgraded Sandman to mark Giants for death. Make sure to mark Giant Medics before their pockets.
- While collecting money and not using your support weapons, kill the bomb carrier to keep him from buffing.
- If necessary for waves with Super Scouts, you can use Ammo Canteens to instantly recharge your Mad Milk.
- After upgrading Movement Speed, Jump Height, and Crit Resistance, if you do not need other Resistances to survive, upgrade your primary weapon as much as you can to help with destroying Tanks. Scout is one of the best anti-Tank classes when fully upgraded.
 Soldier
- Upgrade one point of Rocket Specialist, and use direct hits to stagger Super Scouts and other Giants.
- Follow Tanks when they spawn. Equip the Buff Banner and deploy it as much as possible against them.
- Upgrade Reload Speed and Firing Speed before Damage, unless using the Beggar's Bazooka, in which case Firing Speed should not be upgraded until very late.
- Firing Speed is less preferred when using the Airstrike with the B.A.S.E. Jumper as after you rocket jump, the firing speed will be highly increased and can be done twice to three times with max Reload Speed.
- Soldier's mobility and weaponry make him good at dealing with Engineer Robots, which can be quite a nuisance on this map if left unchecked.
- Blasting away with the Airstrike and B.A.S.E. Jumper at a Giant Soldier's marked-for-death pocket Medic is very devastating with enough damage and high reload speed.
 Pyro
Pyro
- Burning without paying attention to airblast with Health on Kill and Resistances is the most effective strategy on this map. If a group of robots is too strong for you to tackle head-on, let them target your teammates first, then attack from behind.
- The Backburner is Pyro's best weapon for killing Giants, but the Phlogistinator is the best Tank killer because of the frequent Crits it gives that can be activated.
- Most teams favor a Medic and Soldier over a Pyro for this map, but a very popular strategy is to abuse the Refund option and have multiple Phlogistinator Pyros for the 3-Tank last wave of Hamlet Hostility.
- When a Tank spawns, follow it. Pyro is the best Tank buster regardless of weapon choice (although the Degreaser is almost never recommended); just make sure to keep your flamethrower stocked up on ammo.
- Be aware that being in front of the tank when the tank is turning to the roadblock will crush you, causing an unavoidable trip to spawn.
- There are three ways to reset the bomb in Rottenburg. Use an upgraded Scorch Shot or your airblast (Scorch Shot recommended) to put these ways to good use.
- If the bomb follows the lower route, it can be hard reset in the bottomless pit in the middle of the map.
- If the bomb follows the upper route, it can be soft reset by airblasting the bomb carrier off of the bridge in the middle of the map.
- The bomb can be hard reset regardless of the route by airblasting it off the cliff found near the hatch (the area where the tank exits from). Be sure not to let the bomb carrier on the hatch, though.
- Be sure to help out teammates if they are having trouble with Spies.
 Demoman
- The Scottish Resistance has a higher damage output and is cheaper to upgrade than the stock Sticky Launcher, though the extra arming time takes getting used to.
- Focus Engineers. When an Engineer is building a Sentry Gun, lay a sticky trap to kill the Sentry before it can fire and the Engineer before they can run off and build another.
- Against active Sentry Guns, take advantage of your ability to kill targets not in your direct line of sight.
- Upgrading your Grenade Launcher can kill Tanks more effectively, at the expense of requiring greater skill against robots.
- Stickies are very effective against Giant Medics. Lay a big sticky trap when a Giant Medic is getting low on health to kill it before it can be deployed.
- Damage-upgraded crit sticky traps can kill Giant Medics in one blow, even if their Megaheal is deployed.
 Heavy
Heavy
- Kill Giant Medics by shooting them point-blank. Do not use Knockback Rage against them; it only directly decreases your damage output, indirectly decreases your team's damage output due to damage falloff, and makes it harder for your team's Demoman or Sniper to predict the Giant Medic's movements.
- Remember, Heavy's primaries have their damage harshly reduced against Tanks. Be efficient and use your firepower to keep your teammates alive.
- Although the Brass Beast does more damage compared to stock, the stock Minigun allows for more mobility, allowing you to move closer to your targets and take advantage of damage ramp-up.
- Hover near your team's Dispenser to stay alive and keep your ammo full.
- When a Super Scout spawns, bodyblock it, however, don't let it kill you with its melee weapon.
- Against Force-A-Nature Super Scouts, there is not much you can do to stop them without weaponry. Block them for the short period you can.
 Engineer
- The best spot for a Sentry Gun is just to the left of the right corner of the tunnel entrance. This way, it covers the right-side choke path when not Wrangled, and has a clear shot of the middle of the field while Wrangled. Best of all, it blocks Super Scouts.
- On waves without Super Scouts or Über Medics, the Sentry can go behind the wooden barricade, or behind the gap between the two leftmost rocks.
- The Dispenser usually goes behind the rock formation to the left of the barricade, though it may be moved behind the rock on the right as the robots begin to funnel through that side.
- Some popular Teleporter Exit spots include the tower in the middle of the map and the forward Upgrade Station.
- Make sure your Teleporter Exit isn't facing a wall, check where the arrow is pointing to know what direction you and your teammates will be facing when teleported.
- If you get pushed back, Sentry placement becomes more complicated. Hold the tunnel if possible. If you lose it, it is sometimes best to just set it up at spawn.
- The Wrangler is important for killing Giants, Tanks, and Snipers, and prevents your Sentry from popping Über Medics.
 Medic
Medic
- Inexperienced players struggle to stay alive without a Medic. Use your Reanimator and Projectile Shield to help them.
- When healing, focus on the Heavy and Soldier, especially when using the Kritzkrieg's ÜberCharge, but don't neglect the rest of your team.
- Use the Ubersaw on robots and Sentry Busters when safe to do so, especially Sir Nukesalot.
- Revived players will respawn where they died. Make sure you're in a safe spot before you reanimate, or you may be in danger and die yourself.
 Sniper
- Shoot slow robots in the head while upgraded with Explosive Headshots. Giants, Medics, and the bomb carrier are your first priority.
- Medics are extremely high priority-wise.
 Spy
Spy
- Spy is very powerful on the last few waves of Bavarian Botbash. Consider having a Spy instead of a Scout for all or part of that mission, especially if your team has trouble killing Giant Medics.
- Max out Armor Penetration and Swing Speed to make quick work of Giant Medics, as they don't turn around to look at you.
- Focus on stabbing Giants, Medics, Snipers, and the bomb carrier. Your Sapper can be used to sap and chainstab groups of robots when upgraded.
- One point of Sapper upgrade is all you need at first. Swing Speed and Armor Penetration are higher priorities.
- Spy can easily assassinate the bomb carrier once it's buffed by taking advantage of his disguises to approach safely, unlike other classes.
- The Diamondback stores a Crit for each backstab kill you get. Consider using it to help out a bit with Tanks.
- Without any crits, if there is nothing left to attack but the Tank, just stab it repeatedly. Your increased Swing Speed will give you a higher DPS than shooting it with an unupgraded Revolver.

