The Demoman (often said as "demo") is a core member of the standard competitive lineup, valued for his damage output and area denial capabilities.
Information
Health
 Demoman Demoman
|
175
|
260
|
220
|
| With weapon slot boots equipped
|
200
|
300
|
251
|
| With a head-taking melee weapon equipped with 0 heads
|
150
|
225
|
189
|
| With a head-taking melee weapon equipped with 1 head
|
165
|
245
|
208
|
| With a head-taking melee weapon equipped with 2 heads
|
180
|
270
|
226
|
| With a head-taking melee weapon equipped with 3 heads
|
195
|
290
|
245
|
| With a head-taking melee weapon with 4 or more heads
|
210
|
315
|
264
|
| With weapon slot boots and a head-taking melee weapon equipped with 0 heads
|
175
|
260
|
220
|
| With weapon slot boots and a head-taking melee weapon equipped with 1 head
|
190
|
285
|
239
|
| With weapon slot boots and a head-taking melee weapon equipped with 2 heads
|
205
|
305
|
258
|
| With weapon slot boots and a head-taking melee weapon equipped with 3 heads
|
220
|
330
|
276
|
| With weapon slot boots and a head-taking melee weapon equipped with 4 or more heads
|
235
|
350
|
295
|
Speed
| Demoman
|
|
|
|
|
| With weapon slot boots and a shield equipped
|
|
|
|
|
| With a head-taking melee weapon equipped with 0 heads
|
|
|
|
|
| With a head-taking melee weapon equipped with 1 head
|
|
|
|
|
| With a head-taking melee weapon equipped with 2 heads
|
|
|
|
|
| With a head-taking melee weapon equipped with 3 heads
|
|
|
|
|
| With a head-taking melee weapon equipped with 4 or more heads
|
|
|
|
|
| With weapon slot boots, a shield, and a head-taking melee weapon equipped with 0 heads
|
|
|
|
|
| With weapon slot boots, a shield, and a head-taking melee weapon equipped with 1 head
|
|
|
|
|
| With weapon slot boots, a shield, and a head-taking melee weapon equipped with 2 heads
|
|
|
|
|
| With weapon slot boots, a shield, and a head-taking melee weapon equipped with 3 heads
|
|
|
|
|
| With weapon slot boots, a shield, and a head-taking melee weapon equipped with 4 or more heads
|
|
|
|
|
| Wielding the Scotsman's Skullcutter
|
|
|
|
|
| Wielding the Scotsman's Skullcutter with weapon slot boots and a shield equipped
|
|
|
|
|
| Charging with a shield
|
|
N/A
|
N/A
|
|
| Charging with a shield and wielding the Scotsman's Skullcutter
|
|
N/A
|
N/A
|
|
| Charging with a shield and wielding the Scotsman's Skullcutter with weapon slot boots equipped
|
|
N/A
|
N/A
|
|
Weapons
The Demoman's main strength is from his stickybomb launchers. The ability to set traps, deal strong damage at range, and move extremely quickly around the map make the Demoman the most versatile and aggressive class. His grenade lauchers allow him to deal damage while he has a trap laid down, and also can contribute very heavily to spam. The Demoman has a few interesting melee weapons, which can boost his overall speed and health, or simply be a good source of non-explosive damage.
Secondary
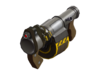
Stock
Stickybomb Launcher
|

|
8
|
24
|
Base: 103—138
Crit: 353
|
 Primary fire launches the bombs, secondary fire (with any weapon deployed) makes all armed stickybombs explode at once. Holding primary fire launches the bomb farther. Primary fire launches the bombs, secondary fire (with any weapon deployed) makes all armed stickybombs explode at once. Holding primary fire launches the bomb farther.
Stickybombs stick to most surfaces and remain ready until the player either detonates them or dies.
Can lay up to 8 stickybombs at once.
Stickybombs may be attacked and destroyed with any bullet firing weapon, direct strike from a melee weapon, an enemy Scottish Resistance sticky, or an enemy Quickiebomb Launcher sticky detonating near it.
|
Unlock
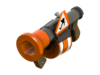
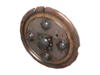
Chargin' Targe
|

|
N/A
|
N/A
|
Full charge:
- 50 + 5 per head (up to 5 heads)
|
Secondary fire (with any weapon deployed) makes the player charge forward at high speed in a straight line (turning is limited to very slight angles to the left or right). During the charge, the next melee swing is a guaranteed mini-crit at 25% charge or a critical hit at 60% charge. Any enemy hit by only the shield charge takes up to 50 damage (scales by distance), with additional damage based on the number of heads collected with the Eyelander, Horseless Headless Horsemann's Headtaker or Nessie's Nine Iron.
 Charging removes debuffs. Charging removes debuffs.
+50% resistance to fire damage.
+30% resistance to explosive damage.
Grants its abilities passively, does not need to be selected.
Does not grant resistance to self-inflicted damage.
|
Unlock
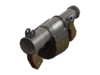
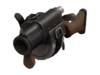
Scottish Resistance
|

|
8
|
36
|
Base: 103—138
Crit: 353
|
Primary fire launches the bombs, secondary fire (with any weapon deployed) makes all armed stickybombs under the crosshair, and directly under your feet, explode at once. Holding primary fire launches the bomb farther.
Stickybombs stick to most surfaces and remain ready until the player either detonates them or dies.
Stickies are visible through walls and any obstacle, and can be selectively detonated by aiming at them and pressing the secondary fire button.
Stickybombs may be attacked and destroyed with any bullet firing weapon, direct strike from a melee weapon, an enemy Scottish Resistance sticky, or an enemy Quickiebomb Launcher sticky detonating near it.
Can destroy enemy stickies.
+6 more stickybombs out at once (max is 14).
+50% more ammo carried (max is 36).
+25% faster firing speed.
 Stickybombs have 0.8 second longer priming time. Stickybombs have 0.8 second longer priming time.
|
Craft
Sticky Jumper
|
N/A
|
8
|
72
|
Base: 0
Crit: 0
|
Primary fire launches the bombs, secondary fire (with any weapon deployed) makes all armed stickybombs explode at once. Holding primary fire launches the bomb farther.
Stickybombs stick to most surfaces and remain ready until the player either detonates them or dies.
Stickybombs may be attacked and destroyed with any bullet firing weapon, direct strike from a melee weapon, or an enemy Scottish Resistance sticky, or an enemy Quickiebomb Launcher sticky detonating near it.
+200% max secondary ammo.(max is 72)
No self inflicted blast damage taken.
-100% damage penalty.
Unable to carry the intelligence and the PASS Time JACK.
-6 stickybombs out.(max is 2)
No random critical hits (purely cosmetic, as they don't inflict any damage either).
|
Craft
Splendid Screen
|

|
N/A
|
N/A
|
Full charge:
- 85 + 8.5 per head (up to 5 heads)
|
Secondary fire (with any weapon deployed) makes the player charge forward at high speed in a straight line (turning is limited to very slight angles to the left or right). During the charge, the next melee swing is a guaranteed mini-crit at 25% charge or a critical hit at 60% charge. Any enemy hit by only the shield charge takes up to 85 damage (scales by distance), with additional damage based on the number of heads collected with the Eyelander, Horseless Headless Horsemann's Headtaker or Nessie's Nine Iron.
Charging removes debuffs.
+20% resistance to fire damage.
+20% resistance to explosive damage.
+70% more charge impact damage.
+50% charge recharge rate.
Grants its abilities passively, does not need to be selected.
Does not grant resistance to self-inflicted damage.
|
Craft
Tide Turner
|

|
N/A
|
N/A
|
Full charge:
- 50 + 5 per head (up to 5 heads)
|
Secondary fire (with any weapon deployed) makes the player charge forward at high speed in a straight line. During the charge, the next melee swing is a guaranteed mini-crit at 25% charge. Any enemy hit by only the shield charge takes up to 50 damage (scales by distance), with additional damage based on the number of heads collected with the Eyelander, Horseless Headless Horsemann's Headtaker or Nessie's Nine Iron.
Charging removes debuffs.
+15% resistance to fire damage.
+15% resistance to explosive damage.
Full turning control while charging.
Melee kills refill 75% of charge meter.
Taking damage while shield charging reduces charge time.
Grants its abilities passively, does not need to be selected.
Does not grant resistance to self-inflicted damage.
|
Craft
Quickiebomb Launcher
|

|
4
|
24
|
Base: 88-117/109-147
Crit: 300/375
|
Primary fire launches the bombs, secondary fire (with any weapon deployed) makes all armed stickybombs explode at once. Holding primary fire launches the bomb farther.
Stickybombs stick to most surfaces and remain ready until the player either detonates them or dies.
Stickybombs may be attacked and destroyed with any bullet firing weapon, direct strike from a melee weapon, or an enemy Scottish Resistance sticky, or an enemy Quickiebomb Launcher sticky detonating near it.
Can lay up to 8 stickybombs at a time.
Able to destroy enemy stickybombs.
-0.2 sec faster bomb arm time.
Max charge time decreased by 70%.
Up to +35% damage based on charge.
-15% damage penalty.
-50% clip size.
|
Usage
The Demoman is one of two classes (the other being Medic) limited to 1 per team in all major leagues, largely because of his ability to spam and deny chokes. Because of how useful he is in these areas, the Demoman is played the entire round on both teams in almost all games regardless of strategy or team lineup (again, similarly to Medic).
Common Tactics
There are two great benefits a Demoman can provide to his team: damage and area denial. Both of the Demoman's standard weapons, the Grenade Launcher and the Sticky Bomb Launcher, have very high damage outputs. The Sticky Bomb Launcher in particular possesses the ability to inflict massive amounts of damage to enemies reliably and efficiently. In addition, the Demoman's Sticky Bomb Launcher is capable of completely stopping an enemy advance from one direction, forcing them to take another route, waste time destroying the stickies, or risk losing a key player. The Grenade Launcher is useful for softening up a position or dealing spam damage, especially to opponents around corners.
The Demoman is a very effective mid-long range damage dealer. However, a Demoman is much less capable at defending from close threats, with his only option is to usually attempt to land direct hits with the Grenade Launcher, attempt to set sticky bombs while retreating and possibly taking self-damage, or attempting a melee hit. Therefore, he should be wary of opposing team members getting too close to him, especially Scouts. Because a team's Demoman is perhaps the best class for area denial, a team should try to keep their Demoman alive as much as possible. The Demoman should try and stick near the main bulk of the team, including the combo, so that they can provide protection from enemy Scouts.
A general strategy for Demomen on the defense is to leave sticky traps. By placing sticky bombs at choke points but out of sight from the enemy team, the Demoman can take out unaware members of the opposite team. Often, a skilled Demomen will wait until more valuable members of the opposing team, such as Medics, pass through the choke point before detonating the trap for maximum damage.
The vast majority of competitive Demomen stick with the standard Grenade Launcher and Sticky Bomb Launcher, though a few prefer the Loch-n-Load and some Demomen switch to the Scottish Resistance for specific points on defense. The use of melee weapons is a bit more varied, but the Pain Train is somewhat common to see on attacking Demomen on control point style maps due to the increase capture rate. A demoknight loadout focused on melee attacks is very rare in the competitive world, due to the loss of the damage-dealing potential at long range.
5-CP Push Strategies
A skilled Demoman can be the first player to arrive at the mid point of some 5-CP maps. His Sticky jumping technique allows him to travel more quickly than even the Scouts on these maps, provided that he receives enough healing from his team's Medic. If a team's Demoman is fast enough, he should use the extra time to seal off the enemy team's path with stickies, forcing them to waste valuable time and giving his own team a significant advantage in the fight for the center point. A Demoman arriving quickly to the middle point should beware of Scouts, as they will arrive at the mid point around the same time that he does, before the team's Soldiers can help him fend them off.
During the mid fight, a Demoman can contribute greatly to the team's ability to spam projectiles at the enemy. Grenades from the Demoman's Grenade Launcher will deal significant damage and present a threat to the enemy team even if the Demoman does not land a direct hit, and a few sticky bombs will force the enemy to either retreat or suffer massive damage. If the opportunity arises, aggressive Demomen have the option of sticky-jumping over the enemy, planting sticky bombs along the way and using his weapons to deal massive damage to the enemy team, usually aiming to kill the enemy Medic. While often a risky tactic that places the Demoman in the midst of the enemy team, in the right situation, this technique can cripple an enemy team due to the Demoman's high damage output.
Once the mid fight is over, if a team has lost, a Demoman will usually stick with his team and try to hold a chokepoint. This option allows the team's Medic to build his ÜberCharge, and buy time to allow key players who were killed during the mid fight to respawn. The Demoman's primary weapons, especially the Sticky bomb launcher, are ideal for holding chokepoints, allowing him to keep an enemy team occupied with spam and block off a route.
King of the Hill
King of the Hill maps are much smaller than 5 CP maps, so Demomen will most likely arrive at the mid point with the rest of their teams. Most of the usual 5 CP map tactics still apply to KoTH, but due to the small size of many KoTH maps and the longer mid fights, Demoman should always join the battle buffed by Medic.
Attack-Defend Strategies
Due to the minute of setup time that exists before a round on an Attack/defend map, the defending Demoman can plant sticky bombs and score a pick or two on a careless team right when the round starts, which can easily add a minute to a team's Stopwatch time if he kills the Medic. The defending Demoman will find it much easier to set up deadly sticky bomb traps, as the defending team controls the entire map at the start of each round. The offensive Demoman is a key player, as defending teams on Attack/defend maps often run static or slow-moving defenders, such as Sentry Guns and Heavies. These defenders are very vulnerable to spam, as they are unable to avoid explosives sent at them by a Demoman. Demomen with sufficient support from their teammates are also quite adept at clearing Control points of enemies.
Demomen weaknesses
The demoman plays for a mid to long range fight, as his primary and secondary will hurt him at close range. Scouts, especially, pose a large problem as their high speed and double jump allow them to get very close to a demoman while avoiding his non-hitscan weapons. Demoman are also less favored when they have the low ground, as their splash damage and curving projectiles are much harder to hit against a higher enemy.
Anti-Demoman classes
Although it mostly depends on skill, some classes are designed to have an advantage over others, many classes have an advantage over a Demoman, as well as others having a disadvantage against him. Lets look at the ones who have an advantage over a Demoman:
The Scout
In terms of 6v6, the Scout is a Demoman's biggest threat, especially on mid-fights due to Scouts being able to arrive before your teams Soldiers can deal with them. Making Demoman also heavily reliant on his teams Scouts to defend him and attack the enemy Demoman while they try to do the same.
The Scout is very fast and mobile and his ability to excel at dodging allows him to counter act his low health pool. Due to the high speeds of a Scout this leaves the usual 'explosive load-out Demoman' with a significant disadvantage, this is because of the Demoman's weapons as they have long reload intervals, arcs making it harder to aim and the long set-up times such as the delay in the sticky-bombs and the time for a grenade to explode. Overall making the perfect prey for a Scout. However, Scouts are suspectable to hidden sticky traps.
The Pyro
The Pyro is an 'ambush' based class, meaning he normally would catch his enemies off-guard, Demoman, unlike some other classes, is at a disadvantage if he isn't prepared with a sticky bomb trap to kill close-quarter enemies like Scouts. Additionally, the Pyro has the 'airblast' ability allowing him to push away projectiles including sticky bombs and grenade pipes meaning that a skilled Pyro can render a Demoman useless, making Pyro extremely dangerous to a Demoman and his Medic buddy with a kritzkrieg charge as both can be instantly killed by the reflected "critically charged pipes". A Pyro can also airblast called-out sticky bomb traps which leaves the Demoman vulnerable to attacks off-guard, you can also kill a Demoman with his own sticky bomb trap.
The Soldier
The Soldier is also a great ambushing class, his ability to rocket jump can allow him to "air-ambush" enemies and also allows him to get to spots not even Scouts can get too. His projectiles are also much easier to aim than a Demoman's as they don't arc and explode on contact with objects too, letting him deal more reliable splash damage. The Soldier also has a 25+ health advantage but moves slightly slower than a Demoman. Overall, if planned correctly a Soldier can easily kill a alone Demoman. However, due to a Soldiers slow speed, it leaves him more susceptible to spam than it would be to a Scout for instance.
See also
