Panic
 | Esta página está no processo de tradução (em inglês) para português do Brasil. Fluente em inglês e português? Ajude-nos a terminar a tradução deixando uma mensagem na página de discussão ou entrando em contato com quem já contribuiu para a tradução (disponível no histórico da página). |
| Panic | |
|---|---|

| |
| Informações básicas | |
| Desenvolvedor(es): | {{{map-developer}}} |
| Informações do mapa | |
| Ambiente: | Industrial |
| Cenário: | Pôr-do-sol |
| Perigos: | Queda em Abismo (apenas no terceiro estágio) |
Panic (Pânico) é um mapa de Corrida de Payload criado para o Concurso de A/D CTF e Corrida de Payload TF2Maps.net. Venceu em segundo lugar na competição.
Panic se encontra em uma pequena área industrial, cercada por uma floresta. Diferentemente de outros mapas de Corrida de Payload e de Payload, é possível que um jogador seja morto pelo seu próprio carrinho. No primeiro estágio, o carrinho cai em uma rampa e rola até o seu ponto inicial antes do início da rodada. Se um jogador incauto cruzar o seu caminho, ele será atropelado e morto, de forma similar aos trens de Well.
O Estágio 3 também é único, já que todo o trilho fica em uma rampa com um buraco sem fundo enquanto o carrinho sempre irá retroceder quando ninguém estiver o empurrando. Isso força às equipes ficarem sempre próximas ao seu carrinho para seguirem em frente. Caso contrário, o carrinho caíra para fora dos trilhos e a equipe perderá a rodada automaticamente.
Índice
Meta
Ambas equipes devem empurrar simultaneamente seus carrinhos pelo território inimigo para alcançarem seus respectivos pontos de captura, enquanto previnem que o adversário faça o mesmo.
Localizações
Estágio 1

O Estágio 1 de Panic começa com os carrinhos de ambas equipes caindo sobre uma rampa e rolando em direção aos seus pontos iniciais antes do início da partida em frente às salas de renascimento RED ou BLU. Diretamente após o ponto inicial, os caminhos fazem uma leve curva e sobem a colina para a área de interseção, uma pequena planície no meio do mapa. No meio do mapa também encontramos placas elevadas de metal protegendo a porção central (para prevenir que Sentry Guns sejam erguidas na área de renascimento mirando para o ponto central, mas essa medida foi tomada antes da introdução do Wrangler. Também existem pequenas partes em que Sentry Guns podem ser instaladas.
Os trilhos viram para a esquerda/direita para RED/BLU, e retornam para um prédio. De lá, eles fazem uma lenta curva de 180 graus em direção às salas de renascimento do adversário e uma rampa de descida. Os pontos finais para ambos os carrinhos são em frente às salas de renascimento do inimigo, perto da colina de onde o carrinho adversário rolou no início do mapa.
Estágio 2

Stage 2 of Panic starts with the cart right outside each team's spawn. As the round begins, the walls in front of each spawn and the cart explode, sending large chinks of concrete flying into the air. The cart path makes a quick turn in one direction, then in the opposite direction after a short distance. From here, the cart paths cross in the middle of the map, then turn slightly as they wind to the other side.
Following the crossover, each cart path makes a broad, 180-degree turn, then travels up a steep incline near the opposing team's starting point. At the top of the incline is a quick series of turns right before the stage's capture point in an open area directly outside the other team's spawn. There are also several elevated areas and overhangs, accessible through paths from both sides of the map, where players can attack or defend from.
Stage 3

The final stage of Panic is a pure uphill push: the entire track is an inclined ramp with a large pit (with broken bridges) on one end and the final capture point on the other. Near the capture point is a building with a large amplifier attached to a mechanical arm. A small building sits between the two points, offering a path between them. Under the two cart paths are open spaces players can fall to if they are knocked off the cart by the opposing team. Paths lead back up to the main cart path area from below. Additionally, a bridge extends over both cart paths about two-thirds of the way from the bottom, giving players a second crossover point, as well as an area to ambush from above.
Panic is unique in that each cart will constantly roll backward toward the pit unless it is being pushed by its respective team. This mechanic forces teams to stay with their cart in order to keep it moving. If a cart reaches the pit end of the cart path, it will fall off into the cart and explode, ending the round with a loss for the offending team. Once the round ends — be it by successful capture or failure to keep the cart out of the pit — the amplifier at the top of the map will activate, sending out a low, repeating bass thump that causes the player's screen to shake.
Strategy
Stage 1
- Due to the early crossover of RED's and BLU's carts, Heavies are vital for a successful push through the middle of the stage.
- Sentry Guns can be placed outside spawn to provide both cover for respawning teammates and defense against the enemy team's push.
- Spies are less effective on the first stage because of its compact design. If playing Spy on Stage 1, focus on enemy Heavies, Medics and Engineers, as they pose the greatest defensive threats.
Stage 2
- The hill before each finishing point offers an optimum point for Engineers to place their Sentry Guns, as the cart will roll back down the hill if successfully defended.
- Similarly, Pyros using the Backburner can launch surprise ambushes here for the same effect.
- Spies are effective on one part of the map in particular: in front of the enemy's spawn, sapping Sentry Guns and causing general havoc to allow for friendly pushes.
Stage 3
- Because the cart will roll back if no enemies are pushing it, the Pyro's compression blast is incredibly useful on this map. Teamed up with a Medic, Pyros can easily push multiple enemies off the cart and onto areas below in order to force the enemy's cart to roll back.
- The covered bridge two-thirds of the way up the hill has windows above each cart path, perfect for Pyro ambushes.
- The large building in between the two cart tracks, along with the large space between each cart, make Snipers a less than ideal class for the final stage. It is suggested that players that elect to play Sniper equip Jarate for its useful Mini-Crit effect.
- To ensure the best chance for success, teams may choose to split into two groups: one to push their cart, the other to deny the opposing team the chance to push theirs.
Screenshots
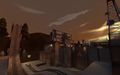
Spawn/enemy finishing point in Stage 1
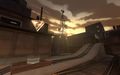
Finishing point in Stage 1

Stage 2
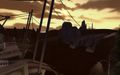
The pit which the cart can fall into in Stage 3
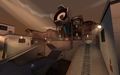
Stage 3


Changelog
b1: detailed stage 3. Finished stage 2. Initial optimization on all stages, explosion in stage 2 reduced in size to help performance. Moved some pickups around, mainly in stage 1 and 3. Closed off the middle (wooden) tunnel in stage 2. Clipped more edges, switched some clips for trigger_push to allow rocketjumping. And more that I can't remember!
a9: stage 2 detailing. custom soundscape. a8: rebuilt ALL logic in the map. Continued some detailing in stage 2. Slowed the carts in stage 3 by 20% a7: Anti-stalemate mode added. Stage 2 rough texturing. a6: stage 1 detailed, still not 100%. Fixed a rare bug with auto-rolling carts in stage 1. a5: fixed crashing. Added particles! a4: stage 2 deleted, new stage 2 added. Dynamic cart speeds in stage 3. a3: various fixes and tweaks. a2: added stage 3.
a1: release (stage 1 & 2).Trivia
- The bombs on the walls in the beginning of the second stage are actually a old unused Demoman weapon, the MIRV Grenade. They explode as the setup rounds end.
Additional Links
- Panic WIP Thread: http://forums.tf2maps.net/showthread.php?t=7036
| ||||||||||||||||||||||||||||||||||||||||||||||||