Difference between revisions of "Arena/zh-hant"
< Arena
m (Auto: patchNameLinkFilter (Review RC#922540)) |
m (Cosmetic changes) |
||
| Line 1: | Line 1: | ||
{{DISPLAYTITLE:競技場模式}} | {{DISPLAYTITLE:競技場模式}} | ||
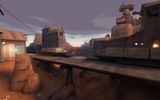
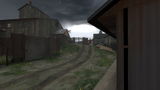
| − | [[ | + | [[File:Arenalumberyard.jpg|thumb|right|300px|Lumberyard]] |
{{Quotation|亞伯拉罕.林肯,第二次就職演說,1865 年|我以我坦率誠實的本性,很明白跟你們說:'''我愛競技場模式'''。}} | {{Quotation|亞伯拉罕.林肯,第二次就職演說,1865 年|我以我坦率誠實的本性,很明白跟你們說:'''我愛競技場模式'''。}} | ||
| Line 6: | Line 6: | ||
'''競技場模式(Arena)'''是一個於[[Heavy Update/zh-hant|重裝兵更新]]時新增的[[List of game modes/zh-hant|遊戲模式]],會讓[[RED/zh-hant|紅隊]]及[[BLU/zh-hant|藍隊]]在一張偏小的地圖中激烈地戰鬥。這模式並沒有重生的機制,所以勝利目標是某一隊必須要將另一隊殺到全數陣亡為止。如果兩隊在超過一分鐘後都還有人存活,那麼在中央的[[control point (objective)/zh-hant|控制點]]將會解鎖,可讓殘存的人靠著佔領控制點而獲得勝利。 | '''競技場模式(Arena)'''是一個於[[Heavy Update/zh-hant|重裝兵更新]]時新增的[[List of game modes/zh-hant|遊戲模式]],會讓[[RED/zh-hant|紅隊]]及[[BLU/zh-hant|藍隊]]在一張偏小的地圖中激烈地戰鬥。這模式並沒有重生的機制,所以勝利目標是某一隊必須要將另一隊殺到全數陣亡為止。如果兩隊在超過一分鐘後都還有人存活,那麼在中央的[[control point (objective)/zh-hant|控制點]]將會解鎖,可讓殘存的人靠著佔領控制點而獲得勝利。 | ||
| − | ==遊戲目標== | + | == 遊戲目標 == |
{{See also|List of official tips/zh-hant|l1=競技場模式小技巧}} | {{See also|List of official tips/zh-hant|l1=競技場模式小技巧}} | ||
| Line 20: | Line 20: | ||
{{main|Community Arena strategy|l1=社群競技場策略}} | {{main|Community Arena strategy|l1=社群競技場策略}} | ||
| − | ==地圖== | + | == 地圖 == |
{{main|List of maps/zh-hant|l1=地圖列表}} | {{main|List of maps/zh-hant|l1=地圖列表}} | ||
| Line 31: | Line 31: | ||
! class="header" |檔案名稱 | ! class="header" |檔案名稱 | ||
|- | |- | ||
| − | |style="background-color:#F9D483;" |'''[[Badlands (Arena)/zh-hant|Badlands<br>(競技場模式)]]''' | + | |style="background-color:#F9D483;" |'''[[Badlands (Arena)/zh-hant|Badlands<br />(競技場模式)]]''' |
| width="100px" |[[File:Arenabadlands.jpg|160px|link=Badlands (Arena)/zh-hant]] | | width="100px" |[[File:Arenabadlands.jpg|160px|link=Badlands (Arena)/zh-hant]] | ||
| width="60px" |{{code|arena_badlands}} | | width="60px" |{{code|arena_badlands}} | ||
|- | |- | ||
| − | |style="background-color:#F9D483;" |'''[[Granary (Arena)/zh-hant|Granary<br>(競技場模式)]]''' | + | |style="background-color:#F9D483;" |'''[[Granary (Arena)/zh-hant|Granary<br />(競技場模式)]]''' |
| width="100px" |[[File:Arenagranary.jpg|160px|link=Granary (Arena)/zh-hant]] | | width="100px" |[[File:Arenagranary.jpg|160px|link=Granary (Arena)/zh-hant]] | ||
| width="60px" |{{code|arena_granary}} | | width="60px" |{{code|arena_granary}} | ||
| Line 43: | Line 43: | ||
| width="60px" |{{code|arena_lumberyard}} | | width="60px" |{{code|arena_lumberyard}} | ||
|- | |- | ||
| − | |style="background-color:#F9D483;" |'''[[Nucleus (Arena)/zh-hant|Nucleus<br>(競技場模式)]]''' | + | |style="background-color:#F9D483;" |'''[[Nucleus (Arena)/zh-hant|Nucleus<br />(競技場模式)]]''' |
| width="100px" |[[File:Arenanucleus.jpg|160px|link=Nucleus/zh-hant]] | | width="100px" |[[File:Arenanucleus.jpg|160px|link=Nucleus/zh-hant]] | ||
| width="60px" |{{code|arena_nucleus}} | | width="60px" |{{code|arena_nucleus}} | ||
| Line 55: | Line 55: | ||
| width="60px" |{{code|arena_ravine}} | | width="60px" |{{code|arena_ravine}} | ||
|- | |- | ||
| − | |style="background-color:#F9D483;" |'''[[Sawmill/zh-hant|Sawmill<br>(競技場模式)]]''' | + | |style="background-color:#F9D483;" |'''[[Sawmill/zh-hant|Sawmill<br />(競技場模式)]]''' |
| width="100px" |[[File:Sawmill.PNG|160px|link=Sawmill/zh-hant]] | | width="100px" |[[File:Sawmill.PNG|160px|link=Sawmill/zh-hant]] | ||
| width="60px" |{{code|arena_sawmill}} | | width="60px" |{{code|arena_sawmill}} | ||
| Line 63: | Line 63: | ||
| width="60px" |{{code|arena_watchtower}} | | width="60px" |{{code|arena_watchtower}} | ||
|- | |- | ||
| − | |style="background-color:#F9D483;" |'''[[Well (Arena)/zh-hant|Well<br>(競技場模式)]]''' | + | |style="background-color:#F9D483;" |'''[[Well (Arena)/zh-hant|Well<br />(競技場模式)]]''' |
| width="100px" |[[File:Tg arenawell.jpg|160px|link=Well (Arena)/zh-hant]] | | width="100px" |[[File:Tg arenawell.jpg|160px|link=Well (Arena)/zh-hant]] | ||
| width="60px" |{{code|arena_well}} | | width="60px" |{{code|arena_well}} | ||
| Line 69: | Line 69: | ||
== 相關成就 == | == 相關成就 == | ||
| − | ==={{Class link|Scout}}=== | + | === {{Class link|Scout}} === |
{{Achievement table | {{Achievement table | ||
| 1 = {{Show achievement|Scout|First Blood}} | | 1 = {{Show achievement|Scout|First Blood}} | ||
Revision as of 16:29, 7 June 2012

| “ | 我以我坦率誠實的本性,很明白跟你們說:我愛競技場模式。
— 亞伯拉罕.林肯,第二次就職演說,1865 年
|
” |
競技場模式(Arena)是一個於重裝兵更新時新增的遊戲模式,會讓紅隊及藍隊在一張偏小的地圖中激烈地戰鬥。這模式並沒有重生的機制,所以勝利目標是某一隊必須要將另一隊殺到全數陣亡為止。如果兩隊在超過一分鐘後都還有人存活,那麼在中央的控制點將會解鎖,可讓殘存的人靠著佔領控制點而獲得勝利。
遊戲目標
參見: 競技場模式小技巧
在絕地要塞 2 中,競技場模式的地圖,是以兩隊戰鬥時還能保有各職業的活用及多樣性為基礎而設計的。相較於其他模式的地圖傾向於寬闊、整體性的戰略和玩法;競技場模式注重於個別的戰術,讓隊伍決定如何攻擊敵方以得勝。
競技場模式地圖的大致上都是小規模的地圖,回合時間也較短,以便玩家能夠更快地結束一場比賽。當一方隊伍隊員全數陣亡,或是其中一方成功佔領了中央控制點,這一回合才結束,中央控制點會在回合開始過後一段時間解除封鎖。每一回合的步調都非常快,也極具競爭性,因為模式強調隊伍的立即戰術選擇和反應。競技場模式比較適合小型的戰鬥,比方說 3 對 3 的 PK,但是也可以 12 對 12 的混戰。競技場模式有點像驟死戰-陣亡的玩家該回合不能重生,地圖也沒有重生區補給櫃。地圖中也幾乎沒有生命補充包,有的話也都放在很遠或是極高風險的地方(比方說,放在橫越懸崖的一根樹幹中間)。這強迫了隊伍必須要依賴補給器和醫護兵來補充生命值。
輸掉的隊伍的某些玩家,下一回合可能得要坐冷板凳,以維持雙方的人數平衡和替換之前在旁觀戰的玩家上場。至於贏的那一方,下一回合不會有人得去觀戰。
至於第一滴血爆擊機制,也是競技場模式所獨有,搶先獲得的玩家可以用此來當作打擊敵方的優勢。
策略
主條目: 社群競技場策略
地圖
主條目: 地圖列表
競技場模式的地圖檔案都是 arena_ 開頭;社群地圖將以"雙引號"表示
| 地圖名稱 | 圖片 | 檔案名稱 |
|---|---|---|
| Badlands (競技場模式) |
|
arena_badlands
|
| Granary (競技場模式) |
|
arena_granary
|
| Lumberyard | 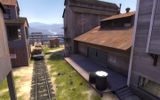
|
arena_lumberyard
|
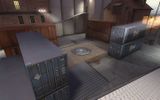
| Nucleus (競技場模式) |
160px | arena_nucleus
|
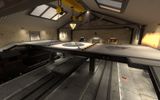
| "Offblast" | 
|
arena_offblast_final
|
| Ravine | 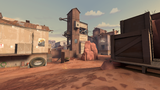
|
arena_ravine
|
| Sawmill (競技場模式) |
|
arena_sawmill
|
| "Watchtower" | 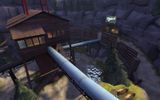
|
arena_watchtower
|
| Well (競技場模式) |
|
arena_well
|
相關成就
 偵察兵
偵察兵
|
|


更新紀錄
- 新增競技場模式。
- 新增地圖 Lumberyard、Ravine、Well、Granary、Badlands,皆為競技場模式版本。
- 修正尚方寶鯖的打擊會自動觸發第一滴血機制的問題。
- 修正一個第一滴血爆擊機制沒有在正確時間解除的問題。
| |||||||||||||||||||||||