Difference between revisions of "Hunted (custom map)"
m |
m |
||
| (32 intermediate revisions by 17 users not shown) | |||
| Line 1: | Line 1: | ||
| + | {{custom map}} | ||
{{Map infobox | {{Map infobox | ||
| − | |game-type= | + | | map-status = custom |
| − | |map-image= | + | | map-workshopid = 454326638 |
| − | | | + | | map-name = Hunted |
| − | |developer={{ | + | | map-game-type = Special Delivery |
| − | | | + | | map-image = sd_hunted1.jpg |
| − | [http:// | + | | map-file-name = sd_hunted |
| + | | map-version = Final | ||
| + | | map-released = {{patch name|07|05|2012|date-only=yes}} | ||
| + | | map-developer = {{Steamid|76561197976267165|D36}} | ||
| + | | map-links = [http://gamebanana.com/tf2/maps/167047 GameBanana.com] | ||
| + | | map-environment = Industrial | ||
| + | | map-setting = Night, cloudy | ||
| + | }} | ||
| − | '''Hunted''' is a | + | '''Hunted''' is a custom [[Special Delivery (game mode)|Special Delivery]] map. The [[BLU]] team plays offense, escorting their courier to the capture zone near the [[RED]] base, while the RED team must prevent the enemy team from capturing the [[Australium]]. The briefcase is located in the BLU respawn room and returns there after 20 seconds if dropped. |
| − | RED team | + | The RED team has 60 seconds of setup time and wins after the round timer ends. The BLU team has 6 minutes to capture the Australium. The capture zone is blocked by closed gates, and the courier needs a little help to open them. To do this, one of the BLU players (including the courier himself) must gain access to one of two control towers, where the buttons to open the gates are located. Opening the gates gives 2 [[Scoreboard|points]] to the player who pressed the button, adds 1 minute to the round timer, and decreases [[respawn]] time for the BLU team. |
| − | |||
| − | |||
| − | |||
| − | |||
| − | |||
==Locations== | ==Locations== | ||
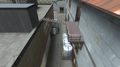
=== BLU Base === | === BLU Base === | ||
| − | [[Image: | + | [[Image:sd_hunted6.jpg|thumb|200px|right|Ruins]][[Image:sd_hunted3.jpg|thumb|200px|right|Gates with control towers]] |
| − | + | The Australium is located here, near the spawn. Unlike other CTF and SD maps, a player can change [[class]]es here without committing suicide and will not drop the Australium by entering the base. There are two exits here: an underground tunnel and a ladder to a door leading outside. | |
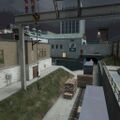
=== First building === | === First building === | ||
| − | [[ | + | Has a medium [[Pickup|medkit]] and provides a good sniping position on the second floor. Also has a ladder to the roof, which provides a good view of the map and leads to the next building. The BLU team can go through the first floor, where there are a few hiding spots for [[Spies]] and [[Pyros]]. |
| − | |||
| − | |||
| − | |||
| − | |||
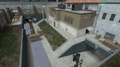
=== Ruins === | === Ruins === | ||
| − | Provides very useful spots for ambushes | + | Provides some hidden medkits and very useful spots for ambushes. There are two paths from here through second floor that lead to the capture zone. |
| − | === Capture | + | === Capture zone === |
| − | + | The capture zone is blocked by closed gates and can be opened by buttons in one of two towers to the left and right. Because of the RED base nearby, it can be difficult to attack and hold the position while waiting for the courier to deliver the Australium. The ambulance car behind the gates should give the BLU team some cover. | |
| − | |||
| − | There are two | + | There are two paths here: one that goes right, near the RED spawn, making it a dangerous but faster route, while the second path passes across open space with little cover. |
==Strategy== | ==Strategy== | ||
| − | + | === Offense === | |
| − | + | It is important for the BLU team to have the courier escorted with defending players and, if possible, overhealed by [[Medics]]. Always watch your back for enemy Spies and windows for Snipers, and listen for [[Sentry Gun]] noises. Never let your courier run alone through the open space near the capture zone because enemy Snipers have an unobstructed line-of-sight. It's better to go through first and open the gates. Although the courier can open the gates himself, he is a very easy target inside a control tower, since it's a closed space with only one exit. Communicate with your team to choose the most experienced player to carry the Australium. | |
| − | It is important for BLU to have courier escorted with defending players and, if possible, | ||
==== Courier ==== | ==== Courier ==== | ||
| − | + | Due to his fast speed, a [[Scout]] can escape from danger, hide, and quickly restore health. [[Medics]], [[Snipers]] and [[Spies]] are almost defenseless alone as the courier. Like a regular Special Delivery game, the player holding the Australium cannot use Teleporters, receive an [[ÜberCharge]], Cloak, disguise, or use [[Bonk! Atomic Punch]]. | |
| − | |||
| − | + | === Defense === | |
| − | Every window on this map | + | Every window on this map is a good sniping position, and the two control towers near capture zone are perfect, covering both paths to the gates. Two Snipers can be a good pair, with each using a tower, defending the whole area. Just be aware of enemy Snipers and Spies! Engineers are the second most useful defending class here: just one Sentry Gun can easily defend the capture point gates. Pyros and Spies have many hiding spots to make successful ambushes, and a [[Demoman]] can place his stickybombs where they cannot be seen. |
| − | ==Changelog== | + | ==Trivia== |
| − | {{Changelog|Version 1.2 (30 | + | * The [[Civilian (Classic)|Civilian]] bobblehead seen in ''[[Meet the Sniper]]'' can be found in the RED base. |
| + | * When first released, the map game mode prefix was ETF (Escort the Flag). BLU team instantly loses if the intelligence is dropped anywhere and anytime. | ||
| + | * This map is based on [[Hunted|a VIP map of the same name]] from [[Team Fortress Classic]]. | ||
| + | |||
| + | == Changelog == | ||
| + | {{Changelog| '''Version 2 (07/05/12):''' | ||
| + | * Reworked for new Special Delivery gamemode | ||
| + | * Lots of new map details and optimization | ||
| + | * Additional exit from Red spawn room | ||
| + | * New one-way doors for Red team | ||
| + | * Removed second Blue resupply room | ||
| + | * Removed old intro movie | ||
| + | |||
| + | '''Version 1.2 (05/30/10):''' | ||
* Map prefix changed to ad_ (official CTF Attack\Defend gametype name) | * Map prefix changed to ad_ (official CTF Attack\Defend gametype name) | ||
* Intelligence drops and courier kills are unlimited now | * Intelligence drops and courier kills are unlimited now | ||
| Line 64: | Line 73: | ||
* Updated serverbrowser thumbnail and briefing images | * Updated serverbrowser thumbnail and briefing images | ||
| − | Version 1.1 (03 | + | '''Version 1.1 (12/03/09):''' |
| − | |||
* Added intelligence return time (3 sec.) to prevent griefing and give advantage to Blue team | * Added intelligence return time (3 sec.) to prevent griefing and give advantage to Blue team | ||
| − | * Added little | + | * Added little Dispenser into Intelligence briefcase. Stay near courier to get health and ammo! |
| − | * Added new custom skin for | + | * Added new custom skin for Intelligence briefcase |
* Added fully functional Blue respawn zone | * Added fully functional Blue respawn zone | ||
* Added modified CTF HUD with compass showing current intelligence location and status | * Added modified CTF HUD with compass showing current intelligence location and status | ||
| Line 75: | Line 83: | ||
* Added few sound and text hint notifications on HUD | * Added few sound and text hint notifications on HUD | ||
* Red spawn moved closer to escape gates | * Red spawn moved closer to escape gates | ||
| − | * Removed Blue | + | * Removed Blue Sentry Guns |
* Reworked Blue respawn zone layout to prevent door camping | * Reworked Blue respawn zone layout to prevent door camping | ||
* Added roof over ruined building to prevent courier rocket jump rush and improve performance | * Added roof over ruined building to prevent courier rocket jump rush and improve performance | ||
| Line 84: | Line 92: | ||
* Reduced map file size | * Reduced map file size | ||
| − | Version 1 (10 | + | '''Version 1 (09/10/09):''' |
| − | |||
* Initial release}} | * Initial release}} | ||
| − | == | + | == Gallery == |
| − | + | <gallery> | |
| − | + | File:sd_hunted2.jpg | |
| − | + | File:sd_hunted4.jpg | |
| − | + | File:sd_hunted5.jpg | |
| − | + | File:Hunted Steam Workshop image.jpg|Steam Workshop thumbnail for Hunted. | |
| − | + | </gallery> | |
| − | + | {{CustomMapNav}} | |
| − | |||
| − | |||
| − | |||
Latest revision as of 15:22, 17 January 2024
 | “I built that.” This page contains information about a custom map that is not an officially released Team Fortress 2 map. All released Valve and Community-made TF2 maps can be found on the list of maps. |
| Hunted | |
|---|---|

| |
| Basic Information | |
| Map type: | Special Delivery |
| File name: | sd_hunted
|
| Version: | Final |
| Released: | July 05, 2012 |
| Developer(s): | D36 |
| Link(s): | GameBanana.com |
| Map Info | |
| Environment: | Industrial |
| Setting: | Night, cloudy |
Hunted is a custom Special Delivery map. The BLU team plays offense, escorting their courier to the capture zone near the RED base, while the RED team must prevent the enemy team from capturing the Australium. The briefcase is located in the BLU respawn room and returns there after 20 seconds if dropped.
The RED team has 60 seconds of setup time and wins after the round timer ends. The BLU team has 6 minutes to capture the Australium. The capture zone is blocked by closed gates, and the courier needs a little help to open them. To do this, one of the BLU players (including the courier himself) must gain access to one of two control towers, where the buttons to open the gates are located. Opening the gates gives 2 points to the player who pressed the button, adds 1 minute to the round timer, and decreases respawn time for the BLU team.
Contents
Locations
BLU Base


The Australium is located here, near the spawn. Unlike other CTF and SD maps, a player can change classes here without committing suicide and will not drop the Australium by entering the base. There are two exits here: an underground tunnel and a ladder to a door leading outside.
First building
Has a medium medkit and provides a good sniping position on the second floor. Also has a ladder to the roof, which provides a good view of the map and leads to the next building. The BLU team can go through the first floor, where there are a few hiding spots for Spies and Pyros.
Ruins
Provides some hidden medkits and very useful spots for ambushes. There are two paths from here through second floor that lead to the capture zone.
Capture zone
The capture zone is blocked by closed gates and can be opened by buttons in one of two towers to the left and right. Because of the RED base nearby, it can be difficult to attack and hold the position while waiting for the courier to deliver the Australium. The ambulance car behind the gates should give the BLU team some cover.
There are two paths here: one that goes right, near the RED spawn, making it a dangerous but faster route, while the second path passes across open space with little cover.
Strategy
Offense
It is important for the BLU team to have the courier escorted with defending players and, if possible, overhealed by Medics. Always watch your back for enemy Spies and windows for Snipers, and listen for Sentry Gun noises. Never let your courier run alone through the open space near the capture zone because enemy Snipers have an unobstructed line-of-sight. It's better to go through first and open the gates. Although the courier can open the gates himself, he is a very easy target inside a control tower, since it's a closed space with only one exit. Communicate with your team to choose the most experienced player to carry the Australium.
Courier
Due to his fast speed, a Scout can escape from danger, hide, and quickly restore health. Medics, Snipers and Spies are almost defenseless alone as the courier. Like a regular Special Delivery game, the player holding the Australium cannot use Teleporters, receive an ÜberCharge, Cloak, disguise, or use Bonk! Atomic Punch.
Defense
Every window on this map is a good sniping position, and the two control towers near capture zone are perfect, covering both paths to the gates. Two Snipers can be a good pair, with each using a tower, defending the whole area. Just be aware of enemy Snipers and Spies! Engineers are the second most useful defending class here: just one Sentry Gun can easily defend the capture point gates. Pyros and Spies have many hiding spots to make successful ambushes, and a Demoman can place his stickybombs where they cannot be seen.
Trivia
- The Civilian bobblehead seen in Meet the Sniper can be found in the RED base.
- When first released, the map game mode prefix was ETF (Escort the Flag). BLU team instantly loses if the intelligence is dropped anywhere and anytime.
- This map is based on a VIP map of the same name from Team Fortress Classic.
Changelog
- Reworked for new Special Delivery gamemode
- Lots of new map details and optimization
- Additional exit from Red spawn room
- New one-way doors for Red team
- Removed second Blue resupply room
- Removed old intro movie
Version 1.2 (05/30/10):
- Map prefix changed to ad_ (official CTF Attack\Defend gametype name)
- Intelligence drops and courier kills are unlimited now
- Blue team can only lost the round if timer expires
- Duration of rounds decreased to 6 minutes
- Opening the capture point gates gives 1 minute of additional round time (6+1)
- Player receives 2 bonus points for opening the capture point gates
- Opening the capture point gates decreases respawn time for Blue team
- Fixed annoying looping sound of briefcase healing beam
- Environment light brightness decreased to previous version
- Fixed some surfaces not holding sticky bombs
- Various map fixes, improvements, optimization
- Updated serverbrowser thumbnail and briefing images
Version 1.1 (12/03/09):
- Added intelligence return time (3 sec.) to prevent griefing and give advantage to Blue team
- Added little Dispenser into Intelligence briefcase. Stay near courier to get health and ammo!
- Added new custom skin for Intelligence briefcase
- Added fully functional Blue respawn zone
- Added modified CTF HUD with compass showing current intelligence location and status
- Now intelligence can be dropped and courier changed anytime on Blue respawn zone
- Added timer (Red team wins after 10 minutes)
- Added few sound and text hint notifications on HUD
- Red spawn moved closer to escape gates
- Removed Blue Sentry Guns
- Reworked Blue respawn zone layout to prevent door camping
- Added roof over ruined building to prevent courier rocket jump rush and improve performance
- Reduced escape gates opening speed
- Increased environment light brightness
- Fixed mp_timelimit not ending the map
- Various map fixes, improvements, optimization
- Reduced map file size
Version 1 (09/10/09):
- Initial release
Gallery
Steam Workshop thumbnail for Hunted.


| ||||||||||||||||||||||||||||||||||||||||||||||||