Difference between revisions of "Swiftwater"
NihonTiger (talk | contribs) m (Added tiny bit of backstory) |
NihonTiger (talk | contribs) m (Flipping sections around for better fit with other custom map pages; also, added spacing so the infobox isn't jutting into the Strategy section) |
||
| Line 11: | Line 11: | ||
According to the map's backstory (as displayed on a film projected inside BLU's spawn), BLU has been bottling water to make a quick profit. However, RED has caught onto this tactic and is poisoning BLU's water reserves from within the RED base, under the guise of its Red Planet Chemicals operation. Thus, BLU's objective is to push the bomb [[cart]] to RED's base, where it will detonate, destroying the base and ending their water poisoning plans. | According to the map's backstory (as displayed on a film projected inside BLU's spawn), BLU has been bottling water to make a quick profit. However, RED has caught onto this tactic and is poisoning BLU's water reserves from within the RED base, under the guise of its Red Planet Chemicals operation. Thus, BLU's objective is to push the bomb [[cart]] to RED's base, where it will detonate, destroying the base and ending their water poisoning plans. | ||
| + | |||
| + | |||
| + | |||
| + | |||
| + | |||
| + | ==Strategy== | ||
| + | *Three wide, open areas on this map and long sightlines offer [[Sniper | Snipers]] good opportunities for racking up kills and headshots. Prime sniping points for RED include: | ||
| + | **The large, two-story building that serves as a shortcut to capture points 2 and 3; | ||
| + | **The entrance from RED's spawn to Capture Point 2; | ||
| + | **The walkways above the final downhill section of the map. | ||
| + | *Platforms and areas of varying height throughout the map offer [[Pyro | Pyros]] a perfect opportunity to ambush BLU as they try to push the [[cart]]. These areas include: | ||
| + | **The ditch between BLU spawn and Capture Point 1, specifically near the small bridge the cart crosses; | ||
| + | **The tower in the same area, which allows Pyros to drop directly onto or behind the cart if timed properly; | ||
| + | **On the walkway directly above Capture Point 2, though the height of the drop may be counter-effective; | ||
| + | **In between Capture Points 2 and 3 in an area accessible via a shortcut. | ||
| + | *Swiftwater is full of nooks, crannies and small, out of the way rooms, offering [[Spy | Spies]] places to disguise away from the fight. | ||
| + | *The finishing point of Swiftwater is located in a depressed bowl-like area, giving a major advantage to RED [[Engineer | Engineers]] and their [[Sentry Gun | Sentry Guns]]. Because of the high walls surrounding the point, [[ÜberCharge | ÜberCharged]] [[Demoman | Demomen]] with the [[Stickybomb Launcher]] may provide the best means of destroying any large Sentry Gun nests above the last point. | ||
== Screenshots == | == Screenshots == | ||
| Line 29: | Line 46: | ||
File:Pl_swiftwater_frc40011.jpg | Billboard featuring Red Planet Chemicals, RED's cover for their operation | File:Pl_swiftwater_frc40011.jpg | Billboard featuring Red Planet Chemicals, RED's cover for their operation | ||
</gallery> | </gallery> | ||
| − | |||
| − | |||
| − | |||
| − | |||
| − | |||
| − | |||
| − | |||
| − | |||
| − | |||
| − | |||
| − | |||
| − | |||
| − | |||
== Changelog == | == Changelog == | ||
Revision as of 18:57, 31 January 2011
| “You are so small! Is funny to me!” This article is a stub. As such, it is not complete. You can help Team Fortress Wiki by expanding it. |
| Swiftwater | |
|---|---|

| |
| Basic Information | |
| Developer(s): | {{{map-developer}}} |
| Map Overview | |
 | |
Swiftwater is a single-stage Payload map. The Alpine-styled map features 4 control points and encourages continuous pushing from BLU while trying to break RED's defenses.
According to the map's backstory (as displayed on a film projected inside BLU's spawn), BLU has been bottling water to make a quick profit. However, RED has caught onto this tactic and is poisoning BLU's water reserves from within the RED base, under the guise of its Red Planet Chemicals operation. Thus, BLU's objective is to push the bomb cart to RED's base, where it will detonate, destroying the base and ending their water poisoning plans.
Strategy
- Three wide, open areas on this map and long sightlines offer Snipers good opportunities for racking up kills and headshots. Prime sniping points for RED include:
- The large, two-story building that serves as a shortcut to capture points 2 and 3;
- The entrance from RED's spawn to Capture Point 2;
- The walkways above the final downhill section of the map.
- Platforms and areas of varying height throughout the map offer Pyros a perfect opportunity to ambush BLU as they try to push the cart. These areas include:
- The ditch between BLU spawn and Capture Point 1, specifically near the small bridge the cart crosses;
- The tower in the same area, which allows Pyros to drop directly onto or behind the cart if timed properly;
- On the walkway directly above Capture Point 2, though the height of the drop may be counter-effective;
- In between Capture Points 2 and 3 in an area accessible via a shortcut.
- Swiftwater is full of nooks, crannies and small, out of the way rooms, offering Spies places to disguise away from the fight.
- The finishing point of Swiftwater is located in a depressed bowl-like area, giving a major advantage to RED Engineers and their Sentry Guns. Because of the high walls surrounding the point, ÜberCharged Demomen with the Stickybomb Launcher may provide the best means of destroying any large Sentry Gun nests above the last point.
Screenshots
BLU's initial spawn
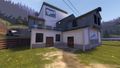
BLU spawn
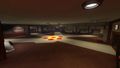
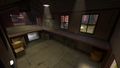
RED spawn interior
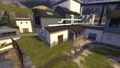
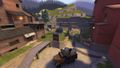
Area surrounding Capture Point 1 and BLU's initial spawn
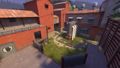
Area surrounding Capture Point 2
"Chicane" just before Capture Point 3
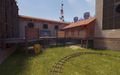
Area outside RED spawn near Capture Point 3
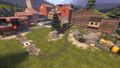
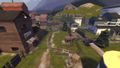
Area between Control Point 3 and finishing point

Buildings/bridge above finishing point

Interior of covered bridge building at finishing point
Interior of entrance near finishing point
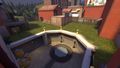
Finishing point (left) and areas above it
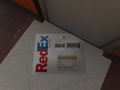
Custom RedEx parcel found in several locations

Billboard featuring Red Planet Chemicals, RED's cover for their operation


Changelog
- Bug fixes
- Removed Rollback (from build 11)
Build 11 Changes
- Stage 1 layout significantly changed
- Added a CP before the final CP. More fighting takes place in courtyard now.
- Reduced amount of time awarded for CPs.
Build 7 Changes
Tons of changes. Most important:
- Blue Spawn remade - doors not stay open on map start
- CP4 tweaked to give red an advantage again. Buildings in upper area have a sniper vantage and a good shortcut behind blue.
- Fixed getting stuck in red spawning areas.
- Red can exit spawn anywhere after round starts.
Old Fixes
- Fixed Engy exploit at CP2
- New Red Spawn layout - more straightforward and should be less campable at cp3 and cp4. Shortened spawn times to compensate for slightly longer travel. (The changes should improve gameplay on insta spawn servers as well)
- New spawn exit from CP2 to prevent camping.
- Vastly increased frame rate.
Additional links
- Development thread: http://forums.tf2maps.net/showthread.php?t=6749
| ||||||||||||||||||||||||||||||||||||||||||||||||