User:SupaNeo/Sandbox
Contents
My Sandbox
Working on big edits here.
Thunder Mountain Locations Overhaul
| SupaNeo | |
|---|---|

| |
| Basic Information | |
| Developer(s): | {{{map-developer}}} |
| Map Info | |
| Environment: | Alpine |
| Setting: | Daylight, raining |
| Hazards: | Pitfall |
| Map Photos | |
 | |
| “ | Aw, now you don't look like a happy camper.
Click to listen
— The Engineer finding the Sniper's hidden camping spot
|
” |
Thunder Mountain is a Valve-developed Payload map included with the Engineer Update, revealed on Day 4 thereof. It is the third official Payload map to be developed and released since the Heavy Update, and one of three Payload-based maps released during the Engineer Update, the others being Upward and Hightower (a Payload Race map).
Thunder Mountain is a multi-stage Payload map, like Gold Rush and Hoodoo. However, unlike other Payload maps, it features new gameplay elements such as a bridge which must be raised in order for the cart to cross, and new types of cart tracks. Going down, the cart will roll whether it is being pushed or not, and if it is going up, if it is stopped with no-one pushing, it will roll to the bottom of the hill. These sections are marked with yellow and black caution tape-like decor.
Goal
- BLU Team: The BLU team's primary goal is to guide the cart on its tracks throughout the map. By continuously pushing the cart forward and breaking through RED defensive positions, it will detonate and the BLU team will be victorious. Failure to push the cart forward by having teammates near it will eventually result in the cart slowly moving backwards after a period of time, eroding your team's past progress.
- RED Team: Opposite the BLU team's objective, the team function of RED, as a group, is to deter and stall the BLU team and prevent them from advancing the cart to its final destination. By fighting off their opposition for a long enough period of time, the RED team will be victorious. The most effective way to stall the BLU team is to remain very close to the cart, thereby halting it from moving even with BLU forces nearby.
Locations

Stage A
Checkpoint 1
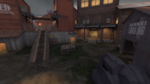
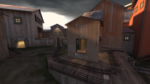
There is a wide, open courtyard below a large ridge outside the BLU Spawn. The cart starts to the right of the BLU spawn and travels along the edge of a cliff. It then enters a small building and travels in to the courtyard towards the first checkpoint. A long, narrow ramp leads to the first checkpoint. Reaching this checkpoint will raise a bridge allowing the cart to continue.
- BLU Spawn: The BLU spawn has a resupply area and two exits that face eachother. A large fence sheilds the spawn from direct fire coming from the courtyard. BLU players can either turn left and drop in to the courtyard or turn right to push the cart. The rock protrusion to the left of the BLU spawn can be used by RED defenders as an ambush point or to block access to the courtyard.
- The Cliff:
- The Cliff: This is a track that runs along the left of the map from BLU's perspective and runs all the way back to the tunnel and the checkpoint. RED defenders, especially Demomen and Soldiers, can run along this track raining down explosives from above. BLU attackers can Crouch jump onto this track from the top of The Cliff. Due to several close large ammo crates, aggressive RED Engineers can also quickly place a level 2 or 3 Sentry Gun near to the end of the track, close to BLU's spawn.
- The Cliff: It's not really a cliff but from BLU's perspective the ground ramps up and then drops off to its original level so that it looks like a small cliff when viewed from the other side. There is a "gap" in The Cliff where the cart runs through. RED defenders can use The Cliff to hide behind with Pyro's, Sentry Guns or ÜberCharges. There is also a large Health pack just behind the Cliff to the left. It is possible to crouch jump onto the Raised Track from the highest part of the cliff and Demomen can sticky jump all the way to the Tunnel from this position (and right onto the health pack that is just before the checkpoint, with some practice).
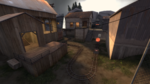
- The Hut: The Hut is at the back to the right as BLU's leave their spawn. It is two storied and has a veranda facing the BLU Spawn. The lower level has a door facing the spawn with a large Ammo pack outside of it and a door facing the track to the left of the map. The Hut is a favorite place for Snipers to sit in and pick off BLU players as they push the cart or come out of the front exit of their spawn. Engineers also like to build their Sentry Guns on the top level as they can shoot out to the track on the left and are protected from direct fire from BLU's Spawn. With some practice, Demomen can sticky jump from the BLU Spawn right on the balcony on the upper level.
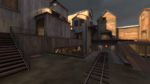
- The Tunnel: The Tunnel is a tunnel to the left that the cart runs through. Until the first checkpoint has been reached, it is the only passage linking the first open area to the second. This is a common chokepoint for this stage.
Stage A, Checkpoint 1
The Cliffs

The Hut
The Tunnel


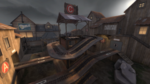
- First Courtyard - Just outside BLU spawn is a courtyard that resembles Gold Rush's Stage A, Checkpoint 1.
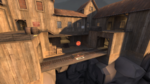
- Bridge - At the end of the First Courtyard is a small, tighter section of woodwork that leads to an unraised bridge. By pushing the cart onto the point the bridge raises slowly until it is high enough for the Payload to cross.
- Final Spiral - In Thunder Mountain's final stage is a large tower, which the BLU team slowly climbs over the course of the round until they push it into a hole in the center, detonating the cart.
Strategy
Easter eggs
- On Stage A, in the BLU spawn, the player may see some BLU characters in an area similar to the Soldier Training map, around a blackboard. They will occasionally taunt, albeit with no weapons, and will also occasionally do the Thriller taunt regardless of the time of the year. [1]
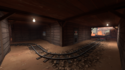
- On Stage B, in the RED spawn, one may see the RED team swimming in a pool.
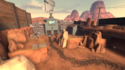
- On Stage C, near the second checkpoint (third dot), off in the distance the Sniper can be seen near his camper van (the same one seen in Meet the Sniper), a tent, and a fire. He only appears after BLU team has pushed the Payload past the first checkpoint.
Gallery
Stage A Checkpoint 1
Stage A Checkpoint 2
Stage B Checkpoint 1
Stage B Checkpoint 2
Stage C Checkpoint 1
Stage C Checkpoint 2
Stage C Checkpoint 3
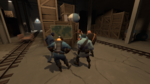
The BLU characters as seen on Thunder Mountain, Stage A, from BLU spawn.
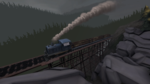
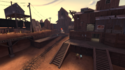
The train as seen on Stage A of Thunder Mountain.
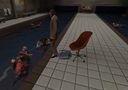
The swimming pool Easter egg as seen from inside the swimming pool as seen on Stage B.

Close-up on the Sniper Easter egg as seen on Thunder Mountain, Stage C. The camper van is not visible on this screenshot.
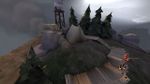
An aerial picture of Sniper's tent and camper van on Thunder Mountain, Stage C.


