Difference between revisions of "Gold Rush/zh-hans"
m (→第一阶段) |
m (Changed images from JPG to PNG.) |
||
| (16 intermediate revisions by 3 users not shown) | |||
| Line 1: | Line 1: | ||
{{Other uses|this=推车模式地图|for=更新补丁|Gold Rush Update/zh-hans|l1=淘金热更新}} | {{Other uses|this=推车模式地图|for=更新补丁|Gold Rush Update/zh-hans|l1=淘金热更新}} | ||
{{DISPLAYTITLE:Gold Rush}} | {{DISPLAYTITLE:Gold Rush}} | ||
| − | |||
{{Map infobox | {{Map infobox | ||
| − | | game-type | + | | map-status = official |
| − | | file-name | + | | map-game-type = Payload |
| + | | map-file-name = pl_goldrush | ||
| map-image = Goldrush_1.jpg | | map-image = Goldrush_1.jpg | ||
| − | | | + | | map-released = {{Patch name|4|29|2008}} |
| − | | map- | + | | map-released-major = Gold Rush Update |
| + | | map-has-n-stages = 3 | ||
| map-environment = 沙漠 | | map-environment = 沙漠 | ||
| map-setting = 白昼,晴天 | | map-setting = 白昼,晴天 | ||
| − | | map-pyrovision | + | | map-has-pyrovision = yes |
| − | | map-health | + | | map-pickups-health-small = 9 |
| − | | map-health | + | | map-pickups-health-medium = 14 |
| − | | map-health | + | | map-pickups-health-large = 4 |
| − | | map-ammo | + | | map-pickups-ammo-small = 4 |
| − | | map-ammo | + | | map-pickups-ammo-medium = 12 |
| − | | map-ammo | + | | map-pickups-ammo-large = 14 |
| − | | map-bots | + | | map-has-bots = yes |
}} | }} | ||
| Line 55: | Line 56: | ||
<gallery widths=140px heights=75px> | <gallery widths=140px heights=75px> | ||
| − | File:Goldrush1a. | + | File:Goldrush1a.png|第一阶段的第一检查点 |
| − | File:goldrush11cliffs. | + | File:goldrush11cliffs.png|山崖 |
| − | File:goldrush11house. | + | File:goldrush11house.png|小屋 |
| − | File:goldrush11tunnel. | + | File:goldrush11tunnel.png|隧道 |
</gallery> | </gallery> | ||
| Line 66: | Line 67: | ||
战车从上文提到的隧道穿过后会经历一段“S”型转弯然后就进入到开阔的第二检查点区域。在这里,战车沿着水渠行进然后经过一个小桥后向右转便是第二检查点。第二检查点位于红队出生点后方。下文将以红队视角描述位置。 | 战车从上文提到的隧道穿过后会经历一段“S”型转弯然后就进入到开阔的第二检查点区域。在这里,战车沿着水渠行进然后经过一个小桥后向右转便是第二检查点。第二检查点位于红队出生点后方。下文将以红队视角描述位置。 | ||
| − | * '''红队出生点''' | + | * '''红队出生点''':红队基地出口处可选择向左进入矿道然后直接到检查点旁也可以向右到一片更开阔的区域,直面来自第一检查点区的敌人。此处设置有楼梯,可通往红队高台。红队的出生点面朝土墙,所以必须进行一个180°转弯才能直面进攻方。从进攻方视角看,检查点正位于红队出生点之前。 |
| − | * '''红队高台''' | + | * '''红队高台''':红队出生点右侧(如果面对进攻方就是左侧)有一个高台抵着地图左侧的高墙分布。在平台偏前方有弹药箱和医疗包分布,使得此处成为绝佳的步哨枪点位,在此处建造步哨枪能直接覆盖到刚从隧道里出来的战车。平台上还有一座小桥连接到红队出生点屋顶,此处是狙击手的优质点位,在此处可以轻松狙击在隧道战车附近的敌人。 |
| − | * '''水渠''' | + | * '''水渠''':在红队出生点和蓝队进入的建筑之间的开阔区域中,有一条(小型)峡谷状水渠横穿区域。其右侧为缓缓上升的土坡路,最终于地面齐平。其左侧有一架小梯子,为回到隧道提供了捷径。在水渠中间有一座木桥横跨水渠,为双方玩家提供了直接推进的选择。战车绕水渠而行最终向右转进入检查点。 |
| − | * '''二楼''' | + | * '''二楼''': 在第一检查点的隧道咽喉处附近,有一到座从右到左一直延伸到边界的双层结构建筑。该建筑被玩家称为'''二楼'''。在一楼,建筑左侧(红队视角)有一个出口,战车从此进入第二检查点区。其上有一扇从二楼开启的窗户,其右边是一条木板路连接着二楼和左侧房间。左侧房间内有一个出口,连接着一个离检查点很近的小平台。进入隧道后,红队可以向左沿着战车轨道回到第一检查点,也可以向右走沿着上层轨道方向,此处有一个大医疗包,继续向右进入建筑。对于进攻方来说此处的通道至关重要,此处的出口都距离检查点很近而且还有掩体提供掩护。 |
| − | *'''狙击高台''' | + | *'''狙击高台''':在第一检查点被占领时,通往左侧小隧道的铁门将开启,使蓝队玩家可以进入这个小隧道。小隧道的尽头是一个房间,内有中医疗包。房间内有一条通往狙击平台的楼梯。狙击平台位于水渠之上,此处为狙击手狙击的绝佳点位,在此处可以看到水渠和其周围的一切。 |
| − | *'''矿道''' | + | *'''矿道''':于红队出生点平行且同样位于地图右边(蓝队视角)的就是矿道。一条狭窄的隧道,其中有矿车轨道经过。矿道连接了检查点和红队出生点,虽然非常狭窄但是同时也是抵达检查点和进入二楼的最短路径。 |
| − | + | 红队可以提前在准备阶段中在二楼处设防。红队工程师可以先在基地出口前建造一个传送装置入口,然后再在平台下方沿墙壁建造一个补给器,在建造进度在60%左右时跳到补给器上方然后打开建造工具选择建造传送装置出口并不断跳跃和选择来在极限高度建造出口。建造完成后,工程师和他的队友就可以在二楼处提前设防来拖延时间。 | |
| − | + | 还有另一条进入第二检查点区的途径是从平台的最右边走到一处开放的二楼结构,此处正位于水渠旁。在此处只能看到红队出生点二楼的一小部分。占领此处可对任何想要通过木桥和水渠的人火力压制,不过还是需要注意的是,即使水渠阻挡了敌人徒步进入此处,士兵,爆破手和侦察兵可以爆炸跳或二段跳到此处偷袭你。 | |
<gallery widths=140px heights=70px> | <gallery widths=140px heights=70px> | ||
| − | File:Goldrush1b. | + | File:Goldrush1b.png|第一阶段的第二检查点 |
| − | File:goldrush12house. | + | File:goldrush12house.png|二楼 |
| − | File:goldrush12upper. | + | File:goldrush12upper.png|红队高台 |
| − | File:goldrush12valley. | + | File:goldrush12valley.png|水渠 |
</gallery> | </gallery> | ||
| Line 101: | Line 102: | ||
=== 第二阶段 === | === 第二阶段 === | ||
| − | [[File:Gold Rush_Section_two.png|thumb|top| | + | [[File:Gold Rush_Section_two.png|thumb|top|第二阶段]] |
==== 第一检查点 ==== | ==== 第一检查点 ==== | ||
被占领后增加的时长:4分钟30秒 | 被占领后增加的时长:4分钟30秒 | ||
| − | + | 战车在一处战壕前起始,这条战壕将蓝队出生点和战场分隔。战车将会在瞭望塔和屋子之间行进,最终会经过一座桥,检查点位于桥上。 | |
| − | * ''' | + | * '''蓝队出生点''':蓝队出生点有两个出口,左边一个隧道出口,中间一个双门大型出口。大部分玩家会从中间的出口出来。中间的出口一般用于超能冲锋来冲破敌方的防线,而左边的出口一般用于打偷袭。左侧出口很适合间谍来潜行到防线背后。但是也需要注意,有时候在开局红队医生和火焰兵会开启超能冲锋从左侧隧道进入,该战术通常会使隧道中的一切灰飞烟灭。 |
| − | * ''' | + | * '''屋子旁隧道''':在蓝队视角看屋子的左侧有一个小隧道,内有一个大弹药箱和一个小医疗包。穿过小隧道后有通往狙击角的楼梯。 |
| − | * ''' | + | * '''狙击角''':在红队进入第一检查点区域的地方,有一条小台阶通往狙击角。就像该位置的名字一样,该处经常被用作狙击点位。此处有一些箱子和一个小屋以及一个中医疗包,为狙击手提供了掩护和补给。 |
| − | * ''' | + | * '''瞭望塔''':在蓝队出生点右侧是瞭望塔。因其有利的地势,在开局时大部分红队玩家会在此处防守。此处还有一个大弹药箱和一个中医疗包。在瞭望塔上狙击手可以同时覆盖到两个出口,此处也是常见的步哨枪点位。 |
| − | * ''' | + | * '''桥''':在通过第一检查点之前,战车需要通过一座架在沟壑之上的木桥。 |
| − | + | * '''屋子''':在蓝队视角观察,屋子位于地图左侧。屋子配有一个出入口和两扇窗户,窗户没有掩护可以被子弹穿过。有时此处会有步哨枪或爆破手把手。 | |
| − | * ''' | ||
<gallery widths=140px heights=70px> | <gallery widths=140px heights=70px> | ||
| − | File:Goldrush2a. | + | File:Goldrush2a.png|第二阶段第一检查点 |
| − | File:goldrush21house. | + | File:goldrush21house.png|屋子 |
| − | File:goldrush21housetunnel. | + | File:goldrush21housetunnel.png|屋子旁隧道 |
| − | File:goldrush21sniperdeck. | + | File:goldrush21sniperdeck.png|狙击角 |
</gallery> | </gallery> | ||
| Line 130: | Line 130: | ||
被占领后增加的时长:4分钟 | 被占领后增加的时长:4分钟 | ||
| − | + | 在通过第一检查点后,战车会绕着一栋隔绝着两个检查点区域的建筑行进。接着会进入一个咽喉地带,通过后会经过一个分隔了大房的小木桥,最终抵达检查点。 | |
| − | * ''' | + | * '''咽喉地区''':咽喉地区是位于大房和上层平台间的开阔区域。 |
| − | *''' | + | *'''最终区域''':最终区域指红队出生点和大房之间的区域。 |
| − | * ''' | + | * '''上层平台''':上层平台位于红队出生点对面。该位置可从第一检查点右边的建筑进入。此处有两个供下到战斗区域的出口,可作为{{cl|Soldier}}和{{cl|Demoman}}进入区域的第二选择。 |
| − | * ''' | + | * '''大房''':大房位于该区域的中央。将第二检查点区域的战场一分为二。大房由两栋建筑组成,其中间由一座小木桥连接,两栋建筑都可以从下方的楼梯进入。从某种角度来看,大房位于最终区域和咽喉地区之间。 |
| − | * ''' | + | * '''步哨角''':在检查点旁边由一个小角落,该位置是非常常见步哨枪点位。 |
| − | * ''' | + | * '''凹槽''':在大房步哨角对面的建筑有一个凹槽区域。此处是跟步哨角一样也是个非常常见的步哨枪点位。 |
| − | * ''' | + | * '''红队出生点''':红队出生点出口位于第二检查点对面。红队只能向左或向右走到检查点附近的区域(右边有步哨角,左边有凹槽)。该出生点与第一阶段的出生点不同,其内只有一个补给柜,相同的是,该出生点同样只有一个面朝墙壁的出口,这使其非常不利于反制蹲点(Spwan camp)。 |
<gallery widths=140px heights=70px> | <gallery widths=140px heights=70px> | ||
| − | File:Goldrush2b. | + | File:Goldrush2b.png|第二阶段第二检查点 |
| − | File:goldrush22choke. | + | File:goldrush22choke.png|咽喉区域 |
| − | File:goldrush22houses. | + | File:goldrush22houses.png|大房 |
| − | File:goldrush22sniperdeck. | + | File:goldrush22sniperdeck.png|上层平台 |
</gallery> | </gallery> | ||
[[File:Goldrush section2.png|thumb|200px|第二检查点的位置|left]] | [[File:Goldrush section2.png|thumb|200px|第二检查点的位置|left]] | ||
| − | 1. | + | 1.瞭望塔 |
| − | 2. | + | 2.屋子 |
| − | 3. | + | 3.桥 |
| − | 4. | + | 4.狙击角 |
| − | 5. | + | 5.上层平台 |
| − | 6. | + | 6.大房 |
| − | 7. | + | 7.步哨角 |
<br> | <br> | ||
| + | |||
=== 第三阶段 === | === 第三阶段 === | ||
| − | [[File:Gold Rush Section three.png|thumb|top| | + | [[File:Gold Rush Section three.png|thumb|top|第三阶段(点击放大)]] |
==== 第一检查点==== | ==== 第一检查点==== | ||
被占领后增加的时长:3分钟30秒 | 被占领后增加的时长:3分钟30秒 | ||
| − | + | 战车位于蓝队出生点之外,在开始的一大段轨道内,战车只会向前直行,在从盆地地形驶出时就会经过在大门下的检查点并转弯。 | |
| − | * ''' | + | * '''隧道''':隧道是蓝队出生点出口之一。隧道从蓝队出生点内部开始,截止至卡车房下方。 |
| − | * ''' | + | * '''盆地''':盆地指地图中部低于卡车房和平台的区域。 |
| − | * ''' | + | * '''卡车房''':卡车房位于平台对面。这是一栋小型建筑,配有能俯瞰战车轨道的小平台。因其旁边有一辆大卡车得名卡车房。 |
| − | * ''' | + | * '''平台''':位于卡车房对面,平台可俯瞰轨道。其上有一个不可进入的小屋可用作掩体。 |
<gallery widths=140px heights=70px> | <gallery widths=140px heights=70px> | ||
| − | File:Goldrush3a. | + | File:Goldrush3a.png|第三阶段第一检查点 |
| − | File:goldrush31truck. | + | File:goldrush31truck.png|卡车房 |
| − | File:goldrush31valley. | + | File:goldrush31valley.png|盆地 |
</gallery> | </gallery> | ||
| Line 188: | Line 189: | ||
被占领后增加的时长:4分钟30秒 | 被占领后增加的时长:4分钟30秒 | ||
| − | + | 在经过第一检查点后,战车会进入一条非常长的小巷,小巷两侧都有建筑可供进入或躲藏。 | |
| − | * ''' | + | * '''通道''':在检查点旁边的墙体处有一个小出口可供进入第一检查点区。该出口为红队在蓝队占领第一检查点前进入第一检查点区的通道。 |
| − | * ''' | + | * '''走廊''':走廊位于两侧建筑的其中一侧中,其为一条延绵狭长且双方都可进入的走廊。走廊的尽头是一个下落到轨道旁的出口。 |
| − | * ''' | + | * '''大平台''':位于走廊对面的建筑同样也有沿墙分布的平台(走廊),该平台可从一系列楼梯进入,该平台通往另一处俯瞰第二检查点的小平台处。 |
| − | * ''' | + | * '''步哨平台''':在第二检查点两侧都有大型平台,这些平台经常用于放置步哨枪。 |
<gallery widths=140px heights=70px> | <gallery widths=140px heights=70px> | ||
| − | File:Goldrush3b. | + | File:Goldrush3b.png|第三阶段第二检查点 |
| − | File:goldrush32dropdown. | + | File:goldrush32dropdown.png|地下通道 |
| − | File:goldrush32house1. | + | File:goldrush32house1.png|大平台 |
| − | File:goldrush32sentrydecks. | + | File:goldrush32sentrydecks.png| 步哨平台 |
</gallery> | </gallery> | ||
==== 第三检查点 ==== | ==== 第三检查点 ==== | ||
| − | + | 在通过第二检查点后,战车需要通过更多其他建筑来最终抵达红队庭院。 | |
| − | * ''' | + | * '''拐角''':拐角是一条非常狭窄的用于进入红队庭院的入口。该位置因其及其容易被红队激活而难以推进而知名,尤其是在战车位于拐角区域时更为混乱。 |
| − | * ''' | + | * '''隧道入口''':拐角旁有一个小洞用于进入地下隧道。 |
| − | * ''' | + | * '''前线大房''':前线大房位于拐角旁边。其内有一条走廊和一个通往红队庭院内卡车后方的下落单向出口。蓝队的工程师一般会选择在此处建造前线。 |
| − | * ''' | + | * '''地下隧道''':地下隧道由隧道入口进入,出口连接小巷。地下隧道由两条小隧道结合而成。两条隧道分别向上通往一个有掩体的平台和小巷。 |
| − | * ''' | + | * '''小巷''':小巷是位于红队庭院旁的峡谷地形,可由一条很长的楼梯出入,出入口处同时连接着地下隧道和狙击平台。 |
| − | * ''' | + | * '''狙击平台''':狙击平台位于小巷之上,红队庭院对面。其上配有两扇窗户和一个能通往最终检查点区域的小路。 |
| − | * ''' | + | * '''上层平台''':上层平台位于检查点之上,可俯瞰整个最终检查点区域。该区域有两个入口,其中一个是红队出生点内的楼梯,另一个入口是从旁边建筑的屋顶上的箱子跳到这个平台上。 |
| − | * ''' | + | * '''红队出生点#1''':红队在第三阶段有两个分开的出生点。第一个出生点位于最终检查点左侧,该出生点配有两个出口,其中一个为通往第一检查点的捷径,另一个为最终检查点旁的小门。当第一检查点被i蓝队占领时,通往第一检查点的出口将关闭。 |
| − | * ''' | + | * '''红队出生点#2''':红队的第二个出生点位于最终检查点的右后方。该出生点有两个出口。其中的主出口向左开启,通往最终检查点后方,右边的楼梯可通往上层平台。 |
<gallery widths=150px heights=70px perrow=5> | <gallery widths=150px heights=70px perrow=5> | ||
| − | File:Goldrush3c. | + | File:Goldrush3c.png|最终阶段最终检查点 |
| − | File:goldrush33battlements. | + | File:goldrush33battlements.png|上层平台 |
| − | File:goldrush33deck. | + | File:goldrush33deck.png|狙击平台 |
| − | File:goldrush33tunnels. | + | File:goldrush33tunnels.png|地下隧道 |
| − | File:goldrush33valley. | + | File:goldrush33valley.png|小巷 |
</gallery> | </gallery> | ||
[[File:Goldrush sectiio3 with lines.png|thumb|第三阶段的位置|250px|left]] | [[File:Goldrush sectiio3 with lines.png|thumb|第三阶段的位置|250px|left]] | ||
| − | 1. | + | 1.平台 |
| − | 2. | + | 2.盆地 |
| − | 3. | + | 3.卡车房 |
| − | 4. | + | 4.走廊 |
| − | 5. | + | 5.大平台 |
| − | 6. | + | 6.狙击平台 |
| − | 7. | + | 7.拐角 |
| − | 8. | + | 8.小巷 |
| − | 9. | + | 9.上层平台 |
| − | 10. | + | 10.狙击平台 |
| − | 11. | + | 11.前线大房 |
{{clr}} | {{clr}} | ||
| + | |||
== 与Gold Rush有关的图片 == | == 与Gold Rush有关的图片 == | ||
{{see also|Category:Gold Rush images}} | {{see also|Category:Gold Rush images}} | ||
| Line 274: | Line 276: | ||
** 在桥下增加了{{code|func_nobuild}}区域来防止玩家在此处建造传送门卡住其他玩家。 | ** 在桥下增加了{{code|func_nobuild}}区域来防止玩家在此处建造传送门卡住其他玩家。 | ||
* 第三阶段 | * 第三阶段 | ||
| − | ** 在屋顶上方加了隐形的{code|func_brush}}区域来防止爆破手利用抛物线弹道攻击对面的敌人。 | + | ** 在屋顶上方加了隐形的{{code|func_brush}}区域来防止爆破手利用抛物线弹道攻击对面的敌人。 |
| − | ** | + | ** 修复了大门的结构使其不再摧毁其上的传送装置。 |
| − | ** | + | ** 在中央大门的上方增加了判定盒。 |
| − | ** | + | ** 延申了红队出生点的出生点区域判定使其充满整个出生点。 |
| − | ** | + | ** 在蓝队上层出口处新增了可视化的出生点材质来阻止玩家试图从上层出口反向进入出生点。 |
'''{{Patch name|7|10|2013}}''' | '''{{Patch name|7|10|2013}}''' | ||
| − | * | + | * 优化了在物体上的碰撞体积,修复了数个穿模问题。 |
| − | * | + | * 修复了玩家无法在第三阶段结尾处的车库建造建筑的问题。 |
| − | * | + | * 现在玩家无法隔着墙阻挡战车了。 |
| − | * | + | * 现在玩家无法再重生点出口内建造建筑了。 |
| − | * | + | * 现在玩家无法再第三阶段末尾处的小屋屋顶建造建筑了。 |
| − | * | + | * 现在玩家和建筑不会因第一检查点被占领而在红队出口处被卡死了。 |
| − | * | + | * 现在玩家无法在第一阶段的杆上建造建筑了。 |
| − | * | + | * 现在扶手不再会阻挡子弹和飞行物了。 |
'''{{Patch name|07|11|2013}}''' | '''{{Patch name|07|11|2013}}''' | ||
| − | * | + | * 修复了{{code|pl_goldrush}}一处错误编译的区域传送。 |
'''{{Patch name|3|5|2014}}''' | '''{{Patch name|3|5|2014}}''' | ||
| − | * | + | * 在第一阶段蓝队出生点旁的火车轨道下方增加了{{code|nobuild}}区域。 |
'''{{Patch name|7|15|2015}}''' | '''{{Patch name|7|15|2015}}''' | ||
| − | * | + | * 修复了在{{map link|Badwater Basin}},{{map link|Barnblitz}},{{map link|Borneo}}和Gold Rush上的一个在最终检查点区域和武器掉落有关的问题。 |
'''{{Patch name|9|10|2015}}''' | '''{{Patch name|9|10|2015}}''' | ||
| − | * {{Undocumented}} | + | * {{Undocumented}} 在Gold Rush上增加了[[saucers/zh-hans|飞碟]]海报。 |
'''{{Patch name|11|25|2015}}''' | '''{{Patch name|11|25|2015}}''' | ||
| − | * {{Undocumented}} | + | * {{Undocumented}} 移除了地图上的飞碟海报。 |
}} | }} | ||
== {{common string|Bugs}}== | == {{common string|Bugs}}== | ||
| − | * | + | * 在第二阶段玩家可以通过向出生点内的塔的窗户射击榴弹来直接蹲红队出生点。 |
| − | * | + | * 在第三阶段中大平台附近的一个位置建造传送装置会导致使用的人卡住。 |
| − | * | + | * 红队工程师可以在出生点内的一些位置建造传送装置,这是由于{{code|func_respawnroom}}没有彻底填满出生点内部导致的。 |
| − | * | + | * 在第三阶段玩家可能卡在蓝队隧道内的木栅栏上。这是因为隧道的判定穿到了栅栏内部,想要脱离只能靠死亡后复活。 |
| − | * | + | * 在第三阶段,如果玩家在蓝队占领第一检查点时站在捷径门口处会导致玩家卡住。被卡住的玩家可以用更换兵种来逃脱。 |
== {{common string|Trivia}}== | == {{common string|Trivia}}== | ||
| − | * Gold | + | * Gold Rush的风格与{{map link|Dustbowl}}相似,该特点在淘金热更新页中有指出。 |
| − | ** | + | ** 这可能是因为Gold Rush一开始被设计为Dustbowl的重制版,且一开始被命名为[[Dustbowl 2/zh-hans|Dustbowl 2]]。 |
=={{common string|External links}}== | =={{common string|External links}}== | ||
| − | * [https://www.teamfortress.com/goldrush/ | + | * [https://www.teamfortress.com/goldrush/ 官方淘金热更新成就页] |
| − | * [https://tf2maps.net/threads/goldrush-and-badwaters-development-pics.5196/ | + | * [https://tf2maps.net/threads/goldrush-and-badwaters-development-pics.5196/ 预告版本的消息]原帖于TF2Maps.net发布 |
{{Goldrush Update Nav}} | {{Goldrush Update Nav}} | ||
{{Maps Nav}} | {{Maps Nav}} | ||
| − | [[Category:Quickplay maps]] | + | [[Category:Quickplay maps/zh-hans]] |
Latest revision as of 21:42, 12 February 2024
| Goldrush | |
|---|---|

| |
| 基本信息 | |
| 种类: | 推车 |
| 文件名: | pl_goldrush
|
| 发布时间: | 2008年4月29日补丁 (淘金热更新) |
| 开发者: | Valve |
| 地图资料 | |
| 阶段数: | 3 |
| 环境: | 沙漠 |
| 设定: | 白昼,晴天 |
| 是否支持火焰兵幻境: | 是 |
| 是否支持人机: | 是 |
| 地图物品 | |
| 地图照片 | |
 | |
| “ | Gold Rush是一张注重于节奏的地图,该特点会使在这张地图上游玩的玩家感到整个队伍在作为一个整体在行动。双方队伍的玩家都需要在推进/停止战车上竭尽全力的同时还要想怎么面对眼前的敌人。随着战车进度的变化,双方队伍都需要根据对方采取的行动决定下一步战略。Gold Rush在设计时考虑到了军团要塞2九个兵种的全部能力,这意味着在这张地图上每个兵种都有其利好的点位,也都可以大放异彩。
— 淘金热更新
|
” |


Gold Rush(也可称为Goldrush)是一张推车模式地图,同时也是第一张被加入到游戏中的推车模式地图。该地图分为三个相连的阶段,每个阶段都有多个检查点。
每阶段剩余的时间会延续到下一阶段,最高叠加到9分钟。叠加的时间会在互换队伍后清零。每回合开始都有1分05秒的准备时间。
介绍视频
位置

第一阶段
第一检查点
被占领后增加的时长:5分钟30秒
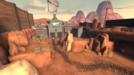
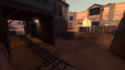
在蓝队出生点和第一检查点中间隔着一段延绵且相对比较开阔的区域。战车起始于蓝队出生点门口并朝着小屋的方向前进。一开始战车沿着悬崖行进,然后会稍微向左转上到一条木制上坡路上,之后会向右转,进入小路。
- 蓝队出生点:蓝队出生点由一个补给区域和一条由三个出口的走廊组成。战车起点后方有两扇门组成的大型出口,且该出口能被该区域大部分位置看到。右侧的门在前方有箱子堆阻碍视线,红队可以利用这个盲区躲在蓝队视野之外并在开局时用火焰兵和超能冲锋的配合来偷袭,在使用此战术时可以等对方医生的超能冲锋结束后再出击来消灭更多敌人。蓝队也可以躲在这堆箱子后方偷袭,尤其是在战斗进入白热化后,红队很难注意你的去向。左侧的出口面朝右边,其门口有矮墙作为掩体可以不受上坡路敌人的干扰,其左侧在山崖处有岩石作为掩体使其不受小屋处敌人的火力影响。
- 上层轨道:在蓝队视角看此处轨道是沿着左侧行进的并一路前进到检查点和隧道处。红队在防守时,尤其是爆破手和士兵可以沿着这里一直向下方的进攻者倾泻火力。蓝队进攻者可以从山崖上蹲跳到此处。因为此处附近有大弹药箱,进攻性强的红队工程师也可以快速在轨道尽头处或蓝队基地附近建造一个2-3级的步哨。
- 山崖:这里其实并不真正意义上是个“山崖”,但是从蓝队视角来看就像是地面缓缓升起然后再一落千丈,所以在蓝队视角看起来有点像个小山崖。在山崖旁边有一条“裂谷”,此处为战车轨道经过处。红队可以在山崖后方藏火焰兵,步哨枪甚至是超能冲锋来偷袭蓝队。在山崖左后方有一个大医疗包。在此处,爆破手可以直接黏弹跳到小路入口处(如果加以练习可以精确落到医疗包处)。
- 小屋:小屋位于地图的右侧。其内部分为两层,且有一个面对蓝队出生点的阳台。一层的其中一个入口正面对着出生点且外面有一个大弹药箱,还有一个入口面对着轨道。小屋是狙击手的优质狙击点,在此处可以轻松解决掉从正门出来尝试推车的蓝队玩家。工程师也可以在顶层建造步哨,因为这里不仅可以覆盖到第一检查点区域还可以不受蓝队出生点内的火力影响。需要注意的是,蓝队的爆破手在经过一些练习后也可以直接精确落到阳台上。
- 隧道:战车需要从该区域左侧进入第二检查点区域。在第一检查点被占领前,此处是进入地图后半部分的唯一途径。此处也是该阶段重要的咽喉处部分。

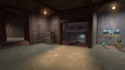
第一阶段的第一检查点
山崖
小屋
隧道


第二检查点
被占领后增加的时长:4分钟
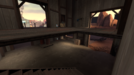
战车从上文提到的隧道穿过后会经历一段“S”型转弯然后就进入到开阔的第二检查点区域。在这里,战车沿着水渠行进然后经过一个小桥后向右转便是第二检查点。第二检查点位于红队出生点后方。下文将以红队视角描述位置。
- 红队出生点:红队基地出口处可选择向左进入矿道然后直接到检查点旁也可以向右到一片更开阔的区域,直面来自第一检查点区的敌人。此处设置有楼梯,可通往红队高台。红队的出生点面朝土墙,所以必须进行一个180°转弯才能直面进攻方。从进攻方视角看,检查点正位于红队出生点之前。
- 红队高台:红队出生点右侧(如果面对进攻方就是左侧)有一个高台抵着地图左侧的高墙分布。在平台偏前方有弹药箱和医疗包分布,使得此处成为绝佳的步哨枪点位,在此处建造步哨枪能直接覆盖到刚从隧道里出来的战车。平台上还有一座小桥连接到红队出生点屋顶,此处是狙击手的优质点位,在此处可以轻松狙击在隧道战车附近的敌人。
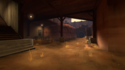
- 水渠:在红队出生点和蓝队进入的建筑之间的开阔区域中,有一条(小型)峡谷状水渠横穿区域。其右侧为缓缓上升的土坡路,最终于地面齐平。其左侧有一架小梯子,为回到隧道提供了捷径。在水渠中间有一座木桥横跨水渠,为双方玩家提供了直接推进的选择。战车绕水渠而行最终向右转进入检查点。
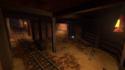
- 二楼: 在第一检查点的隧道咽喉处附近,有一到座从右到左一直延伸到边界的双层结构建筑。该建筑被玩家称为二楼。在一楼,建筑左侧(红队视角)有一个出口,战车从此进入第二检查点区。其上有一扇从二楼开启的窗户,其右边是一条木板路连接着二楼和左侧房间。左侧房间内有一个出口,连接着一个离检查点很近的小平台。进入隧道后,红队可以向左沿着战车轨道回到第一检查点,也可以向右走沿着上层轨道方向,此处有一个大医疗包,继续向右进入建筑。对于进攻方来说此处的通道至关重要,此处的出口都距离检查点很近而且还有掩体提供掩护。
- 狙击高台:在第一检查点被占领时,通往左侧小隧道的铁门将开启,使蓝队玩家可以进入这个小隧道。小隧道的尽头是一个房间,内有中医疗包。房间内有一条通往狙击平台的楼梯。狙击平台位于水渠之上,此处为狙击手狙击的绝佳点位,在此处可以看到水渠和其周围的一切。
- 矿道:于红队出生点平行且同样位于地图右边(蓝队视角)的就是矿道。一条狭窄的隧道,其中有矿车轨道经过。矿道连接了检查点和红队出生点,虽然非常狭窄但是同时也是抵达检查点和进入二楼的最短路径。
红队可以提前在准备阶段中在二楼处设防。红队工程师可以先在基地出口前建造一个传送装置入口,然后再在平台下方沿墙壁建造一个补给器,在建造进度在60%左右时跳到补给器上方然后打开建造工具选择建造传送装置出口并不断跳跃和选择来在极限高度建造出口。建造完成后,工程师和他的队友就可以在二楼处提前设防来拖延时间。
还有另一条进入第二检查点区的途径是从平台的最右边走到一处开放的二楼结构,此处正位于水渠旁。在此处只能看到红队出生点二楼的一小部分。占领此处可对任何想要通过木桥和水渠的人火力压制,不过还是需要注意的是,即使水渠阻挡了敌人徒步进入此处,士兵,爆破手和侦察兵可以爆炸跳或二段跳到此处偷袭你。
第一阶段的第二检查点
二楼
红队高台

水渠


1.上层轨道
2.山崖
3.小屋
4.狙击高台
5.水渠
6.红队高台
7.二楼
8.矿道
第二阶段

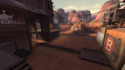
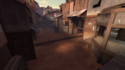
第一检查点
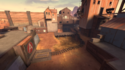
被占领后增加的时长:4分钟30秒
战车在一处战壕前起始,这条战壕将蓝队出生点和战场分隔。战车将会在瞭望塔和屋子之间行进,最终会经过一座桥,检查点位于桥上。
- 蓝队出生点:蓝队出生点有两个出口,左边一个隧道出口,中间一个双门大型出口。大部分玩家会从中间的出口出来。中间的出口一般用于超能冲锋来冲破敌方的防线,而左边的出口一般用于打偷袭。左侧出口很适合间谍来潜行到防线背后。但是也需要注意,有时候在开局红队医生和火焰兵会开启超能冲锋从左侧隧道进入,该战术通常会使隧道中的一切灰飞烟灭。
- 屋子旁隧道:在蓝队视角看屋子的左侧有一个小隧道,内有一个大弹药箱和一个小医疗包。穿过小隧道后有通往狙击角的楼梯。
- 狙击角:在红队进入第一检查点区域的地方,有一条小台阶通往狙击角。就像该位置的名字一样,该处经常被用作狙击点位。此处有一些箱子和一个小屋以及一个中医疗包,为狙击手提供了掩护和补给。
- 瞭望塔:在蓝队出生点右侧是瞭望塔。因其有利的地势,在开局时大部分红队玩家会在此处防守。此处还有一个大弹药箱和一个中医疗包。在瞭望塔上狙击手可以同时覆盖到两个出口,此处也是常见的步哨枪点位。
- 桥:在通过第一检查点之前,战车需要通过一座架在沟壑之上的木桥。
- 屋子:在蓝队视角观察,屋子位于地图左侧。屋子配有一个出入口和两扇窗户,窗户没有掩护可以被子弹穿过。有时此处会有步哨枪或爆破手把手。
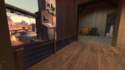
第二阶段第一检查点
屋子
屋子旁隧道
狙击角


第二检查点
被占领后增加的时长:4分钟
在通过第一检查点后,战车会绕着一栋隔绝着两个检查点区域的建筑行进。接着会进入一个咽喉地带,通过后会经过一个分隔了大房的小木桥,最终抵达检查点。
- 咽喉地区:咽喉地区是位于大房和上层平台间的开阔区域。
- 最终区域:最终区域指红队出生点和大房之间的区域。
- 大房:大房位于该区域的中央。将第二检查点区域的战场一分为二。大房由两栋建筑组成,其中间由一座小木桥连接,两栋建筑都可以从下方的楼梯进入。从某种角度来看,大房位于最终区域和咽喉地区之间。
- 步哨角:在检查点旁边由一个小角落,该位置是非常常见步哨枪点位。
- 凹槽:在大房步哨角对面的建筑有一个凹槽区域。此处是跟步哨角一样也是个非常常见的步哨枪点位。
- 红队出生点:红队出生点出口位于第二检查点对面。红队只能向左或向右走到检查点附近的区域(右边有步哨角,左边有凹槽)。该出生点与第一阶段的出生点不同,其内只有一个补给柜,相同的是,该出生点同样只有一个面朝墙壁的出口,这使其非常不利于反制蹲点(Spwan camp)。
第二阶段第二检查点
咽喉区域
大房
上层平台


1.瞭望塔
2.屋子
3.桥
4.狙击角
5.上层平台
6.大房
7.步哨角
第三阶段

第一检查点
被占领后增加的时长:3分钟30秒
战车位于蓝队出生点之外,在开始的一大段轨道内,战车只会向前直行,在从盆地地形驶出时就会经过在大门下的检查点并转弯。
- 隧道:隧道是蓝队出生点出口之一。隧道从蓝队出生点内部开始,截止至卡车房下方。
- 盆地:盆地指地图中部低于卡车房和平台的区域。
- 卡车房:卡车房位于平台对面。这是一栋小型建筑,配有能俯瞰战车轨道的小平台。因其旁边有一辆大卡车得名卡车房。
- 平台:位于卡车房对面,平台可俯瞰轨道。其上有一个不可进入的小屋可用作掩体。
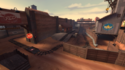
第三阶段第一检查点
卡车房
盆地


第二检查点
被占领后增加的时长:4分钟30秒
在经过第一检查点后,战车会进入一条非常长的小巷,小巷两侧都有建筑可供进入或躲藏。
- 通道:在检查点旁边的墙体处有一个小出口可供进入第一检查点区。该出口为红队在蓝队占领第一检查点前进入第一检查点区的通道。
- 走廊:走廊位于两侧建筑的其中一侧中,其为一条延绵狭长且双方都可进入的走廊。走廊的尽头是一个下落到轨道旁的出口。
- 大平台:位于走廊对面的建筑同样也有沿墙分布的平台(走廊),该平台可从一系列楼梯进入,该平台通往另一处俯瞰第二检查点的小平台处。
- 步哨平台:在第二检查点两侧都有大型平台,这些平台经常用于放置步哨枪。
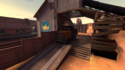
第三阶段第二检查点
地下通道
大平台
步哨平台


第三检查点
在通过第二检查点后,战车需要通过更多其他建筑来最终抵达红队庭院。
- 拐角:拐角是一条非常狭窄的用于进入红队庭院的入口。该位置因其及其容易被红队激活而难以推进而知名,尤其是在战车位于拐角区域时更为混乱。
- 隧道入口:拐角旁有一个小洞用于进入地下隧道。
- 前线大房:前线大房位于拐角旁边。其内有一条走廊和一个通往红队庭院内卡车后方的下落单向出口。蓝队的工程师一般会选择在此处建造前线。
- 地下隧道:地下隧道由隧道入口进入,出口连接小巷。地下隧道由两条小隧道结合而成。两条隧道分别向上通往一个有掩体的平台和小巷。
- 小巷:小巷是位于红队庭院旁的峡谷地形,可由一条很长的楼梯出入,出入口处同时连接着地下隧道和狙击平台。
- 狙击平台:狙击平台位于小巷之上,红队庭院对面。其上配有两扇窗户和一个能通往最终检查点区域的小路。
- 上层平台:上层平台位于检查点之上,可俯瞰整个最终检查点区域。该区域有两个入口,其中一个是红队出生点内的楼梯,另一个入口是从旁边建筑的屋顶上的箱子跳到这个平台上。
- 红队出生点#1:红队在第三阶段有两个分开的出生点。第一个出生点位于最终检查点左侧,该出生点配有两个出口,其中一个为通往第一检查点的捷径,另一个为最终检查点旁的小门。当第一检查点被i蓝队占领时,通往第一检查点的出口将关闭。
- 红队出生点#2:红队的第二个出生点位于最终检查点的右后方。该出生点有两个出口。其中的主出口向左开启,通往最终检查点后方,右边的楼梯可通往上层平台。
最终阶段最终检查点
上层平台
狙击平台
地下隧道
小巷


1.平台
2.盆地
3.卡车房
4.走廊
5.大平台
6.狙击平台
7.拐角
8.小巷
9.上层平台
10.狙击平台
11.前线大房
与Gold Rush有关的图片
战术
 | “孙武没告诉咱们该咋做!” 这张地图的社区战术(英语)页面是个小条目,它的内容还有待完善。 你可以通过扩充它来为军团要塞官方维基的社区战术计划出一份力。 附注:未添加附注 |
更新历史
- Gold Rush 被添加到游戏中。
- 修复了Gold Rush上的多个漏洞
- 对第一阶段第二检查点区域做了一些调整,使其对进攻者更有利。
- 第一阶段
- 修复了一段重叠了的战车轨道模型。
- 修复了红队出生点出口的地形缝隙。
- 修复了红队出生点大门会穿过天花板的问题。
- 红队第一出生点屋顶的灯改为非实体。
- 第二阶段
- 在桥下增加了
func_nobuild区域来防止玩家在此处建造传送门卡住其他玩家。
- 在桥下增加了
- 第三阶段
- 在屋顶上方加了隐形的
func_brush区域来防止爆破手利用抛物线弹道攻击对面的敌人。 - 修复了大门的结构使其不再摧毁其上的传送装置。
- 在中央大门的上方增加了判定盒。
- 延申了红队出生点的出生点区域判定使其充满整个出生点。
- 在蓝队上层出口处新增了可视化的出生点材质来阻止玩家试图从上层出口反向进入出生点。
- 在屋顶上方加了隐形的
- 优化了在物体上的碰撞体积,修复了数个穿模问题。
- 修复了玩家无法在第三阶段结尾处的车库建造建筑的问题。
- 现在玩家无法隔着墙阻挡战车了。
- 现在玩家无法再重生点出口内建造建筑了。
- 现在玩家无法再第三阶段末尾处的小屋屋顶建造建筑了。
- 现在玩家和建筑不会因第一检查点被占领而在红队出口处被卡死了。
- 现在玩家无法在第一阶段的杆上建造建筑了。
- 现在扶手不再会阻挡子弹和飞行物了。
- 修复了
pl_goldrush一处错误编译的区域传送。
- 在第一阶段蓝队出生点旁的火车轨道下方增加了
nobuild区域。
- 修复了在Badwater Basin,Barnblitz,Borneo和Gold Rush上的一个在最终检查点区域和武器掉落有关的问题。
- [未记载] 在Gold Rush上增加了飞碟海报。
- [未记载] 移除了地图上的飞碟海报。
漏洞
- 在第二阶段玩家可以通过向出生点内的塔的窗户射击榴弹来直接蹲红队出生点。
- 在第三阶段中大平台附近的一个位置建造传送装置会导致使用的人卡住。
- 红队工程师可以在出生点内的一些位置建造传送装置,这是由于
func_respawnroom没有彻底填满出生点内部导致的。 - 在第三阶段玩家可能卡在蓝队隧道内的木栅栏上。这是因为隧道的判定穿到了栅栏内部,想要脱离只能靠死亡后复活。
- 在第三阶段,如果玩家在蓝队占领第一检查点时站在捷径门口处会导致玩家卡住。被卡住的玩家可以用更换兵种来逃脱。
细枝末节
- Gold Rush的风格与Dustbowl相似,该特点在淘金热更新页中有指出。
- 这可能是因为Gold Rush一开始被设计为Dustbowl的重制版,且一开始被命名为Dustbowl 2。
外部链接
- 官方淘金热更新成就页
- 预告版本的消息原帖于TF2Maps.net发布
| ||||||||||||||||||||