Difference between revisions of "Summer Event 2013"
(→Tweaked Item Sets) |
|||
| (6 intermediate revisions by 4 users not shown) | |||
| Line 6: | Line 6: | ||
}} | }} | ||
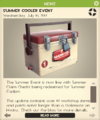
| − | The '''Summer Event Update''' was the in-game release of several [[items]] that were selected by Valve for outstanding quality through the [[Steam Workshop]] and resubmitted using new item importing system, along with the fixing of several exploits and bugs present in existing [[maps]] and the tweak to several [[weapons]]. Released with the {{Patch name|7|10|2013}}, the update added a total of 64 new [[Cosmetic items]] which were available via opening [[Summer 2013 Cooler|Crates]] with their special [[Key|Summer Cooler Keys]], and 2 new | + | The '''Summer Event Update''' was the in-game release of several [[items]] that were selected by Valve for outstanding quality through the [[Steam Workshop]] and resubmitted using the new item importing system, along with the fixing of several exploits and bugs present in existing [[List of maps|maps]] and the tweak to several [[weapons]]. Released with the {{Patch name|7|10|2013}}, the update added a total of 64 new [[Cosmetic items]] which were available via opening [[Summer 2013 Cooler|Crates]] with their special [[Key|Summer Cooler Keys]], and 2 new maps, [[Standin]], and [[Process]]. |
== Additions == | == Additions == | ||
=== Cosmetics === | === Cosmetics === | ||
| + | {{main|Cosmetic items}} | ||
{| class="wikitable collapsible" cellpadding=2 style="text-align:center;" | {| class="wikitable collapsible" cellpadding=2 style="text-align:center;" | ||
| − | | width=" | + | | width="80px" style="background:#ffe567;" rowspan="6" | '''{{class link|Scout|br=yes|color=black}}''' |
| − | | | + | | style="background:#fff2b3;" | {{Icon item|Bigg Mann on Campus|75px}} |
| − | | | + | | '''{{Item link|Bigg Mann on Campus}}''' |
|- | |- | ||
| − | | | + | | style="background:#fff2b3;" | {{Icon item|Caffeine Cooler|75px}} |
| − | | | + | | '''{{Item link|Caffeine Cooler}}''' |
|- | |- | ||
| − | | | + | | style="background:#fff2b3;" | {{Icon item|Cool Cat Cardigan|75px}} |
| − | | | + | | '''{{Item link|Cool Cat Cardigan}}''' |
|- | |- | ||
| − | | | + | | style="background:#fff2b3;" | {{Icon item|Delinquent's Down Vest|75px}} |
| − | | | + | | '''{{Item link|Delinquent's Down Vest}}''' |
|- | |- | ||
| − | | | + | | style="background:#fff2b3;" | {{item icon|Greased Lightning|75px}} |
| − | | | + | | '''{{Item link|Greased Lightning}}''' |
|- | |- | ||
| − | | | + | | style="background:#fff2b3;" | {{Icon item|Half-Pipe Hurdler|75px}} |
| − | | | + | | '''{{Item link|Half-Pipe Hurdler}}''' |
|- | |- | ||
| − | | | + | | style="background:#ffe567;" rowspan="11" | '''{{class link|Soldier|br=yes|color=black}}''' |
| − | | | + | | style="background:#fff2b3;" | {{Icon item|Brawling Buccaneer|75px}} |
| − | | | + | | '''{{Item link|Brawling Buccaneer}}''' |
|- | |- | ||
| − | | | + | | style="background:#fff2b3;" | {{item icon|Caribbean Conqueror|75px}} |
| − | | | + | | '''{{Item link|Caribbean Conqueror}}''' |
|- | |- | ||
| − | | | + | | style="background:#fff2b3;" | {{Icon item|Colonial Clogs|75px}} |
| − | | | + | | '''{{Item link|Colonial Clogs}}''' |
|- | |- | ||
| − | | | + | | style="background:#fff2b3;" | {{Icon item|Compatriot|75px}} |
| − | | | + | | '''{{Item link|Compatriot}}''' |
|- | |- | ||
| − | | | + | | style="background:#fff2b3;" | {{Icon item|Founding Father|75px}} |
| − | | | + | | '''{{Item link|Founding Father}}''' |
|- | |- | ||
| − | | | + | | style="background:#fff2b3;" | {{Icon item|Hornblower|75px}} |
| − | | | + | | '''{{Item link|Hornblower}}''' |
|- | |- | ||
| − | | | + | | style="background:#fff2b3;" | {{Icon item|Lieutenant Bites|75px}} |
| − | | | + | | '''{{Item link|Lieutenant Bites}}''' |
|- | |- | ||
| − | | | + | | style="background:#fff2b3;" | {{item icon|Rebel Rouser|75px}} |
| − | | | + | | '''{{Item link|Rebel Rouser}}''' |
|- | |- | ||
| − | | | + | | style="background:#fff2b3;" | {{Icon item|Shogun's Shoulder Guard|75px}} |
| − | | | + | | '''{{Item link|Shogun's Shoulder Guard}}''' |
|- | |- | ||
| − | | | + | | style="background:#fff2b3;" | {{item icon|Valley Forge|75px}} |
| − | | | + | | '''{{Item link|Valley Forge}}''' |
|- | |- | ||
| − | | | + | | style="background:#fff2b3;" | {{item icon|Whirly Warrior|75px}} |
| − | | | + | | '''{{Item link|Whirly Warrior}}''' |
|- | |- | ||
| − | | | + | | style="background:#ffe567;" rowspan="6" | '''{{class link|Pyro|br=yes|color=black}}''' |
| − | | | + | | style="background:#fff2b3;" | {{Icon item|Backpack Broiler|75px}} |
| − | | | + | | '''{{Item link|Backpack Broiler}}''' |
|- | |- | ||
| − | | | + | | style="background:#fff2b3;" | {{item icon|Burning Bandana|75px}} |
| − | | | + | | '''{{Item link|Burning Bandana}}''' |
|- | |- | ||
| − | | | + | | style="background:#fff2b3;" | {{Icon item|El Muchacho|75px}} |
| − | | | + | | '''{{Item link|El Muchacho}}''' |
|- | |- | ||
| − | | | + | | style="background:#fff2b3;" | {{item icon|Hive Minder|75px}} |
| − | | | + | | '''{{Item link|Hive Minder}}''' |
|- | |- | ||
| − | | | + | | style="background:#fff2b3;" | {{item icon|Pampered Pyro|75px}} |
| − | | | + | | '''{{Item link|Pampered Pyro}}''' |
|- | |- | ||
| − | | | + | | style="background:#fff2b3;" | {{Icon item|Soot Suit|75px}} |
| − | | | + | | '''{{Item link|Soot Suit}}''' |
|- | |- | ||
| − | | | + | | style="background:#ffe567;" rowspan="7"| '''{{class link|Demoman|br=yes|color=black}}''' |
| − | | | + | | style="background:#fff2b3;" | {{item icon|Black Watch|75px}} |
| − | | | + | | '''{{Item link|Black Watch}}''' |
|- | |- | ||
| − | | | + | | style="background:#fff2b3;" | {{Icon item|Gaelic Garb|75px}} |
| − | | | + | | '''{{Item link|Gaelic Garb}}''' |
|- | |- | ||
| − | | | + | | style="background:#fff2b3;" | {{Icon item|Gaelic Golf Bag|75px}} |
| − | | | + | | '''{{Item link|Gaelic Golf Bag}}''' |
|- | |- | ||
| − | | | + | | style="background:#fff2b3;" | {{item icon|Glasgow Great Helm|75px}} |
| − | | | + | | '''{{Item link|Glasgow Great Helm}}''' |
|- | |- | ||
| − | | | + | | style="background:#fff2b3;" | {{item icon|Stormin' Norman|75px}} |
| − | | | + | | '''{{Item link|Stormin' Norman}}''' |
|- | |- | ||
| − | | | + | | style="background:#fff2b3;" | {{item icon|Tartan Spartan|75px}} |
| − | | | + | | '''{{Item link|Tartan Spartan}}''' |
|- | |- | ||
| − | | | + | | style="background:#fff2b3;" | {{Icon item|Whiskey Bib|75px}} |
| − | | | + | | '''{{Item link|Whiskey Bib}}''' |
|- | |- | ||
| − | | | + | | style="background:#ffe567;" rowspan="8" | '''{{class link|Heavy|br=yes|color=black}}''' |
| − | | | + | | style="background:#fff2b3;" | {{item icon|Bear Necessities|75px}} |
| − | | | + | | '''{{Item link|Bear Necessities}}''' |
|- | |- | ||
| − | | | + | | style="background:#fff2b3;" | {{Icon item|Bolshevik Biker|75px}} |
| − | | | + | | '''{{Item link|Bolshevik Biker}}''' |
|- | |- | ||
| − | | | + | | style="background:#fff2b3;" | {{Icon item|Borscht Belt|75px}} |
| − | | | + | | '''{{Item link|Borscht Belt}}''' |
|- | |- | ||
| − | | | + | | style="background:#fff2b3;" | {{Icon item|Heavy-Weight Champ|75px}} |
| − | | | + | | '''{{Item link|Heavy-Weight Champ}}''' |
|- | |- | ||
| − | | | + | | style="background:#fff2b3;" | {{Icon item|Gabe Glasses|75px}} |
| − | | | + | | '''{{Item link|Gabe Glasses}}''' |
|- | |- | ||
| − | | | + | | style="background:#fff2b3;" | {{item icon|Katyusha|75px}} |
| − | | | + | | '''{{Item link|Katyusha}}''' |
|- | |- | ||
| − | | | + | | style="background:#fff2b3;" | {{Icon item|Red Army Robin|75px}} |
| − | | | + | | '''{{Item link|Red Army Robin}}''' |
|- | |- | ||
| − | | | + | | style="background:#fff2b3;" | {{item icon|Tsarboosh|75px}} |
| − | | | + | | '''{{Item link|Tsarboosh}}''' |
|- | |- | ||
| − | | | + | | style="background:#ffe567;" rowspan="4" | '''{{class link|Engineer|br=yes|color=black}}''' |
| − | | | + | | style="background:#fff2b3;" | {{Icon item|Dry Gulch Gulp|75px}} |
| − | | | + | | '''{{Item link|Dry Gulch Gulp}}''' |
|- | |- | ||
| − | | | + | | style="background:#fff2b3;" | {{Icon item|Flared Frontiersman|75px}} |
| − | | | + | | '''{{Item link|Flared Frontiersman}}''' |
|- | |- | ||
| − | | | + | | style="background:#fff2b3;" | {{item icon|Pardner's Pompadour|75px}} |
| − | | | + | | '''{{Item link|Pardner's Pompadour}}''' |
|- | |- | ||
| − | | | + | | style="background:#fff2b3;" | {{Icon item|Trash Toter|75px}} |
| − | | | + | | '''{{Item link|Trash Toter}}''' |
|- | |- | ||
| − | | | + | | style="background:#ffe567;" rowspan="9" | '''{{class link|Medic|br=yes|color=black}}''' |
| − | | | + | | style="background:#fff2b3;" | {{item icon|Baron von Havenaplane|75px}} |
| − | | | + | | '''{{Item link|Baron von Havenaplane}}''' |
|- | |- | ||
| − | | | + | | style="background:#fff2b3;" | {{Icon item|Das Fantzipantzen|75px}} |
| − | | | + | | '''{{Item link|Das Fantzipantzen}}''' |
|- | |- | ||
| − | | | + | | style="background:#fff2b3;" | {{Icon item|Das Feelinbeterbager|75px}} |
| − | | | + | | '''{{Item link|Das Feelinbeterbager}}''' |
|- | |- | ||
| − | | | + | | style="background:#fff2b3;" | {{item icon|Das Hazmattenhatten|75px}} |
| − | | | + | | '''{{Item link|Das Hazmattenhatten}}''' |
|- | |- | ||
| − | | | + | | style="background:#fff2b3;" | {{item icon|Das Naggenvatcher|75px}} |
| − | | | + | | '''{{Item link|Das Naggenvatcher}}''' |
|- | |- | ||
| − | | | + | | style="background:#fff2b3;" | {{item icon|Das Maddendoktor|75px}} |
| − | | | + | | '''{{Item link|Das Maddendoktor}}''' |
|- | |- | ||
| − | | | + | | style="background:#fff2b3;" | {{Icon item|Das Metalmeatencasen|75px}} |
| − | | | + | | '''{{Item link|Das Metalmeatencasen}}''' |
|- | |- | ||
| − | | | + | | style="background:#fff2b3;" | {{item icon|Das Gutenkutteharen|75px}} |
| − | | | + | | '''{{Item link|Das Gutenkutteharen}}''' |
|- | |- | ||
| − | | | + | | style="background:#fff2b3;" | {{item icon|Das Ubersternmann|75px}} |
| − | | | + | | '''{{Item link|Das Ubersternmann}}''' |
|- | |- | ||
| − | | | + | | style="background:#ffe567;" rowspan="4" | '''{{class link|Sniper|br=yes|color=black}}''' |
| − | | | + | | style="background:#fff2b3;" | {{Icon item|Birdman of Australiacatraz|75px}} |
| − | | | + | | '''{{Item link|Birdman of Australiacatraz}}''' |
|- | |- | ||
| − | | | + | | style="background:#fff2b3;" | {{Icon item|Cobber Chameleon|75px}} |
| − | | | + | | '''{{Item link|Cobber Chameleon}}''' |
|- | |- | ||
| − | | | + | | style="background:#fff2b3;" | {{Icon item|Falconer|75px}} |
| − | | | + | | '''{{Item link|Falconer}}''' |
|- | |- | ||
| − | | | + | | style="background:#fff2b3;" | {{item icon|Wet Works|75px}} |
| − | | | + | | '''{{Item link|Wet Works}}''' |
|- | |- | ||
| − | | | + | | style="background:#ffe567;" rowspan="5"| '''{{class link|Spy|br=yes|color=black}}''' |
| − | | | + | | style="background:#fff2b3;" | {{Icon item|After Dark|75px}} |
| − | | | + | | '''{{Item link|After Dark}}''' |
|- | |- | ||
| − | | | + | | style="background:#fff2b3;" | {{item icon|Belgian Detective|75px}} |
| − | | | + | | '''{{Item link|Belgian Detective}}''' |
|- | |- | ||
| − | | | + | | style="background:#fff2b3;" | {{Icon item|Blood Banker|75px}} |
| − | | | + | | '''{{Item link|Blood Banker}}''' |
|- | |- | ||
| − | | | + | | style="background:#fff2b3;" | {{item icon|Harmburg|75px}} |
| − | | | + | | '''{{Item link|Harmburg}}''' |
|- | |- | ||
| − | | | + | | style="background:#fff2b3;" | {{Icon item|Rogue's Brogues|75px}} |
| − | | | + | | '''{{Item link|Rogue's Brogues}}''' |
|- | |- | ||
| − | | | + | | style="background:#ffe567;" rowspan="4" | '''{{class link|All Classes|br=yes|color=black}}''' |
| − | | | + | | style="background:#fff2b3;" | {{Icon item|Graybanns|75px}} |
| − | | | + | | '''{{Item link|Graybanns}}''' |
|- | |- | ||
| − | | | + | | style="background:#fff2b3;" | {{item icon|Federal Casemaker|75px}} |
| − | | | + | | '''{{Item link|Federal Casemaker}}''' |
|- | |- | ||
| − | | | + | | style="background:#fff2b3;" | {{Icon item|Macho Mann|75px}} |
| − | | | + | | '''{{Item link|Macho Mann}}'''<sup>†</sup> |
|- | |- | ||
| − | | | + | | style="background:#fff2b3;" | {{item icon|Virtual Viewfinder|75px}} |
| − | | | + | | '''{{Item link|Virtual Viewfinder}}''' |
|- | |- | ||
| − | | style="background:#ffe567; height:30px" | ''' | + | | style="background:#ffe567; height:30px" | '''Notes''' |
| − | | colspan="2" | <sup>†</sup> | + | | colspan="2" | <sup>†</sup> Not available for the Pyro. |
| − | |||
| − | |||
|} | |} | ||
| − | === Action | + | === Action items === |
| + | {{main|Action items}} | ||
{| class="wikitable collapsible" cellpadding=2 style="text-align:center;" | {| class="wikitable collapsible" cellpadding=2 style="text-align:center;" | ||
| − | | | + | | width="80px" style="background:#ffe567;" | {{Icon item|A Random Summer Cooler Key Gift|75px}} |
| − | | | + | | '''{{Item link|A Random Summer Cooler Key Gift}}''' |
|- | |- | ||
| − | | | + | | style="background:#ffe567;" | {{Icon item|Pile of Summer Cooler Key Gifts|75px}} |
| − | | | + | | '''{{Item link|Pile of Summer Cooler Key Gifts}}''' |
|} | |} | ||
| − | === | + | === Tools === |
| + | {{main|Tools}} | ||
{| class="wikitable collapsible" cellpadding=2 style="text-align:center;" | {| class="wikitable collapsible" cellpadding=2 style="text-align:center;" | ||
| − | | | + | | width="80px" style="background:#ffe567;" | {{Icon item|Red Summer 2013 Cooler|75px}} |
| − | | | + | | '''{{Item link|Red Summer 2013 Cooler}}''' |
|- | |- | ||
| − | | | + | | style="background:#ffe567;" | {{Icon item|Red Summer 2013 Cooler Key|75px}} |
| − | | | + | | '''{{Item link|Red Summer 2013 Cooler Key}}''' |
|- | |- | ||
| − | | | + | | style="background:#ffe567;" | {{Icon item|Orange Summer 2013 Cooler|75px}} |
| − | | | + | | '''{{Item link|Orange Summer 2013 Cooler}}''' |
|- | |- | ||
| − | | | + | | style="background:#ffe567;" | {{Icon item|Orange Summer 2013 Cooler Key|75px}} |
| − | | | + | | '''{{Item link|Orange Summer 2013 Cooler Key}}''' |
|- | |- | ||
| − | | | + | | style="background:#ffe567;" | {{Icon item|Yellow Summer 2013 Cooler|75px}} |
| − | | | + | | '''{{Item link|Yellow Summer 2013 Cooler}}''' |
|- | |- | ||
| − | | | + | | style="background:#ffe567;" | {{Icon item|Yellow Summer 2013 Cooler Key|75px}} |
| − | | | + | | '''{{Item link|Yellow Summer 2013 Cooler Key}}''' |
|- | |- | ||
| − | | | + | | style="background:#ffe567;" | {{Icon item|Green Summer 2013 Cooler|75px}} |
| − | | | + | | '''{{Item link|Green Summer 2013 Cooler}}''' |
|- | |- | ||
| − | | | + | | style="background:#ffe567;" | {{Icon item|Green Summer 2013 Cooler Key|75px}} |
| − | | | + | | '''{{Item link|Green Summer 2013 Cooler Key}}''' |
|- | |- | ||
| − | | | + | | style="background:#ffe567;" | {{Icon item|Aqua Summer 2013 Cooler|75px}} |
| − | | | + | | '''{{Item link|Aqua Summer 2013 Cooler}}''' |
|- | |- | ||
| − | | | + | | style="background:#ffe567;" | {{Icon item|Aqua Summer 2013 Cooler Key|75px}} |
| − | | | + | | '''{{Item link|Aqua Summer 2013 Cooler Key}}''' |
|- | |- | ||
| − | | | + | | style="background:#ffe567;" | {{Icon item|Blue Summer 2013 Cooler|75px}} |
| − | | | + | | '''{{Item link|Blue Summer 2013 Cooler}}''' |
|- | |- | ||
| − | | | + | | style="background:#ffe567;" | {{Icon item|Blue Summer 2013 Cooler Key|75px}} |
| − | | | + | | '''{{Item link|Blue Summer 2013 Cooler Key}}''' |
|- | |- | ||
| − | | | + | | style="background:#ffe567;" | {{Icon item|Brown Summer 2013 Cooler|75px}} |
| − | | | + | | '''{{Item link|Brown Summer 2013 Cooler}}''' |
|- | |- | ||
| − | | | + | | style="background:#ffe567;" | {{Icon item|Brown Summer 2013 Cooler Key|75px}} |
| − | | | + | | '''{{Item link|Brown Summer 2013 Cooler Key}}''' |
|- | |- | ||
| − | | | + | | style="background:#ffe567;" | {{Icon item|Black Summer 2013 Cooler|75px}} |
| − | + | | '''{{Item link|Black Summer 2013 Cooler}}''' | |
| − | |||
| − | |||
| − | | | ||
|- | |- | ||
| + | | style="background:#ffe567;" | {{Icon item|Black Summer 2013 Cooler Key|75px}} | ||
| + | | '''{{Item link|Black Summer 2013 Cooler Key}}''' | ||
|} | |} | ||
| + | |||
=== Maps === | === Maps === | ||
| + | {{main|List of maps}} | ||
{| class="wikitable" cellpadding=2 style="text-align:center;" | {| class="wikitable" cellpadding=2 style="text-align:center;" | ||
|- style="height: 20px;" | |- style="height: 20px;" | ||
| − | ! style="background: #eec500;" class="header" | <span style="color: black;"> Name | + | ! style="background:#eec500;" class="header" | <span style="color: black;"> {{common string|Name}} |
| − | ! style="background: #eec500;" class="header" | <span style="color: black;"> Picture | + | ! style="background:#eec500;" class="header" | <span style="color: black;"> {{common string|Picture}} |
| − | ! style="background: #eec500;" class="header" | <span style="color: black;"> Game | + | ! style="background:#eec500;" class="header" | <span style="color: black;"> {{common string|Game mode}} |
| − | ! style="background: #eec500;" class="header" | <span style="color: black;"> File | + | ! style="background:#eec500;" class="header" | <span style="color: black;"> {{common string|File name}} |
|- | |- | ||
| − | |style="background:#ffe567; | + | | width="80px" style="background:#ffe567;" | '''[[Process{{if lang}}|<span style="color:black;">Process]]''' |
| − | | style="background: #fff2b3;" | [[File:Cp_process_middle_point. | + | | style="background:#fff2b3;" | [[File:Cp_process_middle_point.png|250px|link=Process{{if lang}}]] |
| − | + | | '''[[Control Point (game mode){{if lang}}|{{common string|Control Point}}]]'''<br />[[File:Controlpoint.png|50px|link=Control Point (game mode){{if lang}}]] | |
| − | + | | {{code|cp_process}} | |
|- | |- | ||
| − | |style="background:#ffe567; | + | | style="background:#ffe567;" | '''[[Standin{{if lang}}|<span style="color: black;">Standin]]''' |
| − | | style="background: #fff2b3;" | [[File:Cp_standin_B.jpg|250px|link=Standin]] | + | | style="background:#fff2b3;" | [[File:Cp_standin_B.jpg|250px|link=Standin{{if lang}}]] |
| − | + | | '''[[Control Point (game mode){{if lang}}|{{common string|Control Point}}]]'''<br />[[File:Controlpoint.png|50px|link=Control Point (game mode){{if lang}}]] | |
| − | + | | {{code|cp_standin}} | |
|} | |} | ||
| − | === Tweaked | + | === Tweaked item sets === |
{| class="wikitable" | {| class="wikitable" | ||
| − | ! style="background: #eec500;" class="header" | <span style="color: black;"> Class | + | ! style="background:#eec500;" class="header" | <span style="color:black;"> Class |
| − | ! style="background: #eec500;" class="header" | <span style="color: black;"> Item set | + | ! style="background:#eec500;" class="header" | <span style="color:black;"> Item set |
| − | ! style="background: #eec500;" class="header" | <span style="color: black;"> Changes | + | ! style="background:#eec500;" class="header" | <span style="color:black;"> Changes |
|- | |- | ||
| − | ! style="background: #ffe567;" rowspan=2 | {{Class link|Scout}} | + | ! width="80px" style="background:#ffe567;" rowspan=2 | {{Class link|Scout|br=yes|color=black}} |
| − | ! style="background: #fff2b3;" rowspan=2 | | + | ! style="background:#fff2b3;" rowspan=2 | {{item link|Special Delivery (item set)}}<br>{{Icon item|Shortstop|icon-size=75px}}{{Icon item|Mad Milk|icon-size=75px}}{{Icon item|Holy Mackerel|icon-size=75px}}{{Icon item|Milkman|icon-size=75px}} |
| − | | {{c| | + | | {{c|+|Added:}} Leave a Calling Card on your victims |
|- | |- | ||
| − | | {{c| | + | | {{c|-|Removed:}} +25 max health on wearer |
|- | |- | ||
| − | ! style="background: #ffe567;" rowspan=2 | {{Class link|Soldier}} | + | ! style="background:#ffe567;" rowspan=2 | {{Class link|Soldier|br=yes|color=black}} |
| − | ! style="background: #fff2b3;" rowspan=2 | | + | ! style="background:#fff2b3;" rowspan=2 | {{item link|Tank Buster}}<br>{{Icon item|Black Box|icon-size=75px}}{{Icon item|Battalion's Backup|icon-size=75px}}{{Icon item|Grenadier's Softcap|icon-size=75px}} |
| − | | {{c| | + | | {{c|+|Added:}} Leave a Calling Card on your victims |
|- | |- | ||
| − | | {{c| | + | | {{c|-|Removed:}} +20% Sentry damage resistance on wearer |
|- | |- | ||
| − | ! style="background: #ffe567;" rowspan=3 | {{Class link|Pyro}} | + | ! style="background:#ffe567;" rowspan=3 | {{Class link|Pyro|br=yes|color=black}} |
| − | ! style="background: #fff2b3;" rowspan=3 | | + | ! style="background:#fff2b3;" rowspan=3 | {{item link|Gas Jockey's Gear}}<br>{{Icon item|Degreaser|icon-size=75px}}{{Icon item|Powerjack|icon-size=75px}}{{Icon item|Attendant|icon-size=75px}} |
| − | | {{c|-|Removed:}} +10% | + | | {{c|+|Added:}} Leave a Calling Card on your victims |
| + | |- | ||
| + | | {{c|+|Removed:}} +10% bullet damage vulnerability on wearer | ||
|- | |- | ||
| − | | {{c| | + | | {{c|-|Removed:}} +10% faster move speed on wearer |
|- | |- | ||
| − | + | ! style="background:#ffe567;" rowspan=2 | {{Class link|Sniper|br=yes|color=black}} | |
| − | + | ! style="background:#fff2b3;" rowspan=2 | {{item link|Croc-o-Style Kit}}<br>{{Icon item|Sydney Sleeper|icon-size=75px}}{{Icon item|Darwin's Danger Shield|icon-size=75px}}{{Icon item|Bushwacka|icon-size=75px}}{{Icon item|Ol' Snaggletooth|icon-size=75px}} | |
| − | ! style="background: #ffe567;" rowspan=2 | {{Class link|Sniper}} | + | | {{c|+|Added:}} Leave a Calling Card on your victims |
| − | ! style="background: #fff2b3;" rowspan=2 | | ||
| − | | {{c| | ||
|- | |- | ||
| − | | {{c| | + | | {{c|-|Removed:}} The wearer cannot be killed by headshots |
|- | |- | ||
| − | ! style="background: #ffe567;" rowspan=8 | {{Class link|Spy}} | + | ! style="background:#ffe567;" rowspan=8 | {{Class link|Spy|br=yes|color=black}} |
| − | ! style="background: #fff2b3;" rowspan=8 | | + | ! style="background:#fff2b3;" rowspan=8 | {{item link|Saharan Spy}}<br>{{Icon item|L'Etranger|icon-size=75px}}{{Icon item|Your Eternal Reward|icon-size=75px}}{{Icon item|Familiar Fez|icon-size=75px}} |
| − | | {{c| | + | | {{c|+|Added:}} Extra effects when taunting |
|- | |- | ||
| − | | {{c| | + | | {{c|+|Removed:}} 0.5 sec longer Cloak blink time |
|- | |- | ||
| − | | {{c| | + | | {{c|-|Removed:}} Reduced decloak sound volume |
|} | |} | ||
| − | === Tweaked | + | === Tweaked weapons === |
{| class="wikitable" | {| class="wikitable" | ||
| − | ! style="background: #eec500;" class="header" | <span style="color: black;"> Class | + | ! style="background:#eec500;" class="header" | <span style="color: black;"> Class |
| − | ! style="background: #eec500;" class="header" | <span style="color: black;"> Weapon | + | ! style="background:#eec500;" class="header" | <span style="color: black;"> Weapon |
| − | ! style="background: #eec500;" class="header" | <span style="color: black;"> Changes | + | ! style="background:#eec500;" class="header" | <span style="color: black;"> Changes |
| − | |||
| − | |||
| − | |||
| − | |||
| − | |||
| − | |||
|- | |- | ||
| − | ! style="background: #fff2b3;" rowspan=2 | {{Icon item|Shortstop|icon-size=75px}} | + | ! width="80px" style="background:#ffe567;" rowspan=5 | {{Class link|Scout|br=yes|color=black}} |
| + | ! style="background:#fff2b3;" rowspan=2 | {{Icon item|Shortstop|icon-size=75px}} <br /> {{item link|Shortstop}} | ||
| {{c|+|Added:}} 20% bonus healing while deployed | | {{c|+|Added:}} 20% bonus healing while deployed | ||
|- | |- | ||
| {{c|-|Added:}} 80% vulnerability increase to all push forces while deployed | | {{c|-|Added:}} 80% vulnerability increase to all push forces while deployed | ||
|- | |- | ||
| − | ! style="background: #fff2b3;" | {{Icon item| | + | ! style="background:#fff2b3;" rowspan=2 | {{Icon item|Crit-a-Cola|icon-size=75px}} <br /> {{item link|Crit-a-Cola}} |
| − | | {{c|+| | + | | {{c|+|Removed:}} Damage taken mini-crits while under the effects |
|- | |- | ||
| − | + | | {{c|-|Added:}} 25% damage vulnerability while under the effects | |
| − | |||
| − | |||
|- | |- | ||
| − | | {{c| | + | ! style="background:#fff2b3;" | {{Icon item|Winger|icon-size=75px}} <br /> {{item link|Winger}} |
| + | | {{c|+|Added:}} +25% jump height bonus when active | ||
|- | |- | ||
| − | ! style="background: #fff2b3;" | {{Icon item|Black Box|icon-size=75px}} | + | ! style="background:#ffe567;" rowspan=16 | {{Class link|Soldier|br=yes|color=black}} |
| + | ! style="background:#fff2b3;" | {{Icon item|Black Box|icon-size=75px}} <br /> {{item link|Black Box}} | ||
| {{c|=|Changed:}} Explosion sound | | {{c|=|Changed:}} Explosion sound | ||
|- | |- | ||
| − | ! style="background: #fff2b3;" rowspan=2 | {{Icon item|Beggar's Bazooka|icon-size=75px}} | + | ! style="background:#fff2b3;" rowspan=2 | {{Icon item|Beggar's Bazooka|icon-size=75px}} <br /> {{item link|Beggar's Bazooka}} |
| − | | {{c|=|Changed:}} Misfired | + | | {{c|=|Fixed:}} An exploit that allowed players to hold a set fixed number of rockets |
| + | |- | ||
| + | | {{c|-|Changed:}} Misfired rockets now remove one loaded rocket from the clip | ||
| + | |- | ||
| + | ! style="background:#fff2b3;" rowspan=5 | {{Icon item|Cow Mangler 5000|icon-size=75px}} <br /> {{item link|Cow Mangler 5000}} | ||
| + | | {{c|+|Removed:}} -10% damage penalty | ||
|- | |- | ||
| − | | {{c| | + | | {{c|+|Removed:}} 5% slower reload speed |
|- | |- | ||
| − | + | | {{c|-|Changed:}} Reduced clip size to 4 (from 5) | |
| − | |||
|- | |- | ||
| − | | {{c|=| | + | | {{c|=|Added:}} "Sets players on fire" description text |
|- | |- | ||
| − | + | | {{c|=|Added:}} New particles and sound | |
| − | |||
|- | |- | ||
| − | | {{c| | + | ! style="background:#fff2b3;" rowspan=2 | {{Icon item|Liberty Launcher|icon-size=75px}} <br /> {{item link|Liberty Launcher}} |
| + | | {{c|+|Removed:}} -25% clip size penalty | ||
|- | |- | ||
| − | | {{c|-| | + | | {{c|-|Added:}} -25% damage penalty |
|- | |- | ||
| − | | {{c| | + | ! style="background:#fff2b3;" | {{Icon item|Original|icon-size=75px}} <br /> {{item link|Original}} |
| + | | {{c|=|Changed:}} Explosion sound | ||
|- | |- | ||
| − | | {{c|+|Added:}} | + | ! style="background:#fff2b3;" rowspan=2 | {{Icon item|Concheror|icon-size=75px}} <br /> {{item link|Concheror}} |
| + | | {{c|+|Added:}} Buffed players now receive a speed boost in addition to its previous effect | ||
|- | |- | ||
| − | + | | {{c|=|Changed:}} Rage is now only generated from damage dealt | |
| − | |||
|- | |- | ||
| − | ! style="background: #fff2b3;" rowspan=2 | {{Icon item| | + | ! style="background:#fff2b3;" rowspan=2 | {{Icon item|Battalion's Backup|icon-size=75px}} <br /> {{item link|Battalion's Backup}} |
| − | | {{c| | + | | {{c|+|Added:}} +15% Sentry damage resistance to all teammates while banner effect is active |
|- | |- | ||
| − | | {{c| | + | | {{c|=|Changed:}} Rage is now generated from damage dealt instead of damage received |
|- | |- | ||
| − | ! style="background: #fff2b3;" | {{Icon item| | + | ! style="background:#fff2b3;" | {{Icon item|Escape Plan|icon-size=75px}} <br /> {{item link|Escape Plan}} |
| − | | {{c| | + | | {{c|-|Added:}} Wearer receives the Marked-For-Death effect when deployed, and for a short period afterwards |
|- | |- | ||
| − | ! style="background: #ffe567;" rowspan=4 | {{Class link|Pyro}} | + | ! style="background:#ffe567;" rowspan=4 | {{Class link|Pyro|br=yes|color=black}} |
| − | ! style="background: #fff2b3;" | {{Icon item|Phlogistinator|icon-size=75px}} | + | ! style="background:#fff2b3;" | {{Icon item|Phlogistinator|icon-size=75px}} <br /> {{item link|Phlogistinator}} |
| {{c|=|Fixed:}} "Mmmph" progress resetting after touching a resupply cabinet | | {{c|=|Fixed:}} "Mmmph" progress resetting after touching a resupply cabinet | ||
|- | |- | ||
| − | ! style="background: #fff2b3;" rowspan=3 | {{Icon item|Powerjack|icon-size=75px}} | + | ! style="background:#fff2b3;" rowspan=3 | {{Icon item|Powerjack|icon-size=75px}} <br /> {{item link|Powerjack}} |
| − | | {{c|+|Added:}} 15% increase move speed while | + | | {{c|+|Added:}} 15% increase move speed while active |
|- | |- | ||
| − | | {{c| | + | | {{c|+|Removed:}} +20% melee vulnerability while active |
|- | |- | ||
| − | | {{c| | + | | {{c|-|Added:}} 20% damage vulnerability while active |
|- | |- | ||
| − | ! style="background: #ffe567;" rowspan=5 | {{Class link|Demoman}} | + | ! style="background:#ffe567;" rowspan=5 | {{Class link|Demoman|br=yes|color=black}} |
| − | ! style="background: #fff2b3;" | {{Icon item| | + | ! style="background:#fff2b3;" rowspan=4 | {{Icon item|Loose Cannon|icon-size=75px}} <br /> {{item link|Loose Cannon}} |
| − | | {{c|+|Added:}} | + | | {{c|+|Added:}} Double Donk damage now mini-crits |
|- | |- | ||
| − | + | | {{c|=|Added:}} Double Donk sound and particle effects | |
| − | |||
|- | |- | ||
| − | | {{c|=| | + | | {{c|=|Changed:}} Reduced charge time to 1 second |
|- | |- | ||
| {{c|=|Changed:}} Range no longer affects direct cannonball impact damage | | {{c|=|Changed:}} Range no longer affects direct cannonball impact damage | ||
|- | |- | ||
| − | + | ! style="background:#fff2b3;" | {{Icon item|Chargin' Targe|icon-size=75px}} <br /> {{item link|Chargin' Targe}} | |
| − | + | | {{c|+|Added:}} Afterburn immunity on wearer | |
| − | |||
| − | ! style="background: #fff2b3;" | ||
| − | | {{c| | ||
|- | |- | ||
| − | | {{c|+| | + | ! style="background:#ffe567;" rowspan=3 | {{Class link|Heavy|br=yes|color=black}} |
| + | ! style="background:#fff2b3;" rowspan=2 | {{Icon item|Buffalo Steak Sandvich|icon-size=75px}} <br /> {{item link|Buffalo Steak Sandvich}} | ||
| + | | {{c|+|Removed:}} Damage taken as mini-crits while under its effects | ||
|- | |- | ||
| − | + | | {{c|-|Added:}} 25% damage vulnerability while under its effects | |
| − | | | ||
|- | |- | ||
| − | + | ! style="background:#fff2b3;" | {{Icon item|Dalokohs Bar|icon-size=75px}} <br /> {{item link|Dalokohs Bar}} | |
| − | ! style="background: #fff2b3;" | {{Icon item| | + | | {{c|+|Changed:}} Increased health restored per-bite to 20 (from 15) |
| − | | {{c| | ||
|- | |- | ||
| − | ! style="background: #fff2b3;" rowspan=2 | {{Icon item|Rescue Ranger|icon-size=75px}} | + | ! style="background:#ffe567;" rowspan=10 | {{Class link|Engineer|br=yes|color=black}} |
| − | | {{c|+| | + | ! style="background:#fff2b3;" rowspan=2 | {{Icon item|Rescue Ranger|icon-size=75px}} <br /> {{item link|Rescue Ranger}} |
| + | | {{c|+|Changed:}} Minor increase in damage per bolt | ||
|- | |- | ||
| − | | {{c|+| | + | | {{c|+|Changed:}} Increase building healing to 75 health per bolt (from 50) |
|- | |- | ||
| − | ! style="background: #fff2b3;" rowspan=5 | {{Icon item|Short Circuit|icon-size=75px}} | + | ! style="background:#fff2b3;" rowspan=5 | {{Icon item|Short Circuit|icon-size=75px}} <br /> {{item link|Short Circuit}} |
| {{c|+|Added:}} Ammo cost of firing reduced to -18 metal when an attack destroys a projectile | | {{c|+|Added:}} Ammo cost of firing reduced to -18 metal when an attack destroys a projectile | ||
|- | |- | ||
| − | | {{c|+| | + | | {{c|+|Changed:}} Increased firing speed by 25% |
| − | |||
| − | |||
|- | |- | ||
| {{c|=|Changed:}} The weapon's muzzle now emits a spark effect when fired | | {{c|=|Changed:}} The weapon's muzzle now emits a spark effect when fired | ||
| Line 453: | Line 450: | ||
| {{c|=|Fixed:}} Attack arcing to nearby teammates as if they were enemies | | {{c|=|Fixed:}} Attack arcing to nearby teammates as if they were enemies | ||
|- | |- | ||
| − | + | | {{c|-|Added:}} Ammo cost increased to -36 metal when an attack does not destroy a projectile or hit a player | |
| − | |||
|- | |- | ||
| + | ! style="background:#fff2b3;" rowspan=2 | {{Icon item|Wrangler|icon-size=75px}} <br /> {{item link|Wrangler}} | ||
| {{c|=|Changed:}} Protective shield now fades 1 second after the owning Engineer dies | | {{c|=|Changed:}} Protective shield now fades 1 second after the owning Engineer dies | ||
|- | |- | ||
| − | ! style="background: #ffe567;" rowspan=9 | {{Class link|Medic}} | + | | {{c|-|Changed:}} Reduced accuracy of manually-controlled sentry at long range |
| − | ! style="background: #fff2b3;" rowspan=4 | {{Icon item|Crusader's Crossbow|icon-size=75px}} | + | |- |
| + | ! style="background:#fff2b3;" | {{Icon item|Gunslinger|icon-size=75px}} <br /> {{item link|Gunslinger}} | ||
| + | | {{c|-|Changed:}} Mini-Sentry Guns do not heal during construction | ||
| + | |- | ||
| + | ! style="background:#ffe567;" rowspan=9 | {{Class link|Medic|br=yes|color=black}} | ||
| + | ! style="background:#fff2b3;" rowspan=4 | {{Icon item|Crusader's Crossbow|icon-size=75px}} <br /> {{item link|Crusader's Crossbow}} | ||
| {{c|=|Changed:}} Arrow projectile to a large syringe | | {{c|=|Changed:}} Arrow projectile to a large syringe | ||
|- | |- | ||
| − | | {{c| | + | | {{c|=|Added:}} New trail effects |
|- | |- | ||
| {{c|=|Changed:}} Smoothed out reload animation (DPS unchanged) | | {{c|=|Changed:}} Smoothed out reload animation (DPS unchanged) | ||
| Line 468: | Line 470: | ||
| {{c|=|Fixed:}} Being able to heal players that are using items that block healing. | | {{c|=|Fixed:}} Being able to heal players that are using items that block healing. | ||
|- | |- | ||
| − | ! style="background: #fff2b3;" rowspan=3 | {{Icon item|Quick-Fix|icon-size=75px}} | + | ! style="background:#fff2b3;" rowspan=3 | {{Icon item|Quick-Fix|icon-size=75px}} <br /> {{item link|Quick-Fix}} |
| − | | {{c|+|Added:}} 50% | + | | {{c|+|Added:}} +50% max overheal |
|- | |- | ||
| − | | {{c| | + | | {{c|+|Changed:}} Über now affects the Medic when there's no heal target |
|- | |- | ||
| − | | {{c| | + | | {{c|+|Changed:}} Shotguns with pushback no longer affect players under the effect of Quick-Fix’s Über |
|- | |- | ||
| − | ! style="background: #fff2b3;" rowspan=2 | {{Icon item|Vaccinator|icon-size=75px}} | + | ! style="background:#fff2b3;" rowspan=2 | {{Icon item|Vaccinator|icon-size=75px}} <br /> {{item link|Vaccinator}} |
| {{c|+|Added:}} Über now fully absorbs crit damage for the selected damage type | | {{c|+|Added:}} Über now fully absorbs crit damage for the selected damage type | ||
|- | |- | ||
| − | | {{c| | + | | {{c|-|Added:}} Depletes Übercharge based on the amount of damage prevented |
|- | |- | ||
| − | ! style="background: #ffe567;" rowspan=6 | {{Class link|Sniper}} | + | ! style="background:#ffe567;" rowspan=6 | {{Class link|Sniper|br=yes|color=black}} |
| − | ! style="background: #fff2b3;" rowspan=2 | {{Icon item|Bazaar Bargain|icon-size=75px}} | + | ! style="background:#fff2b3;" rowspan=2 | {{Icon item|Bazaar Bargain|icon-size=75px}} <br /> {{item link|Bazaar Bargain}} |
| {{c|=|Changed:}} Capped the max charge rate to 200% | | {{c|=|Changed:}} Capped the max charge rate to 200% | ||
|- | |- | ||
| {{c|=|Fixed:}} Starting charge rate being -40% instead of -20% | | {{c|=|Fixed:}} Starting charge rate being -40% instead of -20% | ||
|- | |- | ||
| − | ! style="background: #fff2b3;" rowspan=2 | {{Icon item|Cozy Camper|icon-size=75px}} | + | ! style="background:#fff2b3;" rowspan=2 | {{Icon item|Cozy Camper|icon-size=75px}} <br /> {{item link|Cozy Camper}} |
| − | | {{c| | + | | {{c|+|Removed:}} Movement penalty |
|- | |- | ||
| − | | {{c| | + | | {{c|-|Added:}} Damage taken increased by 20% |
|- | |- | ||
| − | ! style="background: #fff2b3;" rowspan=2 | {{Icon item|Darwin's Danger Shield|icon-size=75px}} | + | ! style="background:#fff2b3;" rowspan=2 | {{Icon item|Darwin's Danger Shield|icon-size=75px}} <br /> {{item link|Darwin's Danger Shield}} |
| − | | {{c|+|Added:}} | + | | {{c|+|Added:}} 15% bullet resistance on wearer |
|- | |- | ||
| − | | {{c| | + | | {{c|-|Added:}} 20% explosive vulnerability on wearer |
|- | |- | ||
| − | ! style="background: #ffe567;" rowspan=3 | {{Class link|Spy}} | + | ! style="background:#ffe567;" rowspan=3 | {{Class link|Spy|br=yes|color=black}} |
| − | ! style="background: #fff2b3;" | {{Icon item| | + | ! style="background:#fff2b3;" | {{Icon item|L'Etranger|icon-size=75px}} <br /> {{item link|L'Etranger}} |
| − | | {{c| | + | | {{c|+|Added:}} +40% Cloak duration |
|- | |- | ||
| − | ! style="background: #fff2b3;" | {{Icon item| | + | ! style="background:#fff2b3;" | {{Icon item|Spy-cicle|icon-size=75px}} <br /> {{item link|Spy-cicle}} |
| − | | {{c| | + | | {{c|=|Fixed:}} A bug that would cause the charge meter to not reset when the Spy was killed |
|- | |- | ||
| − | ! style="background: #fff2b3;" | {{Icon item| | + | ! style="background:#fff2b3;" | {{Icon item|Dead Ringer|icon-size=75px}} <br /> {{item link|Dead Ringer}} |
| − | | {{c| | + | | {{c|-|Changed:}} When under the effect of Feign Death, damage taken decreases the duration of the effect |
|} | |} | ||
| − | == | + | == Gallery == |
| − | |||
| − | |||
| − | |||
<gallery> | <gallery> | ||
File:News item 2013-07-10 Summer Event.png| In-game notification | File:News item 2013-07-10 Summer Event.png| In-game notification | ||
| Line 516: | Line 515: | ||
== External links == | == External links == | ||
| − | * [ | + | * [https://www.teamfortress.com/post.php?id=11023 Move Those Maps Up!] |
| − | * [ | + | * [https://www.teamfortress.com/post.php?id=11024 Move Those Weapons Up!] |
| − | * [ | + | * [https://www.teamfortress.com/post.php?id=11063 Move Those Votes Up!] |
| − | * [ | + | * [https://www.teamfortress.com/post.php?id=11070 Move That Update Up!] |
| + | |||
| + | {{Summer 2013 Nav}} | ||
| + | {{Major Updates Nav}} | ||
| − | |||
| − | |||
[[Category:Content packs]] | [[Category:Content packs]] | ||
Latest revision as of 10:12, 9 January 2024
This article is for content released in the update. For the patch itself, see July 10, 2013 Patch.

| “ | Over the last week we've taken you through some of our thinking around maps, weapons and items. We thought you might find it interesting if we walked you through the process we use to ship an update to TF2.
There we go, update shipped.
— TF2 Official Website
|
” |
The Summer Event Update was the in-game release of several items that were selected by Valve for outstanding quality through the Steam Workshop and resubmitted using the new item importing system, along with the fixing of several exploits and bugs present in existing maps and the tweak to several weapons. Released with the July 10, 2013 Patch, the update added a total of 64 new Cosmetic items which were available via opening Crates with their special Summer Cooler Keys, and 2 new maps, Standin, and Process.
Contents
Additions
Cosmetics
Main article: Cosmetic items
Action items
Main article: Action items
| A Random Summer Cooler Key Gift | |
| Pile of Summer Cooler Key Gifts |
Tools
Main article: Tools
Maps
Main article: List of maps
| Name | Picture | Game mode | File name |
|---|---|---|---|
| Process | 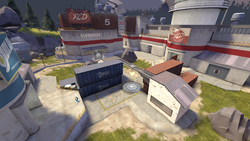
|
Control Point |
cp_process
|
| Standin | 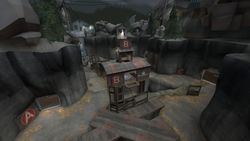
|
Control Point |
cp_standin
|
Tweaked item sets
| Class | Item set | Changes |
|---|---|---|
| The Special Delivery |
||
| The Tank Buster |
||
| The Gas Jockey's Gear |
||
| The Croc-o-Style Kit |
||
| The Saharan Spy |
||
Tweaked weapons
| Class | Weapon | Changes |
|---|---|---|
Shortstop |
||
Crit-a-Cola |
||
Winger |
||
Black Box |
||
Beggar's Bazooka |
||
Cow Mangler 5000 |
||
Liberty Launcher |
||
Original |
||
Concheror |
||
Battalion's Backup |
||
Escape Plan |
||
Phlogistinator |
||
Powerjack |
||
Loose Cannon |
||
Chargin' Targe |
||
Buffalo Steak Sandvich |
||
Dalokohs Bar |
||
Rescue Ranger |
||
Short Circuit |
||
Wrangler |
||
Gunslinger |
||
Crusader's Crossbow |
||
Quick-Fix |
||
Vaccinator |
||
Bazaar Bargain |
||
Cozy Camper |
||
Darwin's Danger Shield |
||
L'Etranger |
||
Spy-cicle |
||
Dead Ringer |
Gallery
In-game notification

External links
| |||||||||||||||||||||||||||||||||||||||||||||||||||||||||||||||||||||||||||||||||||||||||||||||