Granary (Arena)
| Granary (Arena) | |
|---|---|

| |
| Basic Information | |
| Variants: | Control Point |
| Developer(s): | {{{map-developer}}} |
| Map Info | |
| Environment: | Farmland |
| Setting: | Daylight, sunny |
| Map Photos | |
 | |
| Map Overview | |
_overview.png) | |
Granary is an Arena map, and is a modified version of Granary (Control Point). Granary, along with Lumberyard, Ravine, Well (Arena), and Badlands (Arena), was released with the Heavy Update as the one of the first official Arena maps for Team Fortress 2. Similar to other modified arena maps, Granary (Arena) is generally the central Control point area of its Control Point version.
The goal of your team is to eliminate the entire enemy team or capture the central capture point.
Contents
Introduction Video
Locations
Capture Point
The yard is an identical copy of Granary's middle point.
- Point: The point rests on an slightly elevated platform, surrounded by crates.
- Catwalks: Connected from each team's garage are two metal catwalks which rest upon the far walls across from the point.
- Crates: Surrounding the point are stacked large metal crates which can be jumped up to by Soldiers\Demomen or jumped to from the catwalks.
Spawn Areas
For the Arena version of Granary, what would usually be the yards outside Point 2 have been replaced with spawn areas.
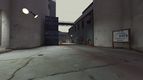
- Garage: Exiting right from spawn will lead to the garage which contains the main entrance to mid and a set of ramps which lead up to the catwalks.
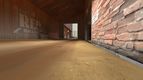
- Choke: Exiting left from spawn will lead to a smaller entrance to mid, commonly known as choke for its tight area. This entrance exits out behind the crates.
Spawn area for BLU.
Spawn area for RED.
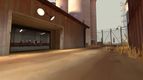
The spawn for arena version.
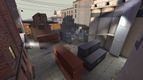
Identical to Granary's regular mid.


Strategy
- Aside from the boxes, there is very little cover on this map. Staying mobile is an imperative.
- By jumping from the catwalk you can get on top of the storage crates. This method can be useful for Spies and Pyros trying to get behind the enemy and catch them in a surprise attack from the rear.
- When fighting around the point, use the containers to gain a height advantage. As a Demoman or Soldier you can Sticky jump or Rocket jump up to them. If you're not a Rocket Jumper, (Snipers for instance are useful there) you can still get on the containers by jumping from the balcony ramps.
- The containers are not parallel to one another, so you can avoid fall damage by landing on the edge of one container, then the floor. This is helpful for Spies to avoid taking unneeded damage.
- This map is much more Engineer-friendly than a lot of other Arena maps. Making a small base with a Dispenser and Sentry Gun on your side of the map can give your team a point to fall back on in times of struggle, as well as support those who are temporarily retreating from the frontlines.
- The Sandman can be very useful here. Try to negate the height advantage of enemies in the central area by rendering them defenceless with a Sandman ball. The Flare Gun can also be used in a similar capacity.
Control Point Timing
| Control Point | Multiplier | Seconds | ||
|---|---|---|---|---|
| Capture point | ×1 |
| ||
| ×2 |
| |||
| ×3 |
| |||
| ×4 |
|
See also
External links
| |||||||||||||||||||||||