Ravine
| Ravine | |
|---|---|

| |
| Basic Information | |
| Developer(s): | {{{map-developer}}} |
| Map Info | |
| Environment: | Desert |
| Setting: | Daylight, sunny |
| Map Photos | |
 | |
| Map Overview | |
 | |
| “ | In contrast to Lumberyard, the other new Arena map, Ravine has a far more open ground level with emphasis on control of four key choke points. A series of canals in Ravine’s lower level provide an excellent opportunity for stealth kills and flanking maneuvers. Like all arena maps, the capture point in the middle becomes active after 60 seconds.
|
” |
Ravine is an Arena map. Ravine, along with Lumberyard, Well (Arena), Badlands (Arena) and Granary (Arena), was released with the Heavy Update as one of the first official Arena maps for Team Fortress 2.
Your goal is to eliminate the entire enemy team or capture the central control point when it becomes available.
Introduction Video
Locations
File:Team fortress 2 map overview arena ravine.jpg
Overview of Arena Ravine
- Shack: The central shack houses that the capture point. There are numerous ways to enter this room, including a small manhole to jump down and surprise your victims.
- Well: Being one of few official maps with water, there is a small pool located to the left or right out of spawn, depending on which team you are on. At first glance, it may not appear deep enough to douse you from a Pyro's flames, but near the sewer drains, you may crouch and become fully submerged.
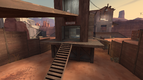
- House: Opposite side from the Well is the house. There is a small underpass below it, and next to that are stairs which lead to its interior. From its interior is a ramp which leads to a drop down above the point.
- Yards: Outside each teams spawn by the house side is a large yard. The yard gives entrance to the house, ravine below the point, and the base building roof. It contains a large metal crate and a concrete block used for cover.
Cap area.

House next to the point.
Well area.

Yard area next to spawn.


Strategy
- Cover is substantially more common towards the edges of the map. Working your way from outside-in allows for greater protection and a possibly way to set up chokepoints with properly placed teammates.
- As an Engineer, build a Dispenser and Sentry Gun directly outside of your spawn room, so teammates can come back and heal in safety.
- As with all arena maps, any Medic on your team is priceless, particularly here as there are no health drops. Stay away from any Pyro rush and dodge fire as you will be the most targeted player.
- When playing Pyro stick to the edges as there is much more cover. This is also a good level for the Backburner as flanking opponents is common. Keep in mind, most flaming enemies will retreat to the water on the edges of the map. Take up a camping position to finish off weakened foes.
- As a Scout, make sure that there is an Engineer or Medic as health will be lost easily. The tight corners of this map make for almost assured surprises from the enemy team. Use the Pistol to chip away at their health from a safe distance if at all possible.
Trivia
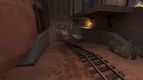
- In the carts near the spawn area, there is a Beta Version of the Rocket Launcher in the cart.
Control Point Timing
| Control Point | Multiplier | Seconds | ||
|---|---|---|---|---|
| Capture point | ×1 |
| ||
| ×2 |
| |||
| ×3 |
| |||
| ×4 |
|
| |||||||||||||||||||||||