Difference between revisions of "Standin"
m (Added overview.) |
m (Corrected.) |
||
| Line 15: | Line 15: | ||
'''Standin''' is a [[Control point (objective)|Control point]] map that was added in the July 10, 2013 Patch. It is set in an alpine area with [[RED]] and [[BLU]] attempting to control all three control points in the area. Standin is the first and only officially-distributed Three Point Free-For-All map. | '''Standin''' is a [[Control point (objective)|Control point]] map that was added in the July 10, 2013 Patch. It is set in an alpine area with [[RED]] and [[BLU]] attempting to control all three control points in the area. Standin is the first and only officially-distributed Three Point Free-For-All map. | ||
| − | The moment one team is in | + | The moment one team is in possession of all three control points, that team will immediately win the round, even if one or more of the control points are in the process of being captured by the other team or in Overtime. |
Standin has been played in competitive leagues such as ESEA and UGC. | Standin has been played in competitive leagues such as ESEA and UGC. | ||
| Line 21: | Line 21: | ||
[[Image:Standin Overview.jpg|thumb|top|Overview of the map.]] | [[Image:Standin Overview.jpg|thumb|top|Overview of the map.]] | ||
| − | ==Locations== | + | == Locations == |
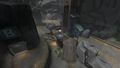
| − | ===Capture Point A=== | + | === Capture Point A === |
This capture point is set in an area enclosed by cliffs. Both RED and BLU's spawn rooms have a door leading down a hallway to this point. At the foot of a large satellite tower is a Cap A, which has two ramps leading onto it and a sheltered enclave behind it. Two large rock ledges, easily accessible from the spawn room entries, flank the point and provide an easy jump down onto A. The only other exit leads to Capture B. Health kits and ammo boxes are scarce around this point, barring a small ammo box in the enclave. | This capture point is set in an area enclosed by cliffs. Both RED and BLU's spawn rooms have a door leading down a hallway to this point. At the foot of a large satellite tower is a Cap A, which has two ramps leading onto it and a sheltered enclave behind it. Two large rock ledges, easily accessible from the spawn room entries, flank the point and provide an easy jump down onto A. The only other exit leads to Capture B. Health kits and ammo boxes are scarce around this point, barring a small ammo box in the enclave. | ||
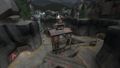
| − | ===Capture Point B=== | + | === Capture Point B === |
This point marks the centre of the map, inside a high-walled rocky canyon. The point is a covered bridge over a ravine, with openings in its walls which a Scout can easily jump over the ravine to reach. Both RED and BLU's spawns have two openings directly into this area, each at the bottom of a slope which leads up to the control point. Health and ammo refills surround the capture point bridge. | This point marks the centre of the map, inside a high-walled rocky canyon. The point is a covered bridge over a ravine, with openings in its walls which a Scout can easily jump over the ravine to reach. Both RED and BLU's spawns have two openings directly into this area, each at the bottom of a slope which leads up to the control point. Health and ammo refills surround the capture point bridge. | ||
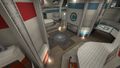
| − | ===Capture Point C=== | + | === Capture Point C === |
This final point is markedly different from the visual styles of the others- the area is a concrete walled rocket launch facility with a high ceiling. A U-shaped corridor connects it to Capture Point B, and longer doglegs connect it from the sides to the teams' respective spawn rooms. The point itself stands between two large pillars-the rocket launch towers- and is cross-shaped. A small health and small ammo kit lie within easy reach of the point. | This final point is markedly different from the visual styles of the others- the area is a concrete walled rocket launch facility with a high ceiling. A U-shaped corridor connects it to Capture Point B, and longer doglegs connect it from the sides to the teams' respective spawn rooms. The point itself stands between two large pillars-the rocket launch towers- and is cross-shaped. A small health and small ammo kit lie within easy reach of the point. | ||
| Line 40: | Line 40: | ||
Standin has 1 map-specific [[Standin achievements|achievement]]. | Standin has 1 map-specific [[Standin achievements|achievement]]. | ||
{{Standin achievement list}} | {{Standin achievement list}} | ||
| − | |||
| − | |||
| − | |||
| − | |||
| − | |||
| − | |||
| − | |||
== Update history == | == Update history == | ||
| Line 59: | Line 52: | ||
* Added achievements for [[Snakewater]], [[Process]], and Standin. | * Added achievements for [[Snakewater]], [[Process]], and Standin. | ||
| + | == Gallery == | ||
| + | <gallery> | ||
| + | File:Cp_standin_A.jpg| Point A. | ||
| + | File:Cp_standin_B.jpg| Point B (middle point). | ||
| + | File:Cp_standin_C.jpg| Point C. | ||
| + | </gallery> | ||
{{Summer2013Nav}} | {{Summer2013Nav}} | ||
{{Maps nav}} | {{Maps nav}} | ||
[[Category:Maps]] | [[Category:Maps]] | ||
Revision as of 23:48, 13 September 2014
| Standin | |
|---|---|

| |
| Basic Information | |
| Developer(s): | {{{map-developer}}} |
| Map Info | |
| Environment: | Alpine |
| Setting: | Daylight, cloudy |
| Map Photos | |
 | |
| Map Overview | |
 | |
Standin is a Control point map that was added in the July 10, 2013 Patch. It is set in an alpine area with RED and BLU attempting to control all three control points in the area. Standin is the first and only officially-distributed Three Point Free-For-All map.
The moment one team is in possession of all three control points, that team will immediately win the round, even if one or more of the control points are in the process of being captured by the other team or in Overtime.
Standin has been played in competitive leagues such as ESEA and UGC.
Contents
Locations
Capture Point A
This capture point is set in an area enclosed by cliffs. Both RED and BLU's spawn rooms have a door leading down a hallway to this point. At the foot of a large satellite tower is a Cap A, which has two ramps leading onto it and a sheltered enclave behind it. Two large rock ledges, easily accessible from the spawn room entries, flank the point and provide an easy jump down onto A. The only other exit leads to Capture B. Health kits and ammo boxes are scarce around this point, barring a small ammo box in the enclave.
Capture Point B
This point marks the centre of the map, inside a high-walled rocky canyon. The point is a covered bridge over a ravine, with openings in its walls which a Scout can easily jump over the ravine to reach. Both RED and BLU's spawns have two openings directly into this area, each at the bottom of a slope which leads up to the control point. Health and ammo refills surround the capture point bridge.
Capture Point C
This final point is markedly different from the visual styles of the others- the area is a concrete walled rocket launch facility with a high ceiling. A U-shaped corridor connects it to Capture Point B, and longer doglegs connect it from the sides to the teams' respective spawn rooms. The point itself stands between two large pillars-the rocket launch towers- and is cross-shaped. A small health and small ammo kit lie within easy reach of the point.
Strategy
Control Point Timing
| Control Point | Multiplier | Seconds | ||
|---|---|---|---|---|
| All control points | ×1 |
| ||
| ×2 |
| |||
| ×3 |
| |||
| ×4 |
| |||
| ×5 |
|
Related achievements
Standin has 1 map-specific achievement.
 |
Stand And Deliver Win 139 Rounds. |
Update history
- Added Standin to the game.
- Fixed players getting out of map in cp_standin.
- Fixed players hiding in vents in cp_standin.
November 21, 2013 Patch (Two Cities Update)
- Added achievements for Snakewater, Process, and Standin.
Gallery
Point A.
Point B (middle point).
Point C.


| ||||||||||||||||||||||||||||||||||||||||||||||||||||||||||||||||