Difference between revisions of "Yukon"
Stevoisiak (talk | contribs) m (→Update history) |
GeminiViRiS (talk | contribs) (Added Stamp leaderboard page) |
||
| Line 4: | Line 4: | ||
| map-image = CP_Yukon_overview.png | | map-image = CP_Yukon_overview.png | ||
| developer = {{steamid|id|mangycarface|Patrick "MangyCarface" Mulholland}}<br />{{steamid|id|Acegikmo|Joachim "Acegikmo" Holmér}} | | developer = {{steamid|id|mangycarface|Patrick "MangyCarface" Mulholland}}<br />{{steamid|id|Acegikmo|Joachim "Acegikmo" Holmér}} | ||
| + | | map-stamp-link = http://steamcommunity.com/stats/TF2/leaderboards/30388 | ||
}} | }} | ||
{{Quotation | [http://www.teamfortress.com/classless/ The Classless Update] | {{Quotation | [http://www.teamfortress.com/classless/ The Classless Update] | ||
Revision as of 22:36, 1 February 2011
| Yukon | |
|---|---|

| |
| Basic Information | |
| Developer(s): | {{{map-developer}}} |
| Map Photos | |
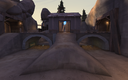
 | |
| Map Overview | |
 | |
| Map Stamp | |
| Supporters Leaderboard | |
| “ | This abandoned mountaintop coalmine was repurposed by shadowy operatives into a top secret surveillance outpost—one which also, so nobody gets wise, insidiously continues to mine coal. There is also a log hanging in the center of the map—possibly as an example to other logs. Logs that said too much.
Five control points promise a lot of momentum swings in this compact outdoor map, with plenty of tunnels and rocky outcroppings. Plenty of alternate routes ensure that if you can’t get past a well-placed Engineer through one tunnel, you might be able to sneak up behind them through another.
|
” |
Yukon is a standard five-point Control Point map. It is one of the community maps chosen by Valve and was included in the Classless Update as an honorary official map due to its outstanding quality. It also is one of the top played competitive maps in 6v6 leagues.
The objective of Yukon is to control all five of the capture points. Each team starts with their second and final control points locked, and only the middle point available.
Contents
Locations
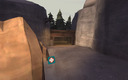
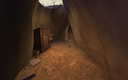
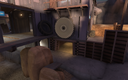
Capture Points 1 & 5, Base
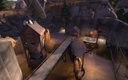
Screenshot #1
Screenshot #2
Screenshot #3
Screenshot #4


The first screenshot displays the possible exits one can make from spawn. Once the player has left spawn, he or she has three possible routes to take to the next point. Note the ammunition box in front of the shed. The player can choose, as shown in the second screenshot, between moving to the low ground and using the small corridor on the left (complete with medium health kit and ammunition box) to end up below the capture point or moving across the pipe to the door. Taking the far right path (past the medium health kit shown in the third screenshot) eventually converges to the same spot pipe leads to. There is (shown in the fourth picture) a large ammunition box here with accompanying small health kit.
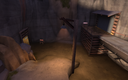
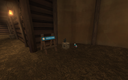
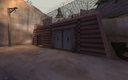
Capture Points 2 & 4, Buffer

Screenshot #1
Screenshot #2
Screenshot #3
Screenshot #4


The first screenshot displays this capture point in its entirety. This capture point is enclosed, allowing skilled classes to land on the roof and barrage those contesting or capturing the point. Below the capture point, as shown in the second screenshot, are two shortcuts to each side of the cap. The shortcut on the right spawns a medium ammunition kit while the one on the left spawns a medium health kit. There are three routes from this capture point, with the two on the left meeting each other at the large rock explained in the section below. The path on the immediate left (shown in the third screenshot) contains a small ammunition and health kit. The other one contains only a small ammunition kit. The remaining and quickest route (screenshot #4) below the point is a straight, albeit risky, shot to the capture point.
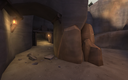
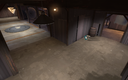
Capture Point 3, Middle
The Middle

Screenshot #1
Screenshot #2
Screenshot #3


This is where the two teams clash. If you choose the long route around to this capture point, you will be greeted with a small ammunition and health kit behind a small rock in front of the much larger rock (shown in the first screenshot). This area is a good choice for Snipers, though one should make sure to keep an eye out for any enemies coming up from the left flank. Coming from the lower route (screenshot #2) immediately dumps you on the capture point. The battlements house a medium health and ammunition kit for each team (screenshot #3). These pickups are spawned closer to your side of the map on the enemy's side of battlements. The bridge in the middle connecting the two sides is excellent for dropping down on any capturing or contesting enemies, assuming you keep an eye out for enemy Snipers looking to pick you off.
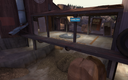
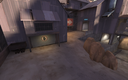
Spawn Locations
Home, Sweet Home
Screenshot #1
Screenshot #2


- Players begin the game spawning at their base.
- (screenshot #1) When they capture the middle point, their spawn is moved below their second capture point.
- (screenshot #2) When they capture the enemy's second point, their spawn is moved mid-map, enemy side, in a large shed.
Common strategies
- Engineers can build at the edge of the bridge above the central point, helping secure a capture.
- For Scouts, Spies, Pyros and Heavies, it is preferable to take the route under the middle point to attack the enemy from behind.
- The roof of the bridge on the central point is a good spot for Soldiers and Demomen to jump to in order to gain height advantage.
- The bridge Control Point 3 is on offers an excellent ambush spot for Pyros to attack those passing below.
- The bridge also offers some cover for Demomen to attack from beneath the point using the Stickybomb Launcher.
- The sign above the crevice leading to the second point is a good spot for defending Demomen to lay sticky traps.
- Snipers can make use of the long path that Control Points 2 and 4 are located on to snipe enemies attempting to capture the point via the main entranceway.
Control Point Timing
| Control Point | Multiplier | Seconds | ||
|---|---|---|---|---|
| Control Point 1 and 5 | ×1 |
| ||
| ×2 |
| |||
| ×3 |
| |||
| ×4 |
| |||
| Control Point 2 and 4 | ×1 |
| ||
| ×2 |
| |||
| ×3 |
| |||
| ×4 |
| |||
| Control Point 3 | ×1 |
| ||
| ×2 |
| |||
| ×3 |
| |||
| ×4 |
|
Update history
- Fixed an exploit where players could get outside of the map.
- Central CP moved up to bridge.
- Bridge widened.
- Several sticky exploits patched.
- Flat bridge added onto CP1's pipes.
- Capture time on final control points reduced from 4s to 3.8s
| ||||||||||||||||||||||||||||||||||||||||||||||||||||||||||||||||