Difference between revisions of "Upward"
m (Applied filters to Upward (Requested on User:WindBOT/PageRequests)) |
TerminalGear (talk | contribs) (added image gallery) |
||
| Line 23: | Line 23: | ||
*'''The Final Control Point Area''' - Around the corner from the third control point lies the heart of [[RED]] base. A group of large buildings surrounding a wide hole in the ground. Once the [[Payload]] bomb cart arrives in the area it must be pushed up a small wooden incline before it can be dropped into the Final [[Control Point]] pit. Once the bomb drops into the hole, [[BLU]] team win the round and the [[Payload]] bomb will explode as it hits the ground, destroying the centre of the mountain base. This area features balconies and underground areas which [[RED]] can use to their defensive advantage. It also features windows and balconies connecting to buildings captured by [[BLU]] when the third control point is taken, these can be used to [[BLU]]'s offensive advantage. | *'''The Final Control Point Area''' - Around the corner from the third control point lies the heart of [[RED]] base. A group of large buildings surrounding a wide hole in the ground. Once the [[Payload]] bomb cart arrives in the area it must be pushed up a small wooden incline before it can be dropped into the Final [[Control Point]] pit. Once the bomb drops into the hole, [[BLU]] team win the round and the [[Payload]] bomb will explode as it hits the ground, destroying the centre of the mountain base. This area features balconies and underground areas which [[RED]] can use to their defensive advantage. It also features windows and balconies connecting to buildings captured by [[BLU]] when the third control point is taken, these can be used to [[BLU]]'s offensive advantage. | ||
| + | <gallery> | ||
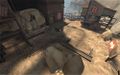
| + | Image:Upward1.jpg|First Checkpoint | ||
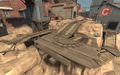
| + | Image:Upward2.jpg|Second Checkpoint | ||
| + | Image:Upward3.jpg|Third Checkpoint | ||
| + | Image:Upward4.jpg|Final Terminus | ||
| + | </gallery> | ||
==Trivia== | ==Trivia== | ||
Revision as of 13:39, 17 October 2010
| Upward | |
|---|---|

| |
| Basic Information | |
| Variants: | Hassle Castle |
| Developer(s): | {{{map-developer}}} |
| Map Photos | |
 | |
| Map Overview | |
 | |
Upward is a Payload map included with The Engineer Update as an official Valve developed map. It is the first Official Payload map to be developed and released since the Heavy Update.
Upward uses a similar design and layout to Badwater Basin, with multiple control points in the same round, unlike Gold Rush and Thunder Mountain which focus on fast-paced, short rounds with only 2-3 control points per individual round.
Contents
Goal
- BLU: The BLU team's primary goal is to guide the blue-colored bomb on its tracks throughout the map. By continuously pushing the cart forward and breaking through RED defensive positions, the bomb will detonate and the BLU team will be victorious. Failure to push the cart forward by having teammates near it will eventually result in the cart slowly moving backwards after a period of time, eroding your team's past progress.
- RED: Opposite the BLU team's objective, the team function of RED, as a group, is to deter and stall the BLU team and prevent them from advancing the bomb to its final destination. By fighting off their opposition for a long enough period of time, the RED team will be victorious. The most effective way to stall the BLU team is to remain very close to the bomb cart, thereby halting it from moving even with BLU forces nearby.
Locations
- Path to the Mine - The start of the Payload's journey begins with a small incline up a hill and wooden paths built to carry the bomb to the first control point. This area focuses on open combat focused down from the hills and balcony's on RED's defensive line.
- The Mine - After the first control point, the Payload cart track drops into a shallow mine below the balconies defending A. RED must focus their attention on the mine and ground level, otherwise BLU players will be able to flank RED by either route. This area offers perfect flanking opportunities for Spys as the area has the mine entrances, the ground level route and a thin side route.
- The Wooden Bridge - After the second control point, there is a thin wooden bridge which hangs over a small sewer door leading into the RED base. It offers a good flanking route for BLU before B is captured as well as offering areas for Scouts and Spys to recover and hide.
- The Spiral Bridge - After the Payload moves across the Wooden Bridge and up a small incline, it arrives at a spiral wooden bridge leading up to the final level of the map. It features automatic Payload roles which make the Payload bomb roll backwards if it is not being pushed by BLU team. After the struggle up the ramps, BLU are able to capture C and move on to the final section of the map.
- The Final Control Point Area - Around the corner from the third control point lies the heart of RED base. A group of large buildings surrounding a wide hole in the ground. Once the Payload bomb cart arrives in the area it must be pushed up a small wooden incline before it can be dropped into the Final Control Point pit. Once the bomb drops into the hole, BLU team win the round and the Payload bomb will explode as it hits the ground, destroying the centre of the mountain base. This area features balconies and underground areas which RED can use to their defensive advantage. It also features windows and balconies connecting to buildings captured by BLU when the third control point is taken, these can be used to BLU's offensive advantage.

First Checkpoint
Second Checkpoint
Third Checkpoint

Final Terminus


Trivia

- Upward was officially revealed on Day 2 of The Engineer Update, but was previously shown in a screenshot given by Robin Walker a short while before.