Carrier
| “Let's go, let's go, let's go!” This article documents a recent addition. It may contain speculation, broken links or errors. You can help improve it by editing this page to include new information. |
| “What are you lookin' at?!” This page or section would benefit from the addition of one or more images. Please add a suitable image, then remove this notice. |
| “You are so small! Is funny to me!” This article is a stub. As such, it is not complete. You can help Team Fortress Wiki by expanding it. |
| Carrier | |
|---|---|

| |
| Basic Information | |
| Developer(s): | {{{map-developer}}} |
| Map Info | |
| Environment: | Alpine |
| Setting: | Night time |
| Hazards: | Pitfalls (and banana peel), Bomb (carrier only) |
| Map Photos | |
 | |
| Map Overview | |
 | |
| “ | Become the machine and destroy RED's missile!
— Carrier publicity blurb
|
” |
Carrier is a community-created Attack/Defend Control Point map. It is set in a mountain town with a RED missile base.
The map uses a unique mechanic in which only the BLU player carrying the bomb can capture the points. The player who picks up the bomb receives several effects, both positive and negative. Whenever a point is captured, the bomb explodes, killing the bomb carrier instantly.
Carrier was contributed to the Steam Workshop.
Contents
Locations
Control Point A
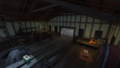
- BLU Spawn: a small room with a resupply cabinet.
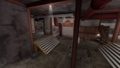
- Bomb Pickup Area: a square room with a drop in the middle where the bomb is located. If multiple players try to pick the bomb up at the same time, the game selects on of them at random to be the carrier; all others are transported back to the spawn room. Players are also transported back if the bomb has already been picked up. There is one giant door for the carrier in the middle and one regular door and resupply cabinet on either side for the other players. Note that this room is not considered a spawn room; switching classes in it does not occur until the player dies or manually enters the spawn room in the back, and results in suicide if the option "Suicide after choosing a player class" is on in the Advanced multiplayer options.
- High Ground: a high piece of ground close to the town and away from the cliff. Wooden planks offer passage up and safely down; falling off likely results in fall damage.
- Arch: a thin building with an arch near the cliff.
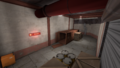
- Green Building: a two-store building painted green on the outside. There is a medium health kit on the first floor and a medium ammo pack on the second.
- Yard: the big open area in front of the point.
- Bar: a partially-collapsed yellow building built over the cliff. A large ammo pack sits safely next to the jukebox; a large health pack sits dangerously next to the abyss and to a slippery banana peel.
- Shops: two buildings with interconnected interiors right next to the point, with an open window in the back.
- White Building: a thin and tall white building with a "Phantom Pane" poster on one of its outer walls. It houses a medium ammo pack and offers an overview of the Yard.
- Point A: BLU's first objective. When the point is captured, the bomb explodes, blowing the gate open and killing the carrier. There is also one regular door available at all times on each side; the bomb carrier must use the gate in order to enter the facility.
BLU spawn.
Bomb pickup zone.
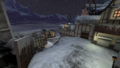
The high-ground leading to the capture point.
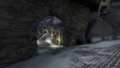
The Arch.
The Bar.
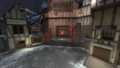
Control point A.


Control Point B
- Entrance: the area immediately inside the facility. The bomb carrier must choose one of two ways to reach the point. A large glass window lets RED players see in advance which path they take.
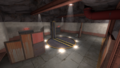
- Shipping Path: a straight path with crates and barrels, as well as a shipping container. The crates and barrels at the end can be easily climbed through smaller boxes that serve as steps; the crates near the shipping container are too tall to jump or crouch-jump onto normally, requiring jumping techniques such as double and flare jumps. An improvised platform near the Hatch offers an overview of the path.
- Bifurcated Path: a larger room with a wall in the middle that players must go around. Two shipping containers can be found atop one another in a corner; a wooden ramp provides easy access to their top, where a medium ammo pack and an overview of the capture zone can be found.
- Capture Zone: the capture zone is quite large; the carrier can stand anywhere past the orange and black stripes on the floor. Two improvised walls offer cover, with the one on the Bifurcated Path's side hiding a medium health kit from BLU and the one on the Shipping Path's side hiding a medium ammo pack. The rocket's rail coming out of the hatch can also serve as cover.
- Hatch: BLU's final goal. Only the carrier can open it by standing anywhere in the capture zone and they must jump into in order to win, dying in the process.
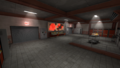
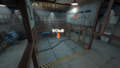
RED spawn.
The shipping path.
The bifurcated path.
Control point B.


Carrying the bomb
A player carrying the bomb, referred to as the "Carrier", receives these attributes[1]:
![]() The Carrier is turned into a Robot version of their class (including Robot footsteps) 3 times the size of a normal player, their voice is pitched down, their weapons glow with Mini-Crit sparkles (similar to those gained from the Crit-a-Cola, Buffalo Steak Sandvich, and Cleaner's Carbine), they cannot taunt, they explode on death (deals no damage), and their death scream is replaced with a laugh.
The Carrier is turned into a Robot version of their class (including Robot footsteps) 3 times the size of a normal player, their voice is pitched down, their weapons glow with Mini-Crit sparkles (similar to those gained from the Crit-a-Cola, Buffalo Steak Sandvich, and Cleaner's Carbine), they cannot taunt, they explode on death (deals no damage), and their death scream is replaced with a laugh.
![]() If the Carrier has the Pain Train or the Thermal Thruster equipped, they will be replaced with the stock weapon instead.
If the Carrier has the Pain Train or the Thermal Thruster equipped, they will be replaced with the stock weapon instead.
![]() Max health is increased, see health table below for specifics.
Max health is increased, see health table below for specifics.
![]() Cannot take fall damage.
Cannot take fall damage.
![]() Projectiles that do not explode on impact (such as Stickybombs will bounce off the Carrier at a greater speed than normal[2], except for the Scorch Shot.[3]
Projectiles that do not explode on impact (such as Stickybombs will bounce off the Carrier at a greater speed than normal[2], except for the Scorch Shot.[3]
![]() -80% reduction in push force taken from damage.
-80% reduction in push force taken from damage.
![]() 100% reduction in airblast vulnerability.
100% reduction in airblast vulnerability.
![]() Cannot be backstabbed.
Cannot be backstabbed.
![]() 100% of ammo is restored ever 5 seconds.
100% of ammo is restored ever 5 seconds.
![]() The Carrier cannot be overhealed.
The Carrier cannot be overhealed.
![]() 95% less health gained from health packs
95% less health gained from health packs
![]() Spies cannot cloak, if a Spy enters while cloaked he will be teleported back to spawn.
Spies cannot cloak, if a Spy enters while cloaked he will be teleported back to spawn.
![]() Movement is slowed to half the default speed of the Carrier's class.
Movement is slowed to half the default speed of the Carrier's class.
![]() 75% reduced healing from Medics.
75% reduced healing from Medics.
Strategy
 | “Sun Tzu's got nothing on us!” This map's Community strategy page is a stub. As such, it is not complete. You can help the Team Fortress Wiki Community Strategy Project by expanding it. Notes: None added |
Update history
December 7, 2023 Patch (Smissmas 2023)
- Added Carrier to the game.
- Updated
cp_carrierto fix some visual issues.
Bugs
- Using the Dead Ringer as a Spy while being the Carrier causes instant death.[4]
- The cloak meter on the watch itself may also be the wrong size.
Trivia
- Hitting the bell in one of the arched building's towers makes it ring.
Gallery
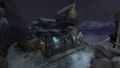
Steam Workshop thumbnail for Carrier.

References
- ↑ scripts\vscripts\cp_carrier:L46-144
- ↑ Projectiles bouncing off
- ↑ Scorch Shot not bouncing off
- ↑ Video demonstrating instant death with Dead Ringer and oversized cloak meter.

| ||||||||||||||||||||||||||||||||||||||||||||||||||||||||||||||||