Difference between revisions of "Nucleus (King of the Hill)"
m (is not gut category) |
GrampaSwood (talk | contribs) m (Nucleus is an alternate version of Nucleus) |
||
| (44 intermediate revisions by 31 users not shown) | |||
| Line 1: | Line 1: | ||
| − | |||
{{Map infobox | {{Map infobox | ||
| − | | game-type=King of the Hill | + | | map-status = official |
| − | | file-name=koth_nucleus | + | | map-game-type = King of the Hill |
| − | | map-image=Nucleus.PNG | + | | map-file-name = koth_nucleus |
| − | | map-environment = Spytech | + | | map-image = Nucleus.PNG |
| − | | map-setting = Indoor | + | | map-released = {{Patch name|8|13|2009}} |
| − | | map-hazards = [[Environmental_Hazards# | + | | map-released-major = Classless Update |
| − | | map-health | + | | map-environment = Spytech |
| − | | map-health | + | | map-setting = Indoor |
| − | | map | + | | map-hazards = [[Environmental_Hazards#Pitfalls|Pitfall]] |
| − | + | | map-pickups-health-small = 2 | |
| − | | map-ammo | + | | map-pickups-health-medium = 2 |
| − | | map- | + | | map-pickups-ammo-small = 2 |
| + | | map-pickups-ammo-medium = 5 | ||
| + | | map-has-bots = yes | ||
}} | }} | ||
{{Quotation|'''The Engineer'''|Down under? More like, six feet down under.|sound=Engineer_dominationsniper08.wav}} | {{Quotation|'''The Engineer'''|Down under? More like, six feet down under.|sound=Engineer_dominationsniper08.wav}} | ||
| − | '''Nucleus''' is an alternate version of [[ | + | '''Nucleus''' is an alternate version of [[Nucleus (Arena)|the Arena variant]], modified for the [[King of the Hill]] game mode. Along with [[Viaduct]] and [[Sawmill (King of the Hill)|Sawmill]], Nucleus was released with the [[Classless Update]] as the first official King of the Hill maps for ''[[Team Fortress 2]]''. |
| − | + | == Locations == | |
| + | {{HelpfulOverviewNote}}<br> | ||
| − | + | * '''The Device''': The swirling, colorful Doomsday Device which dominates the center of the map. It contains the map's Control point, which unlocks after several seconds. | |
| − | + | * '''The Pit''': Directly below the Device is a bottomless radioactive pit with a narrow catwalk suspended just above it. The catwalk holds a [[Health|Medium Health Pickup]], but the pit is an unavoidable death for anyone unfortunate enough to fall in. | |
| − | * '''The Device''' | + | * '''The Perimeter''': The series of ledges and catwalks which directly surround the Pit. The Perimeter is further divided into ''"[[RED]]-Side Perimeter"'' and ''"[[BLU]]-Side Perimeter"'', based on which spawn room is on that side of the map. Narrow bridges to the control point appear across the pit after the control point is opened. |
| − | * '''The Pit''' | + | * '''Roofs''': On top of the buildings along the Perimeter are roofs which are accessible by [[Rocket Jump]]ing or [[Sticky jump|Sticky Jump]]ing. The B roof area can also be accessed by [[Jumping#Crouch-jumping|Crouch Jump]]ing onto the sides of the control point that face the B roof area, and then jumping onto the roof. These are useful spots as they give great height advantage and a view of the entire area. |
| − | * '''The Perimeter''' | + | * '''The Bridges''': Once the timer has ticked the control point will open and bridges will extend out so that it is reachable. There are three bridges, one on each side in front of each team's spawn, and one far bridge in the center between the spawns. |
| − | * '''Roofs''' | + | * '''Flank Building''': The flank building is one of the buildings on the Perimeter. It is mostly blue colored and has no bridge connecting to the point from it, but has a bridge connecting to the catwalks below the point. |
| − | * '''The Bridges''' | + | * '''Access Building''': Directly across from the Flank Building is the Access Building. It is entered from each team's side by a set of staircases, and in its center are two sets of staircases which lead down to the central bridge of the point. On each side there are entrances to balconies which overlook most of the area. |
| − | * '''Flank Building''' | ||
| − | * '''Access Building''' | ||
<gallery widths=150px heights=90px> | <gallery widths=150px heights=90px> | ||
| − | File:Arena_nucleus0000. | + | File:Arena_nucleus0000.png| Closed Control Point |
| − | File:Arena_nucleus0001. | + | File:Arena_nucleus0001.png| Flank Building |
| − | File:Arena_nucleus0002. | + | File:Arena_nucleus0002.png| Flank Building |
| − | File:Arena_nucleus0003. | + | File:Arena_nucleus0003.png| The Pit |
| − | File:Arena_nucleus0005. | + | File:Arena_nucleus0005.png| Access Building |
| − | File:Arena_nucleus0006. | + | File:Arena_nucleus0006.png| Access Building |
| − | File:Arena_nucleus0008. | + | File:Arena_nucleus0008.png| Area View |
</gallery> | </gallery> | ||
{{see also|Category:Nucleus images}} | {{see also|Category:Nucleus images}} | ||
| + | |||
| + | == Helpful overview == | ||
| + | [[File:Nucleus (Arena) overview with lines.png|left|500px|Nucleus's locations]] | ||
| + | <big>1.Perimeter | ||
| + | 2.Roofs | ||
| + | 3.Bridges (Not shown here as they have not yet appeared) | ||
| + | 4.Flank Buildings | ||
| + | 5.Access Buildings</big> | ||
| + | |||
| + | {{clr}} | ||
== Strategy == | == Strategy == | ||
| − | {{ | + | {{main|Community Nucleus (King of the Hill) strategy}} |
| + | {{community strategy stub link}} | ||
| − | ==Control Point | + | == Control Point timing == |
{{Control Point Timing/Official Map}} | {{Control Point Timing/Official Map}} | ||
== Update history == | == Update history == | ||
| − | ''' | + | '''{{Patch name|8|13|2009}}''' ([[Classless Update]]) |
| − | * | + | * Added Nucleus (King of the Hill) to the game. |
| − | ''' | + | |
| + | '''{{Patch name|5|27|2010}}''' | ||
* Changed side spawn exits to prevent sniping from inside the spawn door. | * Changed side spawn exits to prevent sniping from inside the spawn door. | ||
* Fixed graphical glitch on platform floor. | * Fixed graphical glitch on platform floor. | ||
* Fixed blue-colored models in RED area. | * Fixed blue-colored models in RED area. | ||
| − | ==Trivia== | + | == Bugs == |
| − | *The particles seen | + | * Throwable items such as the [[Gas Passer]], [[Mad Milk]], [[Jarate]], and [[Wrap Assassin]] bauble do not explode upon contact with the bridges, rolling along them instead. |
| + | |||
| + | == Notes == | ||
| + | * It is possible to reach the two lights above the Access Building, but only through rocket jumping and sticky jumping. | ||
| + | |||
| + | == Trivia == | ||
| + | * The particles seen around Nucleus's centerpiece are re-used from the ending sequence from ''[[w:Portal (video game)|Portal]]''. | ||
== See also == | == See also == | ||
| − | *[[Nucleus (Arena)]] | + | * [[Nucleus (Arena)]] |
== External links == | == External links == | ||
| − | *[ | + | * [https://www.teamfortress.com/classless/day02.php The Classless Update: Day 2 - King of the Hill game mode, Viaduct, Nucleus (King of the Hill) and Sawmill (King of the Hill) maps] |
| + | |||
| + | {{Classless Update Nav}} | ||
| + | {{Maps Nav}} | ||
| − | + | [[Category:Quickplay maps]] | |
| − | |||
| − | |||
| − | [[Category: | ||
Latest revision as of 21:22, 19 January 2024
| Nucleus (King of the Hill) | |
|---|---|

| |
| Basic Information | |
| Map type: | King of the Hill |
| File name: | koth_nucleus
|
| Released: | August 13, 2009 Patch (Classless Update) |
| Variants: | Arena, Versus Saxton Hale, Smissmas |
| Developer(s): | Valve |
| Map Info | |
| Environment: | Spytech |
| Setting: | Indoor |
| Hazards: | Pitfall |
| Bot support: | Yes |
| Map Items | |
| Map Photos | |
 | |
| Map Overview | |
_overview.png) | |
| “ | Down under? More like, six feet down under.
Click to listen
— The Engineer
|
” |
Nucleus is an alternate version of the Arena variant, modified for the King of the Hill game mode. Along with Viaduct and Sawmill, Nucleus was released with the Classless Update as the first official King of the Hill maps for Team Fortress 2.
Contents
Locations
Note: If you are having trouble with finding the locations listed here, see the Helpful overview section to see their exact position marked on the map.
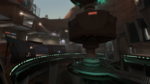
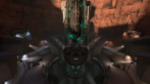
- The Device: The swirling, colorful Doomsday Device which dominates the center of the map. It contains the map's Control point, which unlocks after several seconds.
- The Pit: Directly below the Device is a bottomless radioactive pit with a narrow catwalk suspended just above it. The catwalk holds a Medium Health Pickup, but the pit is an unavoidable death for anyone unfortunate enough to fall in.
- The Perimeter: The series of ledges and catwalks which directly surround the Pit. The Perimeter is further divided into "RED-Side Perimeter" and "BLU-Side Perimeter", based on which spawn room is on that side of the map. Narrow bridges to the control point appear across the pit after the control point is opened.
- Roofs: On top of the buildings along the Perimeter are roofs which are accessible by Rocket Jumping or Sticky Jumping. The B roof area can also be accessed by Crouch Jumping onto the sides of the control point that face the B roof area, and then jumping onto the roof. These are useful spots as they give great height advantage and a view of the entire area.
- The Bridges: Once the timer has ticked the control point will open and bridges will extend out so that it is reachable. There are three bridges, one on each side in front of each team's spawn, and one far bridge in the center between the spawns.
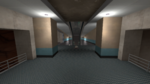
- Flank Building: The flank building is one of the buildings on the Perimeter. It is mostly blue colored and has no bridge connecting to the point from it, but has a bridge connecting to the catwalks below the point.
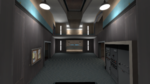
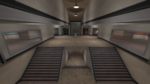
- Access Building: Directly across from the Flank Building is the Access Building. It is entered from each team's side by a set of staircases, and in its center are two sets of staircases which lead down to the central bridge of the point. On each side there are entrances to balconies which overlook most of the area.
Closed Control Point
Flank Building
Flank Building

The Pit
Access Building
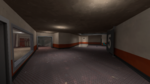
Access Building
Area View


See also: Category:Nucleus images
Helpful overview
_overview_with_lines.png)
1.Perimeter
2.Roofs
3.Bridges (Not shown here as they have not yet appeared)
4.Flank Buildings
5.Access Buildings
Strategy
Main article: Community Nucleus (King of the Hill) strategy
 | “Sun Tzu's got nothing on us!” This map's Community strategy page is a stub. As such, it is not complete. You can help the Team Fortress Wiki Community Strategy Project by expanding it. Notes: None added |
Control Point timing
| Control Point | Multiplier | Seconds | ||
|---|---|---|---|---|
| Control Point | ×1 |
| ||
| ×2 |
| |||
| ×3 |
| |||
| ×4 |
|
Update history
August 13, 2009 Patch (Classless Update)
- Added Nucleus (King of the Hill) to the game.
- Changed side spawn exits to prevent sniping from inside the spawn door.
- Fixed graphical glitch on platform floor.
- Fixed blue-colored models in RED area.
Bugs
- Throwable items such as the Gas Passer, Mad Milk, Jarate, and Wrap Assassin bauble do not explode upon contact with the bridges, rolling along them instead.
Notes
- It is possible to reach the two lights above the Access Building, but only through rocket jumping and sticky jumping.
Trivia
- The particles seen around Nucleus's centerpiece are re-used from the ending sequence from Portal.
See also
External links
| ||||||||||||||||||||||||||||||||||||||||||||||||||||||||||||||||