Venice
| “Let's go, let's go, let's go!” This article documents a recent addition. It may contain speculation, broken links or errors. You can help improve it by editing this page to include new information. |
| Venice | |
|---|---|

| |
| Basic Information | |
| Developer(s): | {{{map-developer}}} |
| Map Info | |
| Environment: | Maritime City |
| Setting: | Daylight, sunny |
| Hazards: | Deadly waters, Payload Cart explosion |
| Map Photos | |
 | |
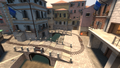
| Map Overview | |
 | |
| Map Stamp | |
| Supporters Leaderboard | |
| “ | Better late than never, Venice is a single-stage payload map set on the historic island of Venice. BLU team must push the payload through the canals, the shopping district, the village, and finally the terrace palace.
— Venice publicity blurb
|
” |
Venice is a community-created, single-stage Payload map. It takes place in the eponymous Italian city.
Venice was contributed to the Steam Workshop.
Contents
Locations
The locations are described from BLU's perspective.
The Canals (Checkpoint A)
BLU's first spawn consists of a two-store central building, containing a single resupply cabinet on the first floor, connected to two adjacent, one-store buildings (one on each side). Each adjacent building has an exit that leads to the sidewalks, while the central building has a single exit that drops players onto the cart. As soon as the cart starts moving, it goes under a bridge and then follows a mostly straight path, ending on a ramp followed by a right turn that leads into checkpoint A. Two of the buildings on the left and one of the buildings on the right can be entered.
The first left building leads to a room with a medium health kit, a small ammo box, and a veranda that overviews the area. The second left building goes around point A. The right building contains RED's first spawn, as well as a lower and an upper access to the next area; the upper access leads to a catwalk, while the lower access leads to the ground level.
Once A is captured, a door on the right building facing BLU's spawn opens up, a third left building becomes available, and RED's spawn is moved to the third area, not too far from B.

Checkpoint A.

The Shopping District (Checkpoint B)
Once BLU has captured A, the cart goes through an arch, then makes a left turn. It then heads a straight line past a shed, goes under a bridge connecting two buildings, and makes a left turn onto point B.
Behind the shed is a ramp that leads to a catwalk with an overview of the area on the building that contained RED's first spawn as well as the inside of a large building. The building that opens up on A's capture leads to the bridge the cart must go under, and has an attic that features a large health kit, a medium ammo box, and a window overseeing B; the attic can only be accessed through certain jumping techniques, such as explosive and triple jumps.
The large building features a drop-down just before point B, one access ramp just before B and another one just after it, and an L-shaped stairway heading left that leads to a terrace.
Capturing B moves BLU's spawn to the Canals' second left building and RED's spawn to the last area. It also opens two paths connecting the first and third areas, one in the same building and one right next to the building with the attic.

Checkpoint B.

The Village (Checkpoint C)
Just to the left of point B is a short L-shaped corridor that turns right. As the cart moves forward, it makes a left turn, a right turn, crosses a bridge, then moves in a Z-shape that leads into a second bridge before a left turn and finally reaching checkpoint C.
Once the cart goes over the first bridge, BLU can enter a building that turns right and left. Turning right leads them to point C (albeit on the other side of the canal) and to a portion of the tracks just after it. Turning left takes them to the catwalks overseeing the final point.
Right next to point C is the entrance to a three-store building (though the third floor is inaccessible) with a roomy interior, access to a veranda that oversees the bridges, and a connection to another building.
Checkpoint C.

The Palace (Final Checkpoint)
The cart's final stretch consists of a left turn and a third bridge before following a narrow and ascending alleyway that turns right and heads into the Palace.
In front of the turn right after checkpoint C is the entrance to a building, where a bookshelf can be seen inside. This is a very large building with big rooms, which connects back to the one with the veranda overseeing the Village, to the alleyway, to a fenced veranda atop C, to the Palace's catwalks, to the back of the Palace's yard, and all the way to RED's last spawn.
After the cart crosses the third bridge, they can once again enter the building that connects the Village to the Palace's catwalks and the large building soon afterwards.

Checkpoint D (final).

Strategy
 | “Sun Tzu's got nothing on us!” This map's Community strategy page is a stub. As such, it is not complete. You can help the Team Fortress Wiki Community Strategy Project by expanding it. Notes: None added |
Venice is a very choke-heavy map with multiple flank routes. The Payload cart runs through the main chokes of the map, which can be an annoyance at best for the offense. However, an Uber push or good coordination among teammates can easily destroy any sentry nests or other blockade obstructing the cart.
As for the flank routes, these should be monitored regularly by the defense as BLU team (especially Spies and Pyros) can use them to slip behind the defense and wreak havoc. Venice also does not have very many sightlines, so Snipers aren’t as much of a problem as they usually would be on other Payload maps, such as Cashworks or Upward.
There are also multiple bridges with water beneath them, which can be used as a retreat to heal up (these are good spots to put Dispensers, although it is recommended that you alert your team of its position since it is out of the way and somewhat difficult to spot) or to escape from a Pyro, Demo, Soldier or Heavy.
Please refer to the main article for more specific strategies.
Update history
July 12, 2023 Patch #1 (Summer 2023 Update)
- Added Venice to the game.
Gallery

Workshop thumbnail for Venice.

| ||||||||||||||||||||||